Deploying dnetcoin node
1.Download the dnetcoin code and compile
Recommended environment: Ubuntu 16.04, 18.04, 20.04
./autogen.sh
./configure
make
make install2.dnetcoin client component
| name | description |
|---|---|
| dnetcoind | dnetcoin daemon(non-GUI) |
| dnetcoin-qt | dnetcoin client(GUI) |
| dnetcoin-cli | dnetcoind CLI(RPC/Rest) |
Stable version download
Linux
dnetcoin-daemon(non-GUI)
md5: 20623cd2c0588bc4293de51e32d25484
link: dnetcoin-daemon.tar.gz
dnetcoin-qt(GUI)
md5: 26515f0c5d5afbc0cbbe422ba678080f
link: dnetcoin-qt.tar.gz
Windows
dnetcoin-daemon(non-GUI)
md5: 11c2ff9459d998e0617e58b227bdc4c9
link: dnetcoin-daemon.zip
dnetcoin-qt(GUI)
md5: fb335035d36348983b98105dfacdbeb1
link: dnetcoin-qt.zip
MacOS
3.Running the dnetcoin client
Start the dnetcoin client via daemon or dnetcoin-qt(GUI)
Start using the daemon:
To start in daemon mode, you need to use the dnetcoin-cli tool to send commands to control dnetcoin.
Every command executed by
dnetcoin-cliis to remotely call theJSON-RPCinterface provided by dnetcoind, so before you start the dnetcoin client, you must configure the RPC information.The easiest way to do this is to create a
dnetcoin.conffile in the dnetcoindata directory, the content is as follows:rpcuser=$custom_username rpcpassword=$custom_password # default 19332 rpcport=19332You can specify the
data directoryor use the default (recommended to use the default).The following are the default paths for different system environments:OS PATH Linux $USER/.dnetcoin Windows C:\Users\$USER\AppData\Roaming\DNetcoin Mac $USER/Library/Application Support/DNetcoin Complete the
dnetcoin.confconfiguration in thedata directoryto start dnetcoin:# "datadir" : Specify the data directory # "testdnet": Specified as test chain dnetcoind -testdnet [-datadir=YOUR_CUSTOM_DIR] -daemonStart with dnetcoin-qt:
# "datadir" : Specify the

 data directory
#   (default datadir:
#      Linux: $USER/.dnetcoin
#      Windows: C:\Users\$USER\AppData\Roaming\DNetcoin
#      Mac: $USER/Library/Application Support/DNetcoin
#   )
# "testdnet": Specified as test chain

# Linux/Mac
dnetcoin-qt -testdnet [-datadir=YOUR_CUSTOM_DIR]

# Windows
dnetcoin-qt.exe -testdnet [-datadir=YOUR_CUSTOM_DIR]
Executing commands on the dnetcoin-qt page is very simple, just open the console page:
' width='839' height='453' xlink:href='data:image/png%3bbase64%2ciVBORw0KGgoAAAANSUhEUgAAAEAAAAAjCAYAAAAkCQwqAAAACXBIWXMAAAsSAAALEgHS3X78AAALbklEQVRo3u1Za3MbVxnOr%2bIztKE0aWihyUwptGlTShjoAANT%2bMQ3ZmhnmKF8YPgJDLRNmkuTxnYuvkqy7jdLsiVb98tKq13trlar2%2b7Dc1ayrThO4zSmeJhq5vE5e257zvs%2b7%2bWsT736yll8KV4%2bczieNI84T7z8g5fw3rnv4YPT38aHF3%2bMv1%2b%2bhI8uvYkPfnQBf3njdfz10hv427sX8dHbP8EfXz2HD09/B78496I77/wR3nFkcL3LP3sbb118HW8T/3j9Ofzplxdx6qUzp3H2MXjp7Hdxloc98/0XH4Joc/vOPP%2bYuWx/8XmcY/2Fs6fxDuvvvfAcLvPFf/j5T/E7buT9y%2b/gNxTErymA3777Ft5n25sXXsGvOO4Sx78g3v8le3taiP2%2b9toPcf78y7hA/Pnct/D7ty7gVCjgRSwScBEN%2b13E3DKAkG8F0dvXkbxzCxtzE6TmbyN2%2bwbC3mVEI7tjH4ZYKx4NIMy1g0SKbUbID9W3hubqEmTPMhTfKtrelQn4LNrU9TVoQR%2bSRCjkQ%2bQYEQ5yL/41hAIeF76gH16e75RcryCX2UA2vYFCbhP57Kb7nC9sQ8%2bkwFnobGfRTibQjMdRjUXhsK5TQPniDrY5Js95O1sZF4VsBlsbcaQSMchSHYpUc9szbM/u5FBv1qHqbXS6ygzUCQwFKmESvf8m%2bP4B3yfViziVioZx%2b%2bZV3Lx%2bDQ/uzuHa1U9x8%2bon%2bIKargb80BfuwHfjKkLXr8J35RN4PruCrteD8r15XLn2KT7nvGscf%2bvmdTy4fx9L9%2bZw9eN/4vPPb2CTwhFC/eImx3zyL66/QEGn0KwU0aw9HtIxolElalNUp%2b0sW40ySsUsTpmagpHVxbhvuuWIpVsn%2bp02hmTCuJgHyJQJqrDLBViqTE11OGcydrQ7X6w16MEmrK5GaauwOG7cn/SJukCffV8HHEvH0NQw7mmwWe93O3zWYXTkiQDERp2h5W74IJxRH7YzwtgeYjQe7EE8i769eTz87hwhvN1nZ7r27PoH685h753OeRaAGHGtxc0KFMOAd7uGzXobtXYHiYrkCsEVwKDX3dfgFENqyh6YcKZapUr3NssB7uLioKJNaFv02%2bJg4sUU2K5wnGHfbXOFIvrYvjseQqjiPWKcGD%2babp6leP%2bjMGbwuP79Z5dtPQPhfA0dXUOq3EBRktFWOyhJLfTJwokJGBpMszuF6WLQ76GlddHSDfRMA7lcFpVqBc2WhEqlhFq9Dq1DJyI1oKoKCoUdKEob5VIBsXiM/TU0GjXUaS5yuwWVfXW21Rt0gGobGTrcWCIBw9Ahy000uI4kSajVqhzXwGDQx3A4YDnAUID10YgCG04wdDFp3%2btn22Ba35vLUihkLEp7RMGPWHCNgYUuTb9czOFUnwxoyS2USkWUyhWUCY2bLCgGPHnJleLC3XkkUglE42EsrSzCH4lA0WSGqiAPW2U4WXOjRnYriZu3biASDbnwM/Sk0klI9PwbnB8IBTi%2bgnB4HQGuodM/JBJReP1e%2bOhwI/EIBRiHZZFlMz/HcTAYCVO0aYJjmqUDZ9q%2b%2bxN9T/rtjh5xLZPvdgUgHJXt2BiLhe39UgwXf7vUUjC47m6sRW1GokHodCA%2bxvFYLEyhFbDM2L64skR6ychsplGuFhBimFz3r0Pn/HQqiWqN4ZYRYc27ijjDZCQWhIfRZGt7B9V6mc9hJNkep0BiDKE67bZDJ7y4vEjhJZEoF3E7EsIi6zEqK0eGZTIJpDY3yc4yAgEfVlZXkN7aJJPKrgJi0QjmFua5XtxlEPYEMISpTQXQE55yRpKzUncly8FisXVqKJ/nwZgj3AmHcI9t1VYTKbG5jQSKpRLSDHtV0jjFUsyJ8iA5xn4hiCqZssED7tBcEokIfNR6nPnEZGwYgWCAaxSxXciRUauc43VZs%2b73IbO1hRGVYvb76IvNs%2bxNzaPXo%2bOlRi2WmqbB6lsu9Q0KsNez3LJL8x6T/phlwCMCELR6BKLZRpSHWV59QJrnkWdys8Bk6D43X6GpbFIg4uBNWUJYMIIxNhILudTPl3bYl0aYmquS%2bql0Aiq1WirlKVDBqihyTLyi9BtCyzVqdSefxeraCgXko1CCFFoMaeYOXasHtWtAFwce2zSJPkzassXDtsUh%2b4Mnm8BUqYcL4IBN7datnol4LEa6ZdAgVVdJyWQsgmKhQJtPI0g2RGnPAaavHqa1Hj9TzXDQ3bRwmP5AgE5QRpj2n0zFMTf3BWQ%2bJ5Ix%2bMmMcrnsOks/5wmmiLlivZbcRo6aX7h7h0Lme5iN/tvnwcfrFAzr8/RHV9bXcYPUvxUO4040ir5lTRRJtrg4WH8qARx4tqcQRBqLuvAbu%2bOmGE/HDO3x/niuMZ72CfQFdZ2Jwxo7Ez8jKLzbP5pZd8h2QfW99fmnx8OI%2bQPOFVbtgm32jJM7VgaMuQGNtmiQrt2NFMs47whbGJKGvWodvWYTJjVtFIvoMjz2NZ1ZogKL9R7D21DX0atUYJTK6CvMOrumO8egr%2bi1FfSpaXHobqPhjjHrTVgMiV2pyXhOirdabONaHGdxrtWQuEaXz6K9wX4ZA5pHT6xHHyLea5RLMPmOPk3GKJTdcQPNeDgKHFkAXLzNO0KLdwJldRXy3B20l1dIt74rGCUQhERPK9%2b9C5WxXd3Oo0PPrHi9aHN8V8R%2bOlD53gI6W1l0t3NQaDYKfYTqW4cajdHMLKj0KR1SWWNUUOlD2otL6OaLvDV62R6Fxrk9CrBDqhs8pHhXi%2b/VNjOuAuQH99C%2b/4A3S94yGaq1SBR6scQ9r6GzkeT8HFn7hChwmABs0lkTB2KM1uIJyAxzOlnQ5UZ1evgObbyzkXa1aTaq0Jd5aDpLcTCd2upR%2bgoPajBSdOg8VRH/s9suddVIEEZuBxrHt5dWGP8t6EymVH8IZrsNhc5XpU/oVupkBG%2bWK7wyM1q0aftqKMSxFajclxqLQ1lbZRvX29rmHUaBxjCsk7WdzKZrYq4ZTXOFp2LAiCagp9NQ6Zk1fwAazUAJhnl/90FjmFOCIWooAovZnuJZgxKKuMJQ6KwUHlZIX6HWNK7R5ubVjQ13vFlrcHMp6JtbPGCZVC1Ay2ahrvKQHo%2b7dodzLGajA5OZIcPbgCntkGYwYNvQ7LGNGR9D34AMGjISiPqIdZu5jDCTESOG1ekw%2bxs9gw9gimkKbZOi3VwOJlNifSdPQSRhkpYGNy2oK2zfYL%2bg7YA3RI0xv0PGmAxtXeEf6LnFAQ2agEFG9ZiPC4r2VBUmbd6S1Uk/ta4zcdEoKCGU4XiM4/g9dRQ47PkoaeZx/ya5iPPM%2bMoM2FvEjafOgef9tr34O1ufib/OTP8j7XuwZ9bdX2tvH8fAgq8ugP8h9vbjOF%2bfAP4ff98I4BsBOEe/DR4MHUex0dlnnEBhPpkBh3jph9qP4KxOMpOeKIDDYrvzlC%2bYhCvnRESPxynpobuAZWiTgzLzsn0%2bOMzGbObZDu/iorTX1mAz33d4AXGYwTmpFGzm4k5yMt7mpcRm3i/G2LHYwznCXiJzcvAoA4zOpJVXVocXCvFvL8frAVoSwCsmigU4vGSAub6Ty8LJpCmINMCrp5NKcnx80haNgCseoIQ98yXhpMDhXWGInj79Kiw%2bi6vtFpqhMKQ1DyReYyVq3i2pYYnaloLB/brfD4naduuiFM%2b8JLl1MYaMkZaXUeclqdLuoNKUifbJQauNYqMJrSM%2b41MAUr2C%2beufweThbd60RpqBMS82Y12Uuzj4PNN%2bsG50MVZ5a/N4MXTEVx2HF5qTgQH3Ir4qyZoJWVVQKbkmoEJvS5Dn59BcXkJzdQXNlWeAmL/4ADJR502v0WqhIZ8kkJFSE4rSmjCgXhH/MS2jVtpGJZtGJZc5FlRLO6iU8ycSVUKcuVop4D/Jh05OHHYvbAAAAABJRU5ErkJggg==' /%3e%3c/svg%3e)
4.Synchronize block
When the dnetcoin client is start finished, it will try to obtain the dnetcoin blockchain seed node and perform block synchronization. If the testdnet chain has generated more blocks, it may take some time to complete the synchronization. During the synchronization process, you cannot perform command operations on the blockchain temporarily, and you need to wait for the block synchronization to complete.
5.dnetcoin storage design
Next, we use the dnetcoin data structure to build a private virtual network.
For virtual network applications, dnetcoin provides three storage structures, each of which belongs to a specified type of namespace. Including dnet, dnetOVC (virtual network control node), dnetOVR (virtual network proxy(data) node):
"dnet" namespace
Each "dnet" namespace has a unique storage address, which we call the
dnet_id.The storage information structure is:
name value dnetvlan node "address" Virtual IP address ...(multiple dnetvlan node addresses) ...(Virtual IP per client)... _OVC_VLAN_LIST_ Use public OVC, the value is "public";
Use private OVC, the value is "OVC(private) namespace address (OVC ID)";_OVR_VLAN_LIST_ OVR(private) namespace address (OVR ID) "dnetOVC" namespace
Each dnetOVC namespace has a unique address, which we call
ovc_id.The storage information structure is:
name value OVC node address Public ip:port ...(Multiple OVC node addresses)... ...(public ip:port of each ovc)...
"dnetOVR" namespace
Each dnetOVR namespace has a unique address, we call it
ovr_id.name value OVR node address (empty) ...(Multiple OVR node addresses) (empty)
Tip: How to use these three types of namespaces will be introduced later.
6.dnetcoin wallet
The dnet virtual network uses the above data structures,users write data according to different namespaces, and these data will be packaged into blocks and confirmed by miners.
Tip: To write data into the block, you need to pay a little dnet coins to encourage miners to verify the data. so, our wallet needs to have a balance in order to operate the data.
In the testdnet environment, we do not need to build a mining pool or use a mining machine to mine, we can mine through a simple command line on the client side.
Use CLI:
# Mining 1 time
dnetcoin-cli [-datadir=YOUR_CUSTOM_DIR] generate 1
Use dnetcoin-qt:
Open the console page and enter
generate 1
You can also transfer money from other dnetcoin wallets with balance, or apply from the d.network website.
7.dnet
Prerequisite: dnetcoin wallet needs to have balance
We divide a large virtual network into multiple small units, each of which is independent and isolated,these small units are called "dnet".
Each "dnet" has security isolation, only the dnetvlan nodes in the same "dnet" can communicate with each other, and the information channels are also encrypted.
Create dnet:
Use CLI: (Returns the dnet namespace address, ie: dnetId)
# "dnet_alias" : dnet alias
dnetcoin-cli [-datadir=YOUR_CUSTOM_DIR] dnet_create $dnet_alias
You can also use the "dnetcoin-qt", which is simpler and more intuitive:
' width='979' height='805' xlink:href='data:image/png%3bbase64%2ciVBORw0KGgoAAAANSUhEUgAAAEAAAAA1CAYAAADxhu2sAAAACXBIWXMAAAsSAAALEgHS3X78AAAYLElEQVRo3t1aiXdc1Xmfv6VpE8LSQDA2YIMTm50AiYnBNpCErelpVk6JN2xjMJi2CU1T2qRZIC5gbDB4lSXLsvZdGo1G0oxmNPu%2b79JopBnJv/6%2b%2b%2baNRt4wNM3J6Tvnd%2b5%2b73e/d7/tvmd4%2bJGHseHRDdiw4Vv4Vh02bNiwLK/6XAWk/2OPP44tW7ZgyxNbsGnTJmzevBmbt2xm/WN4nG2bWN60eROeYPvGxzaqPtL/8U2Pa5A%2brNPLGzduVPRdLQ2Xp%2bsx0iHzPqbo%2bfajj8LwtbW342trVyusX3cn1n19DXEH1t5xm8pL3Z133Io71nw67iTWrF6Fu9avxTcevBf337MO99z9dXzjgXvw4P13M8/yXV/Hgyw/wLLUyVoP3Hc3HpL%2b967HvfesZ39pW%2bqzft0dat4711wdHZej6%2b671nLtu3HfvevUGjKv4e3f/xZtLWdwpuEYDrzzexw6%2bC6OHH4f3Z1tOHrkEN478DZ6utoxMtQH42AvRghJhwd6YCRUWq3TMdTfjcG%2bLpXqeeNwH8zDvTANcSzrjPo4zqv6Sf%2b%2bbtUmaf0c2lrL19DXrqdjGU0DS7TW6B7orbXpdBsmx0Ywk0sh4HHA55pCPOyH12VHLhWDdXQI7ikrSsUCzpeLmJvJoTSdRbmYZ3kWi/NFVT/PcrmYQ4Uol6ZVm96uwD7F3h7Eu/tQGBpChWvOm0cw29%2bDstOGyvwMFqrj1JxEpTSj5tbnWJibVuvLOrK%2btra%2bhtZXygtzWl76C60y5kowDLjjcLhcsE%2bMwu2wwcbUS6IK2RQ6pqJw%2bgKwjRlhHTcjn47hlDkA06QDEyMDmLKaYR41IpeMYNQTRo8tALdtDBNmEyYnzGquMdMwol47uj86hx8eTuPAaRO6WhtxqrER5v5ehLq6uUYYTts4LGSMwMaxdosZVqajPDljpiHWm5BNRODxh%2bETmsZNGB8dhrXa3zjUjwmWBSODfYreUiGD6WySL/hySMHQa/PD7nDAYh5WRE/wzcji0WgYg3Y/3G4nxkYG1SLJWBjnxn2YcLhhMQ2yrxFjZEAy4sekNwSzK4CAywbzyJCChe3jbPc7rTB%2b2Ihfn3Cj5Wwf%2bptOoav5DBw9XQi1d8DlC5IBE6q/lRsTpjkmxzl2BGbjAOkaxaRlDMloAB5vAF6vlzSOKmaZSZu0C92ycWHA5PgopiYtKGQS6iRfCYZs1I9UNIh0PEKEkU1G1cAMuT2dirAcUVzMp%2bO1ugIHFqp10paVyRIh1kc4aVxxtjaGc6YEfZ1Id51j2oU0ZVCQoJ5JWrmxeAipWAjphEaD0KLKzGdqdSElnsLsZCSg1bFNb8/U5fXxsZCP8F8GPjI0CENKJ5ADZIKI300u8k3wbYwaNe7K27TxDchxs1vH%2bVYG1amQE2OiIhFlJcdVjukk36AoHHP1LdaII0MyFCstJYOFyWRUhkzSiP506Jtc2ujV96%2bHvOSkeulhGESu5Y3J2xK5SJDLpuEBdZRE9oQBoyOSjqnjKG0aA4aUrI%2bxTrSpi/pjoLeLMjugjqJxaIAMM5G5Ee10yRu9FOTU8QQJUTpxfw7oJ8wgst/ceEopm16aOw9lXp7z589r6eIirubR%2b19QiXK5XMP8/PyyfKVSQSaVgNvpQNDvrTHh/xrLGBD2u6jNxxHyuZQZjFI%2bCrkMijMFzEznaQKnkc9nUYhHUQwGMBMKYDYcQpHpTFDyQeR8HuRTlPlcFrPsP13IoThdQEHGEflsGtOcU9pm2FZgvyLnns7n1AkJeF2IBL3a0U7I0Q1/6iaudMQ/EwPqRUDXmjFaADM18MjwIEZNI4hHI0icO4ueQwcx2dIM44njsFCLmxqozT86DG9TI2K93Wg800gx6IFt0oqhgX7qEJrAMLV2OI52i5%2bnrB8jIya4XU5M2W1kdgBFrj1ThSjOegg9l8OMtJPm/7UIiHatVxzSEAn64LBZlFIbp5yHAj5kaLLc3KCtsQF2wnm2GS6W7U2nkejqQIKK02SdwCDtcTuZdfTjD3Hy2MdobWlCW3sbDh8/hY8OvYuTJ47hTONJfHLkMFrONKCvu42i14qeznMqFXR3nFP1g72dZOjFkPqOnk4yekJZmRr96gR9Cqonp6YENVNxMRKRoOokJjJGxRgLeJD2OpGmqAhSktJLzNAapLrbkaYCzHe0Iknz9rOtP6FfvxbffORefON%2b%2bt33fQ2PPLAOjzx0Nx5m%2btAD6/HdJzfi%2bWefxDPf24ynnvg2/u657%2bA7rHvm6Sfw4x8%2bjye3bMD9HPcg%2bz94/wV4cD1ee2gl3nr5Rfj9HsQvs4crIUqRUwzIVmWiXq4u1MhKdiSleCyDmDBpi4aQ5cnJu6cQ5AnYtXs7ntz0KJ55ahOefv57ePb7T%2bNZSZ//rsJz338GP/7R32P7z36KbT/7CX7K/I6tL%2bDFF36Af3zhh9i57QX86B%2bew3NPP4nnn7kEnv0O9n/vEbz1%2bm4qTw890au3IBfpAE3xRKkDEijmMyqVzUqddBKIXhC500VEh5TzVZlMSpkMcTKO8DrtKHe2Y665CaXmRjo9fUiMmSkmJiTNZsSoGwJTdnh8Xnp1bvhoATxMvVSmPkLyfr8PQSpZDf5lCAT88EUicExNKrdd6PvcSjCXSWJxoYIINbtpZBg2mw3zcyXMl2aVkopHQrTno3R2euD3eigaIYSpE6RetLeRNn%2bwv49iQlFh/yl6dj4ywdzajOFzzXBQXwQaGmA1mmDtH8Ao4e3uxYLbgxIt5dzcPErzZcyVKwqSL83r6RJm2aZjrrKAVKGo9JSslb%2bCMqzftA5h2BIDOLg8V6SmD8HjnKJbGkWF5dnpHEJ8M2IWx8iYvu5OBkt2pSA1s%2bVTb7qfymh4sF8xRWIFZ5UoG73AUXqFTsJ3%2bjRMTc0Yb27B6JkWKs%2bzKDicSM3MIp3NIZ3L15DJF5DNT9NLLKi8Avtkk2luNMs0xSOfQiKehJ3xg3iboqvETY7T4izBr/RYNhmrvvGlPomIhqoVCEOYMJNPw%2bOwqggrzGOm%2b/hRKgzx%2b4uFjMZpFURU0%2bq4WbbJ5BKYnG1qYCAyoSIxMVXT4vIG6OTwWGd8bmSJNBkohMRIYD3kVAXJSIGcyBCPf4R1oa4euNtbYT3XCB9Dam9PHyKd3XBT3/iojEVss6RJRFd5lYTUySZNw2KOB%2bCnaImo6nTHdQZIHJDLkLt0VGx0iMR%2bB4NBOilZVR8jAblMSuuTvRjSJo5Tgr6D%2bAxt51pUJCb%2bRS1gqSpMHVnFyKhSXjr0IGzSMk4zSNNIs9vV2UFTPIpwJ%2bMNutgffvIejh1rQMfACJzGcTjbzsFPsZP1dVpyVbrE2UrxNI/y9JpHjEt7ymp7rTFAOi/SZV1YWFjmxUp5kW6wuLgLTBcWLgPVtqDmkCeXE9FZ0syfBbqSFRMV4amRqC/JujjfdLCtHf6OTnjbWhHo7uYJ6ICf8Ukqm9VoJA2KlsWLaarfk14vHqiKBivzJfwpH1lAPEe/aHU33WuPS6V6Xi/r%2bYvr3NQxHqVwxUL4XYwTJFag2Ei8IHopyOMcog5KJOKMNz4fncVCVomoYe%2bul/BPr7%2bON17bh/3EGwqvKVxYvhrImFf27MGunTuwa8cOvERIfvfOncxvr5Wlrda%2bQ2vfxXbBDpXuwBvbt2Pviy9i59at2Mn8zm3bNGzfpsqv7Nn9meiTff7zG/sV9r28B6/ufgmGa7/8NxBcd92XcMP11yhcd%2b0X8eVr/ho33HANrmf9Ncxfc80XqumV8aUvfQErVtyobmNvW7UCq1Z%2bFatvX4nbb7sFK2/5qoJWXonVrLvpphtUfg3rVq26GatuX4X1K2/GQxy7lrj1Vva58Tp8WWgkXTquFRpZdzU0Kbq%2b%2bFf4yt9ey7VW4JYVX8Ftt97M9EYY3vz5Gzj47jv4zX/8Cm/92y/w1q/exNu/%2bw0%2beO8d/PLNf8F//frfcej9Azh88L8VDtWler6%2bvKyO45bGvqtunA/XtR/%2b4F2tXfp9eBCHDryNI7/8BZqYfsi2D6TP%2b9V5q/Mcel%2bHNvehC9au73shZM56yPqGMWM/PcC0uoeTez%2bL3KlRE8tFZ09bMx2bCSyWZwG5cS1NM51Rt6%2bolKpYqke5qNVV%2b%2bt9FuhXLJZy9Hqy6rZ2ca6obm/LMzksyvgF9qMZBMNxmg9U9LGSLszV8hW5OZYb4Pli3fpV6P2q%2bUV1szz9qTA4I0k6MR51LR4L0wZLkCMxQTqJcX8cEZoZH91NuSpLMuY/N0F3lHkP68ThCTBAEv/A5A7D4Qsg5JnSFBbhZ2zgdzuQjQdxvM%2bPlz8Ooat3CMb%2bbkZ1tOMSyHjoXVKjBxnhyXW8j/OJFZC7CaHFabeotSRfoNfqD4RViC1zy/p%2b0i15t2OS/eyqTpwjCeDkxU5nExeF2fUwtDJOl5tYudcTR6ar/RxcXNQZjKJ5zKvu%2bvq62tRdXziewPERL0xmusa9XepjxghNVIpxQ7vVjxG7GxPGPgwzIuzr7qh%2b8OhGwDWJd9v82H0kjIaGMzjVcAJNDKO9LWcRaGyG22KFyTSkPor0drap0zjU36PC3m5GmIOcQ%2b4nxdmx2D2YstvV3HL32N/ToT5y9DMibT17Rq3d3d4CJ%2bMEYYB%2bz3EpSJsKh3W/OEVXNqvbY9rIfCKkyjlxJ5mKtydeotjsXKrqV0vgJJEg33I2Hlruh6u7wLCy536aNx9NXUTsL%2bOF9KkTSJDwBNcSpOtuhdUtdfXOMJOIajfL4u4KrdGAdiu87G4xrProdwNCq/SRvWnu76Wh/ID0BdFdjJUBEYmARGVO5WpqZcYFXDxCMfGyXu8jeYeD4sDjHGLcEAx41Bg/xSRWjRAFObltmqbHxtihwAgxK5ukDlCbrr0A0iF%2bey5JB4fgONm4SllOV2%2bQVRvnU9D7SYAjYwWSz6W0/iqyvfQtsjDIIEdBjkohE1c%2bvd9sRO/xT2A624SBhuMYbTmDocaTMDEdbz2LrqNHMEx/f/hMA4wMd4dOn0DvyeOY4nFtP/Ih%2bk8eQ/8pqTsGJ4/pNBmUokil7FaFzFAfUmRYivKapqxmgtplqLjHOcsY8nKxIkxiJJlnpJljXFFgRJnnUS9QPHOU9Tzd4jxPT61vWwsKXe0okK48lXiBYqTqKbrTn3yEPMVRruCzF0SFEucYtHv8PkyMj8LGwbHTp%2bDq6cZkK11OxgXOri7Y29vg7e2Fs7MTHqaSt7HdSeXl7euDs6Mdru4e%2bKQ/6yTv7mG5v59zDGDe58MclZ0CY3k9P%2b92o0CfPxji8WYskeWpyTGazFHvyCZzjPbkpOTGTKouR2UocUXOYl7CxChy5hHkKFY5vjw1nnvJUxeoNvl0J4yvftiphzoB8rFDFJVd7gAZOUV5PB2DA3AMDCJJZeM1DmOcDJhizO8aHISTbU5uyscAw05GObhpF%2btGzjIIEiYw72E/F/vbyDD38DAW4zEgmQDSKfCMYpEu7HmmlUgE%2bb4eKrVJhGkGZQN5njy5WsvzBBSoLOXt5agQ5Y3meQLy8nYlZTlHZZnjy1NvnidU%2bkqbMCbDU60%2bwlCcMtUvXZdkQIFmYoZHX0RAfc7yOBFnVOfs6lAIDA1ixkFz098La0szwsNDfLvdPAkEUxsjtwQ3G3z79%2bj/1zfh%2bOM78B58H7Y//A6OA39E6r0DmOw3Yri1CxZqaSs1v3%2bgD1NkToIbyPicKjxVIkBxkbee46nMUTxUKmV5u3aLeqN5YRLDWxEXVSepnATpp5%2bIKat23Otx4WWJzoB0xI80FZyuDNM0NS4GIUaTEf1DAxjghsOxCKZolzvJ4cFhmso%2bmh8yRtrbe3vgYlTmpR7oOHwInR8cxGhTI/qPfgzT6QaEG05i3BvG2QEj2jrbMWgcwgTD7h6ekigtQlwuXUVbU4FG5V5Aoj8SmCBUKtanlsZUPp6KLWu7KC%2bWJRK4LMSPiHNP4m8YslRUMyeOonjmNHJ0KCIymCZCbPDrr%2bzEa8Te3VsZPGzH/ld3Yd/eHbV6wf5XX8Kre7bj9W0/xc%2bJ/dtfwG9f%2bAF%2b8%2bKPsX/rT1T9vj1bsf%2bVHWq8jN33sjaHzPv6vl0MUl7G/n27GaTsZdCyW63xyp5tnHcb0%2b0qv5TWY/vl8y9fjFeJvVz7F3u34Z0396nvlwbvyaNwUbNPHnwPdqZim6epMT9gfLDi5usZpKxg8HIzA5ebGUh8tS7VUKtbfYvCitUr8AjLDxMr19yC1azTxmjj9P6CW1fdqH5Zeea7m/DYxm/iuWefwlNbvo271q1hIHVTbd1Lg3PdquHyfZZjDedbwWDo2Tuuxyv33YSjtFaGjt/9J07/4bc4/fYf0PDWrxCjhyYKoofKpvHUMZyhmfssOEfz2Nh4AqeZb76K/k00tXpe1qsvXwlnm06hraWJ3l8jmmmmPwuNsoagnYrWME95LzqnEKJMJ8xjCFkmEIlG1eWE/GKyWP%2bry5Ug/eYKygWdLWRVUPJpYxaqQY34ISUJjMolVVfD3MWoMIiSYEfuFOXrtfwJMp1LM0ArqcvchStA2oVOuToTD7OfOs0wOzeLCJWfKCenzw8LI0Gf16Nufn20395IHL5IQkHL60gsq5fvf75wDGabEx6m/mi1XaVxlfqXIanSQCwFJwOcYDii7uqyJC6b1u4gc9mMusPT0kytLB9h5fvllG0SToeDFjau6rS%2b6UuMWT4%2bQxMcDfp4ylthEP9ZPojIx0ntc5H2oWSKJsUXDGLUHYHFG8VkMIUxV4gIw%2bKLYZzR3zjbBBZfXMt7ouwbU/kJYswd1fp6WJY5AkkEMrMIZksI6ikRyJQQTpCwZIpuQoobSmJmurj02V0%2b0UtaxaU%2bxZ%2b/oE9tzKWuw2YK6lJUxNwgd/lyJMQ0dNGja29tUXdv8idIlB5aOj%2bDdGmefnsJ6bkyUkS6yPzsnFZfKqt6KadItNz1J9meYpvkUzJexkm%2bqM2RUeOI4pzKS9/C3DzK8qHk/CLmSbzkFfS8/GtQS7X8vF5XQ7VNHyNp3T8J5fI8KkzTqYRygyXyNBRnpsms5bfCpVIJbuqGrMsB0OujLAD02lR%2bfByMcrS6yUmAOgOTVsDlBPzSL6zlp%2bz0/pJAPA5YLQB1DBgRMu4Fxsxg5ATYbKAPzv4uwMkxQ0Na/QTnHBvjHFNavZTDYS1P/aT6jI5qNEg/i0XrK3TR/T4vdFqtWvkSj9xxyP8Q8kOIYW62eNFfHsItuZGV8LiSSKDs9aLCjZRJcJmLVUhMmUSU6cuX6dOXuXiZhJUpi2W/H2UySfV1OlDJ59mH/RgKV7iBMmW2LOnICCqco8Ky1FdIbIVjKrIWGVLhBiqct8J5K5yvQnGscMNqjLRJX2mT8ZKXMdLHwTFcq8yXI3RWeAoWq1f88kfK4uICT7hPXeT0dZMBpdmZ2uZ1BsjvK14f9YF8d6MLnGesUKAbnKfnl6No5OnRSZSWpzucZzCTY2QnPr0qD/VrUdwY3dbBfrqljN6Mg8pPl2hOBTn0KjPUO8pXl1TP03pkqNFVWfKFjPZj1XRO%2b6EqV/Xv9b7SpvelJckyn6V8p6hMc8Vp5PI5dYkiX53kH4dUMq5%2byZHAS6yIEoHLMoCWIEc5maa3VKB/XaBSLAz2osDgKS8hKSMzQYGRWp6MKtAvV/3otwtUG/3zvMehjZV6%2bveCvPj8EtWpC5VIFdEL0rr6RGTZV6SL%2b4pvH0Y%2bneTGtE9sCbq6aQZgeTLJTTPfxxc1yECtk4HdJEVSFH0Pgy7DXGn2Eh83FrXvcvTPIxSDcDSkIOZSorYwNWg4XAV9eUkjUi99FIIsa3URaZOyXh%2bt1jH%2bkP%2bC/pSQL1JivoM%2bt0r1vNT7GeS5eBp9bofKy52lXLupT2PChFJxRmGWEMWYYAhrt1kxwaM8QaWlYB5Vf2HaqPjskxbYyEk7FeAkFdmyfleDcfNn63%2b1c46PXZyOaamFdFpU/Zj67U/uPg1Z%2bYrK45KIRZWMiCMil5yiKWPU6FInkOMkJtPmpz3npk0jRk44pj4%2bOqnsRGHW/zzxl47alZhsKio/N1BuZNPCDKkL01OKBP2qXm9P8BhbPUH1B5mRZk3%2bExbZstJ7FNfyz/WT4%2bdBph4JDSI2Brk9FY6oH6KqqZ6v1VfrBNlYUCmdfPXvTvXNvfrX1V8qhH65sc4IhH65vSYkNcjP0J/nM/bV/JP7lwDZn5g9hy8ITyBI9z4EizvAkxyAzRuEIVf9o%2bL/JZIx9aNGNBpRv/LLL/2eYJhxShATFGUrGfA/Eb1kLZkLBXgAAAAASUVORK5CYII=' /%3e%3c/svg%3e)
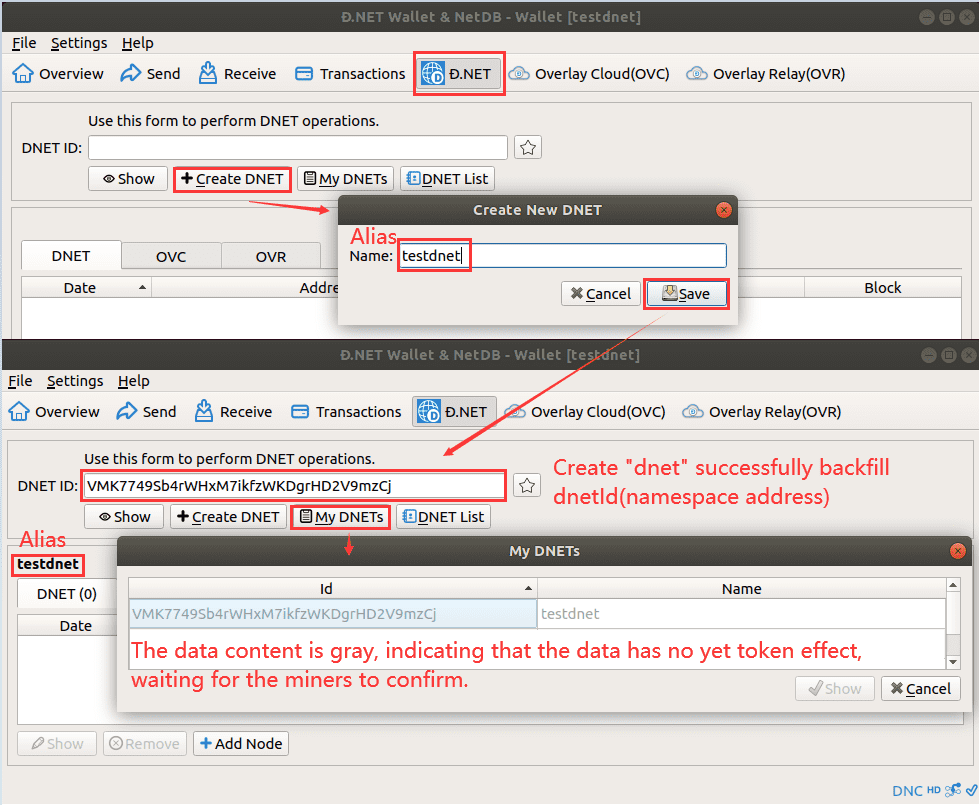
Tip: It takes a little dnet coins to create a dnet,the submitted data is packaged into the block and waits for miners to verify it. (Verification takes some time, depending on the mining time.)
Role Description:
The "dnet" created by the wallet owner is called the dnet admin.
Only dnet admin can add, delete, or modify the information in the dnet (except for query, the dnet blockchain data is public, and any block dnet client can view it).
dnet admin can create one or more "dnet", and then add dnetvlan nodes that need networking to the specified dnet.
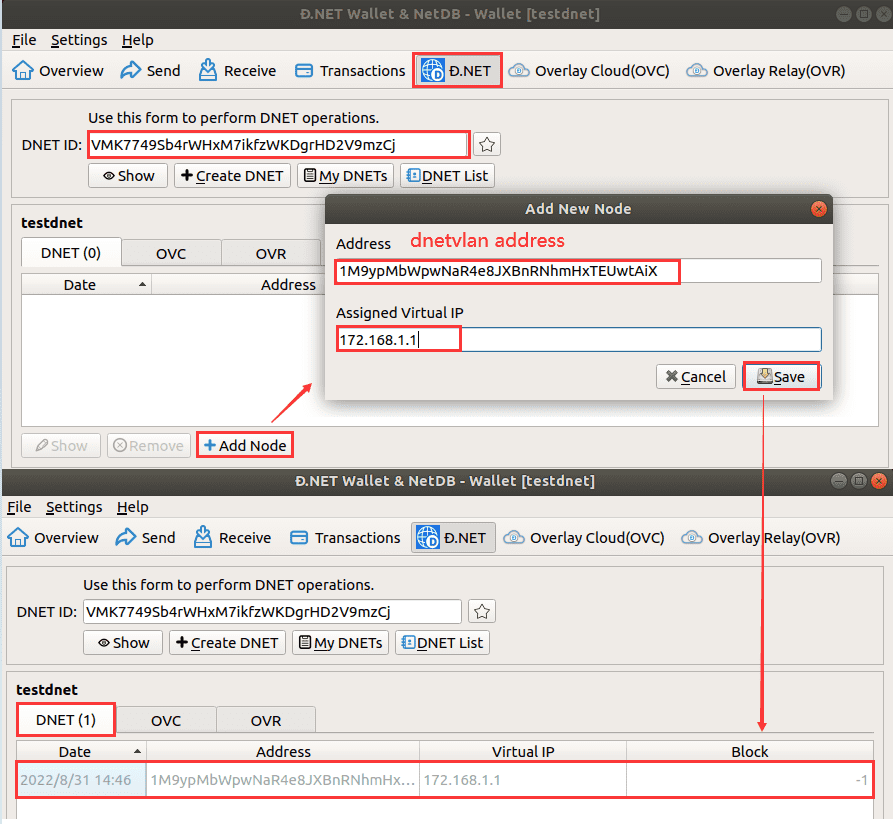
Add dnetvlan node to dnet
A dnet contains at least two or more dnetvlan nodes, using the address of each dnetvlan node as a unique identifier, and assigning virtual IPs by the dnet admin. (Virtual IPs assigned within the same group should avoid conflicts)
Tip: Only dnet admin can operate dnet, and data writing requires a little dnet coins.
Use CLI:
(Please enter the parameters in the correct order.)
# "dnet_id"          : dnet id
# "client_address"   : dnetvlan node address
# "client_virtual_ip : dnetvlan virtual IP
#                      ("Administrator" assigns IP, do not conflict with IP)
dnetcoin-cli [-datadir=YOUR_CUSTOM_DIR] dnet_add_node $dnet_id $client_address $client_virtual_ip
Use dnetcoin-qt:
' width='893' height='824' xlink:href='data:image/png%3bbase64%2ciVBORw0KGgoAAAANSUhEUgAAAEAAAAA7CAYAAADLjIzcAAAACXBIWXMAAAsSAAALEgHS3X78AAAZlElEQVRo3sVbaXNcx3XF/8mXOKXYlrho5yaXrcWiKEuipKKkUtmxXal8SCLbkiVSshQ7dvw1lTiWt4i2uAAEQOzLDICZATAzmBlg9n3f9xksBHhybr/3wAE3wTalTNWt7td73%2b6%2b99zuO33PPvssDj7wZTz04EHSATx4%2bIEeOrAnTeJ3p4Oq3OOPPYwnThzBieNHcPTIozh%2b7PHd%2bJHHH8FR0onjj6v0J5j%2b6COHcezoY6rMMSkjdfht1NXCx/DwQ4f2MYY708MPHVT9Hj3yiCJps%2b%2bbZMCDh%2b/HIw8fwuFDD%2bCxRx9UcRnUIw9pE5I0%2bT586H4cOvjVu9LBA19h2QcVA2TwUk86lW%2bZpDDgiDCIk5VJniA9zMEdP/ooTrC8pAkDnmAd9c1BntAZdZhjOfgZ/d%2bNZPxfe0LG9aiiJ048jj7Lwjw%2b/tV/YvhKP%2bZnJ/HbX/83Pj3/B1w4/3tcHRqAeWZiN822YIJjyQLH4gLJAjvDm0nyl23zWLLOYVlIj%2b9%2bk%2bzLVtgdi3A4F7HssMEuod3GOEO2IXWWe%2bos6e3ctr%2bbqDf9lvKqXb0dm/bdl89m4F5eQC4VQymXUgXikQC8LjuCfi%2bKmQSWF2bgX3Wh06xiZ7ON9VYNW%2b06tjp1bG%2b0cW29tUuSd73L9G5DfW9vaOnbilh2s4MNttlZsaPldmLD68Gmb1VR1%2bPEZrXI8k1sdZuqbUWsu9W90YeRLvENfRyKevJ66xv1dti3MUaD%2borFIgLZCpLZHDKJMPIcnDAjHY%2bgUcmjXqtgJVlGLp9FIuxHJOTDer0IazCNxWAS6YhPMSzGvEQ0iE6jDEsghbVYCtlECDHmZRIRJKMhRINepNNxVE1T%2bOV/WfH%2bb7yYvTIMy5XLMA8PIXjpIkouF2K5InLJKBIRP2IhL%2bKsm%2bW39CN9hHwepvtUvFEpIJ3JIpXOsL8w0/2qnwzLSxgOrCHOscn4gl4364TQbVbQqpXQrpfRl2TFEVcMS2tBLM1PY848q7bc9MQI4uzcn8zi0nIEPq6UaWoc8%2bYZNMo51oljzBVVdRaYZp2bhc0yjxZXcMwdx6I/Co/dijkT80nzbHeOx2mRRyc7dhXnfuPDL4ZyGLg0gAEer4GBywgMDyNpW4IrnILHscQjOYFlixlTkxPqaFnYz9zsFGYnxxhOYpG7tZhNwh%2bKwRuIwsWjNTs9wXLamCxzM5hh2fGRIS0%2bPgIn25VFEsYJ9WXTKWTSCRS5/eulHGqkKqlezqOcT6Ms6YUUasWsSpN8OSqZVALZdJLMKKi0WulGXqOYRjWfQpV1anqbNSPOTks8XonhEaQnJlEmc2pkXnXOhNLEKMpc5Uopi2oho7eZV%2b1UetviOGQski7jruQ1qhZzu2OssH69p5ykyYQlXiDTiopS6MukUmqwMnCVyLCkFygXpHAKBablM0mUyBChst64dCJHRr6lUaEsj0%2bWDK1y4JJezKW1QbJjVZ/xsgyKx6haK6JcJUP4XeIAy8Ic1pEy%2b6WyatOgu5eVORl1yvpY%2btKp5C53DI61ODDvyiJGB69gbmoMZh4Hy/Q4TKNDmJ%2bZgpXbb0621mA/zOPDMDNu4UrK9%2bTgJbiWrBjtv4DZsRFMXB3C1NUBzLNMIRnjbuLuINN6qaZWm6vXu8qfMxk7XO2Aci6JHIVTgYPJMyxyBcucaG56CkXTDPIzEs7ym1t2znwjPs/47LQql5%2bZRpHnvMDvGmVBdmpSxXOsW2CexKtUue3lRXQdy%2bjadXLa0WAfZfZZ4hZW25VU/ZxJmKAYIGow6LHjwqd/wjSFxBwl9Pz4GM/jCOZtixRsFgR8furORQqjKSzy2%2bFwUl0uwGpl/uIyhZEIOxPL2GA2z2N%2bfp71bCrdabdjiXVXHA4sMD2dzkL9dq4D2zsq2rRZEbJaEI5Gdgf3hTFAHQEjUUjOJ7dk02ZBlxPqLi1igyu1xZXqLFrR4uquM03i63reOld1fZnSlRNpcSJVrmjVbMImV3p9ycayNlW%2baVlAjeltti1pUr/N8k22WUzFkaOckb6rX%2bQOyCgZsPfsiXBrNGrwetdgWZiDiRNaWCBYylHqEg%2bM8lwvcgKLasVnqVqWMTk%2bisnpWaSpHdZW3fjj%2bf/FLLe/Y8WFeUr5yfFxrHq9FHI5jPnyGDFZlMpaYhten5fI0KnymlSj%2byFNjRX3SQWlniXsnecuA8q6dFfSUg8LXI0UwZAAixBRmn/NQ3ARU3Ii7F%2bD17NCYOFRCDES9Km0ICnPsyygx%2bNcxiwF6AR1/szkqNLFJuIAgdPjsyZcGRzAxMggTGTCDNXf%2bOgwj40ZzmUNYi8yvmQ174YCiRctJvUt%2bVLOubR/snAH%2bjkPUeuywBVd2/Rl0lqCAQyEuyIhRWXIZHvVjXwbaYYqMdSJQUYZqf/TD8/i5DNP4KUXnsGL33oaL5x6Ct869SRePPUNvMRvLe1Jlf7i81reqZNfx%2bkXv4nv/cPr%2bO63z%2bB733kN32H45uun8V2mff%2b7b%2bDV08%2bpclL%2b%2befuTt8inWL7H714DP/x1vcQDgcUvDfG2ZfLZBBaW4GZUtpEVScoy7Zgpj6Pq6NhcGs/VO6JC/z9x%2b9/m2bo/bTmHqGZ%2bxBN0IdUeIyW2NHjj%2bHY8UdJRkhiuSOkp559Em%2b%2b%2bRpeffVFnDlzGm%2b89jIn%2bwzeeP1VvPnGK3jmqRO0KB%2bk5fgwLczPpqO0NN899iW8c%2bY5%2bGjfVHt3QD6bRYBa4Er/ZbVlx69ewQxVWEWhKjknNyYlO0Odo6LGmGrxRp6BJQwJLhhctqubVp5AVBfDVSdhLi0%2bF6Gqm1rGTVjrJtPdZLqb2scl5XkcXFcHYWe%2bg%2bOxM33ZNgeHWHLMF5It7SLMVu0K0aJU7d6FFimsLZY5BNfcu2hR0wLJBJq1MpXRdSI2GhRkSLVSQjwWRb1eQ4vCMJskNsimOSkvz74LyVhEIbxsSnBDUuVFKStW3SsIB/2UI1msupzKWHGsLGFsYgzzHPgCpX2d1tgmjZINnn1FPNublA0bNE83aB1uUWZsMn2LOH9L8tln59o6urQQu7Tsuqwv1OF3hxZfW6hRoWGjGTe3JRo%2bm7T8xMASmbWXAUoL5LG10SGXF2Cem6MFF6JAWkC5VMR6p6UmXOAkLZTmw1cGEPD71HcqHqVgjCuY7CT6G2Se1CuRka4VB4I0eQszkwgPXUFmagJJ4owcv4tsp0xmlHnUSgKm%2bC1hiRolT41TpF1QkDh3iICr8rxJAakC8yqsI2lFsxavklEVLka1XFTwu1oq7KGKIk6YNotYhF4yeffIGkhQPprCpU5T2cjteoV2dkOFwhzRCHkl/NIK0yvcn%2bkhZUNoeFzKVXhsvNQIcQ68TIA0MzIC68hVzI2MwkSLb2aQ8JnhPNMknKVhNMcytslJTF8ZVGXMw9QewtDJaVioQlfIAPPYFJa4m%2bZGaZWyrWalCqyuYadYUoDq%2bnXZx7eS/La2thQDVl0ONfGibhsoBpRoDNWpL%2bUohP1ujAwNYHJiglyl/uQWEs6mE1E0yCQhKddL7Sa3VzpGfDCIq0ODMPNcT1KOxLnd1gX0ECjVyAyByF37EtoER3WexxZVU2fZpr4lLmEvST0jr2tnfFnilt181Rbbr2Zo0FVuvwM0yqv5iXoOUQi2G1X1LYuncIAIvE6ng26njVazgWq1wgYr6LTbTG9roaJWT3wvtVtN1GtVVbfGMBSSy5Dg7llTCEwkr%2byWjIY9RJgWM3Glm2/F/xmddNtAF7p7ykmaMt9v5KvwJjIEeCoWRjQSQbfbUfNUO0BkQKNawr3%2bVatVJAmkBLyMDg9ieOAiLcMr1DTjmJ4QdTuCqfGrBEiDCAb86vapUrj9BO5IxdvEi7eSwjnUaALk8vm8Zopsb%2btAiAyQ7aCdoev3hORXLJXUlqvzzOZoDeZnZ5QVWae9IFZhjUZVg/ZDWyzJQBDpcgWZXAHpfPHPoMLtKXcrJbN5LkgUuaxmjF27tqXkgM6A0h4G/KW/PQwol5EW1EWZ4KNFmKXmmKXwi7pWEKJ90OSAsENrkPbBtWQaWzIoWodbtBL3Q9d02truSd/W06UtnbZ0QVhev4YYrc18Lqcz4FovA4p/PQNu2gGlYhEJqs%2b2Ywl1qqo6hVVNhQtoMN6k2myJUKMwzEajSMnKcXXS2dy%2bKKXKZpErFLlz8siyfrYgq51DkuZ7wrmKlMdH8iLpWkVi1asEee7zYoCqK%2bGOZuOX6nV1A1sjSKlQc1SFRKPo8YqiIipMq5XlNoiCisJsXyT3kxR%2bORpeXmoamVic2CUU8DGNanmcSHO6H4sjF7E2ZYbPYkOeKjRJgy5HJt1zBhh1ZPIqxk5KDgdSVE8tCrdG%2bfbU1MkwxP4cEqNNzvQCQZHcVC9yV1kpW1KJOAoT07CPD2Lsk99i6k8XYJ8xITc5gySt11yx%2bNkM2B/taBMWMuLSRrOJ61NTaMRiiBMlxikHBCZ/XhSnqpVQBK5QRNKJH1IEYEkyJEkMkbQuIEb8IO8LFar3W4TgPVOD5Or1QEDJAzkINVGFyRTiicTnR/EEEiqMa3FSnLIhwXEkqPNjjMfSaSQyWZQ5%2bW2qP6UGuWCKAfIuIPfpAnK6HQE6NDoE8BDYCEmakW7ktVsNbNIW2OZ5285lNcrnsB0OYYvGVYf5QlJ2nUDqiyX2ud7FOsezTu22TtCzrsbRujEvzqPVrOvX4kntXr9UINzlli3k5dorp4wIeROQc5YRi6%2bQU9dhxTKFFzF1enQCXpsTa8Tz7qtDCHDbe6YnEbtwAdXVFRQo1ATlyeXDZ1FhH2V6LzHuRtJnQd45/KsoRgLqTaPQ20dWC0s57e2jr0LAst6qK7NX8ECTMLZeLWurSIxfKYolJTZAhUeljDrLrdPoqS/YEF5agW9kGAHa8BGCnZXhIST7%2b7FNqLu%2b3sYGDSt5vPxCiXPZkEdTjmGDmmKj29qTL3NVoW7s9c1w1caGL2P86gBh6QDGJLwqYb/63qWrN2iM39MXP4HpT7%2bH6eJ5mC58osjM%2bCzDCZaZGB3E5NgQaVDFNbpyIz5yBVPMl7TxkSt7yki9CT1tkiT5qh1J2weNjw%2bpcUz3f4pxoy29janxYdX%2bDMvMsK%2b%2bk889gwP3fwmHD/49Dh28D4cP/b0WP3DfLhl5vWkHD30ZBw5/BQck7CFJP/3SKbzx%2bss48/IpnHz2G3j9tZfxxmun8cKpp/H8qafw8ksnmf8KXj9zGi%2b/8IxyVHjtzEssdxqvvPQsnjv5tCr/yulTOPPK8yrv1MknceCrf7tnDHei%2b0lff%2bA%2bHGP4gJ524P6/w9EjD%2bKbTz%2bBI187jh%2beuA9nH/sb9P385z/DW//yT/jg3Ds4%2b%2b4P8c6P/hXvvvOW%2bv7g7Ds49%2b6P1PdZhvL9/lkt/f333mb8bcZvpQ8/eBcfffAefvL%2bjxV99JP31LekK3r/XfyE3x%2bc%2b7EWl1Dlvae%2bf/rhOfzbh2d3y0v8px%2bd09vvGcNNoUZv4yz7/OUP/hn//vZbOMe2JU2NlXOS8XzAPn5x7of45dkfoM/ldKgtW8pnlMeE3AUsWbUwnYgp54mRwcuw03DZ6jR0xwJxgDDOVG0PSdpmu6bOv3x3m9VbSJwZsEnaoDZhm9KuODTcaO%2bmOkSTN/dxcyhnX%2bWz/Lo4QcRC2KAAXGe76829ZWRsXcY7TOvLZjLIZNIKWYmN3qxqKEvsbTFRRVcm9QfUTrOiP0wUEE5m1FWT3Ll11J2cdv9WLxdQLOaVnS5OCMYkWnr%2bRqtCfZ3EoCWGWXsE6XhIQWa5b8yl4hS0%2bkMG6xrtSn1J6%2bh3fzIGyRcbX7vGL6gxqbFIP5xYN%2bhFi%2bavTFLSjHalXKOqhU3xD3BFcxhbTcHl8WB%2bZoJw0kx4qTkYCOaeC2Qw6klhZdmCmYkReJxLqBDgfGyJwrqyCjPteptFHCpGEQ2sIV0s43fWKNZCYVhMk6otgari7GCemUJwzQGbJ44zvy7jZxf9uHj%2bD/jkD7/HMK1GQY1ufwJr/jDsVhMW5k3qdmmO9ZzLVuUgMTU%2bghmmmacnsOp2qokteSIIsr8F04Ry4pibn4Xt0qeYJk1NjlHocYxMGxnsJ1CKqh1qLFhflKboWiRBDBBTA0gQWqa4feRFSFY/GCO6SqWQZlo05FP3/blsBjZfDKFoDKloQLmuSF1xYynyKIW5wnnBEOI6w3YiXF3NTSWAXDKivDkumGNYcAbhprXodtrhW3UrKCuYQ5wvktEgkrEwxxNAhKuZihvuL5pLjowxzbHItX2KWEYMIykrfcZZNkEbIU08Eg5pr1Zppkn7cmdpXOtXCln05bn9K7lbX3uMO/4mLbWG7pVhvBrJLYukN8WHSN9%2bxpuB3Mo0Spq1Zhgtqp5%2bNaY5MvBI5WMoZxN7nBfkjq73Jcog4wa39zbXeJFSjhy9dXQHjNrKMgFbABXdkaPUU6f39YpQ2OhIe9kxHkJW2cDuQ8aKHWvyzVBuVYM%2bD1dsRfntrLmYtuLgSi7COq%2b50fnXXCynlZVHDA/rye65cd%2bXU/eQ1eL%2bnsErPS/Glc96PRYmyeJxPFXuIoMBtyurXGSEAfJwIJK3rQseWVHjUdHFLWpfsnHCTjhoWclkVuyL6tXHuWwjY5aUX4DX7cCybUFtN2HUvGmKzLBiccGkHjPlMVXOq7Zq%2bqrrK2f4AFXvhYeItCMCjwyo8ZhU9Zes25VVtoDgeycHOD0xBgcFjUws4F1V58ol11ehIOI0bT0uruqqB4FAkOQnBeD1euFdW1Ppawz9fj93ywpN0iB8Ph/WvD5EaCD5WC4YCsFDQbu%2bsaFs8c3NTVzb2qLKWqcdklW3tSI3/lrniF0GkPm9DLhdWcWAQi4DH1dPdH9Ird6yElaJGCU5J5aIxyAmc8C3BveKU70Kyd1akAzwedc4wTDTvOo1KUAGuMk0N49EJBJWTIizbIgMizL0uN20OerY2exy8mTE1iZxe1cJI%2blTbm17GfCXrP4uA2j/320H7DIgSyEoTlFdXceLalAPnTR%2bRBrLW180HESeJu86zUgBR34yQzzBRKXIvV9K0rhrZLVbNDBW3S64KNnF/UYYI22EKb3zNKHlHs/qi2PV4%2bbu8SDEvHg0rJhquMT91SQMsM7tMqB6tx2Qy6R3HyB6XUfKBDMrjmXigjmYaOkJEqxXS8pRYmZqQqWbZ2eoqykLKBMmRNfabEq4iVPk4MBlTPFYLdqsMNHgslBA%2brljxCN1ZDmAsbFRmE0zWPO4KCOscNjtStPcEy%2bwmsaAOlVfjcy4U7ldB4m87iHWS6LvDVVhqA4jTd4CDd9iw5FCvbeJnyCxgOFtpuJ6fRF8kiYvtPlUZNfRIq/609qQNo264mnylxHrygLOTKJA/JHPpe7QXlyNTd0IlfQJFNLaM5U8X1V0nXqLU6Lh7JhP39Fx8U7eI7fLK/e45pTvBUlbssLUQoIDStzV5dv0bTyQ9okRNDTUj19//Cv87ncf47e/%2bR%2bMT4xTWJWVDq3pIOb2zoa5m/K0I1T/gpwd7ygIBXzNTu3vCOSp7mrEz3WzSXNl49luWRaUW9wG4xVigDyZJNtbpLVyf9XdYo2n8YLKyyhgU9QdrIq6fv9/Ibk6pw1SI5T%2bTCEoT1agVK%2b3GpgzzcK8sIAYVZ%2bHAoumFMoUdIVCjjg7hPGRYUxPjtNuSCpvEnGOyGVS6kxNj4%2bi//Ilqkuv5mmifIxuOC/v2Tm32SVGuRuOknvL363unjZ0LdAcuIS6vE6L1XiHvjQtEI2iS4EhT1jigVGzWbDhcqLG3bDBuLjCZijA5GnZRzQX8HpoWESVzhY3OnmVkf8WiDkrOEJMWs19JqYYU9jnZWZB3HPz%2bvN34Qbs3Xd9XXiKc4Z4pNcJxUs8AnldSN9MJV0492WzmvNyi7RBdRiyW7FEUzPuXkGHBcTgKRXSyou7Rbu8KTa/nCuRDRKKwcM0sdDEz89OeLzqcRJJxpUzhQIiioq7oTheCGlp2neDbQR9bqpSi3ruciwvYoW2iDg%2baP1ooVHXGINB0o84aqyxbzHpXbRHZG7i%2baL66SkrdUVQKmMoR8RXo65uutxoE%2b6Gx6i7z/8RwdExtAldW04nShYLSvPz2CQSFNqQ0KWRxK%2bRWTkyzf3H8/D3X4b/8kUU58zYpo6X8lsu525dqdOxLymHaVXf6VDhlrTB4xXo74fv0kX4eJxSPFZdh11zrha3W3HXZV0hiWt5Ook7L9tIjF6F%2b/wnqg15gt8gKtXq23fb2mDdlnVBXY/3FddWkbXZ4S%2b2Ec5UEcnVkax0kap2Ec3XEWRavNxFsdYmyquTezW0G00VVstEj0xr1htot%2bTxoUu0KJ4mXXSaTZXfqNWoTSqs21Bl2802dsQG6HSoaZrY6Ha5QlV0WH9769qtr03y2GqQvDjRjtiRcvIe2Ztn0E0v1rfkb%2b%2boV6suQVuJuKavKLB2migtmETEF%2bE5DyDkjSAeTiIWjCPoDdOU5TmKp9EhjK0nKPFpHDVSadQpDGvxBMOUnk7Bl0goaqa0NMmrMWzR6mxleIwyWWyWSjxuhN1sb6NQUOU7uZxK265WsUOmGXSdTDMIpG153pL3vZ70XlL19Dau31RfEdO2uRhdar0SQVlfhhK/Q6NnJxrDtVAY2%2bEIrtHAkfjuN8OtYAjgxO9K8f2lX6flJ6S%2bKYRVvoQkI%2b9OtMOxCX1WuTvWp5Em/XS58wX49RW4ApvbW/t7Br9HdLf2Pu%2bf0UeXlqh4j/0fCk%2bxnwEAfoUAAAAASUVORK5CYII=' /%3e%3c/svg%3e)
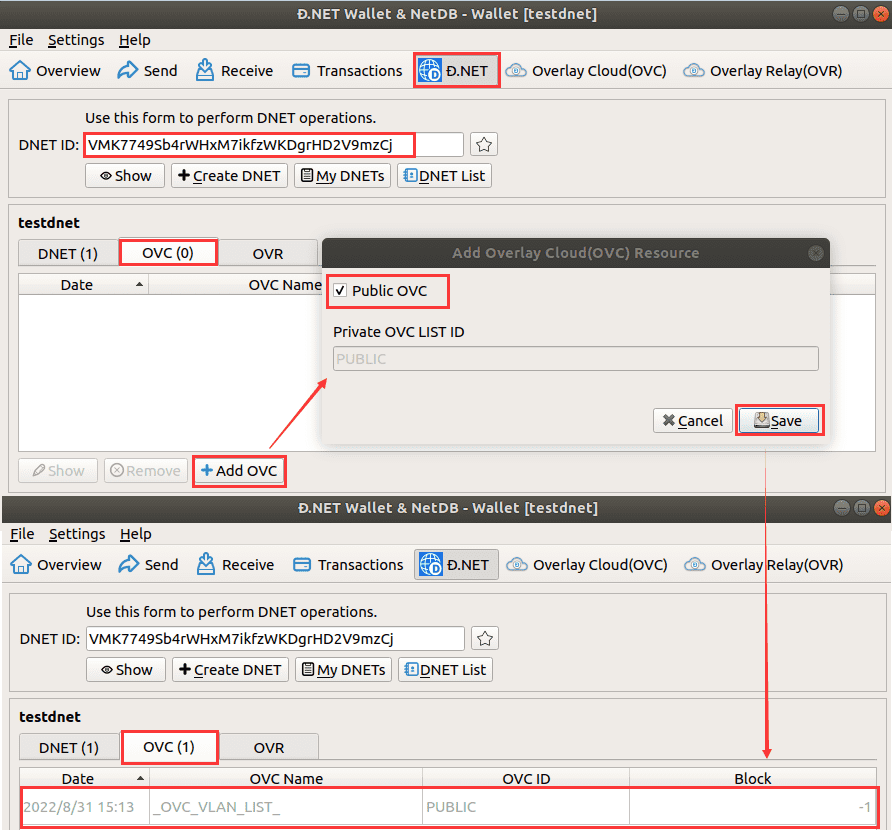
Add ovc namespace to dnet
The dnetvlan nodes inside dnet are controlled by dnetOVC, you need to specify an ovc namespace for dnet.
You can specify your own private ovc, or use a public ovc.
Tip: Only dnet admin can operate dnet, and data writing requires a little dnet coins.
Use the public OVC wizard:
- Use CLI:
# "dnet_id" : dnet id # "ovc_id" : fixed value: public dnetcoin-cli [-datadir=YOUR_CUSTOM_DIR] dnet_add_ovc $dnet_id public - Use dnetcoin-qt:
' width='892' height='830' xlink:href='data:image/png%3bbase64%2ciVBORw0KGgoAAAANSUhEUgAAAEAAAAA8CAYAAADWibxkAAAACXBIWXMAAAsSAAALEgHS3X78AAAXp0lEQVRo3sVb93Pcx3XHn5L8YGcijePYY1uyZY0T2yqWLJGyrUoSJEWCvUuJk0zGnvGk2J5JMuN0V0kei6IoUSR6P/RrAA53B9zhDtd7r%2big%2bMnn7fe%2bxwNAiJSGUG7mYfe7%2b7a9ffvK7kPTgf0vYCvs36fnX2T%2beZVvPvDiXUFwT548iosXTuGHP7yEc2eP4/y5k7h04Qxeu3QGp1h34fxJlp3C%2bbMn8bd/cwnHjjYT7wReu3gGly6exelTgnMKp0%2b24NKlswpf6luOHLjneew0t9OnWjiHFhw7fgS/OP4CXj/8Apqe/s638MRj31Ag%2baee/CaefurbePLxb%2bBxln336cdU2WPfehTfJuipnm%2bEb/3lI/j%2b95/FIQ54rOUQvv/c0zjY/BJePbQPR17djxef34tmLuJQ8ys48PIP1OL3fPdx7H/lebQc3qfw9r30PRw%2btB/N3ARpc4TlB5tfxnPPPoFvsv/H7jDuvYDM7bm9T%2bF7hGf3PIV/fuqLOPz4w2j69a/%2bB0ODvejrasWVt9/Elct/wJU/vIX%2b3m6MGPrwxm9%2bifeuvA2LaRyTpjFMmsdvg3w3wBTLzBMjMI4NwzhqqOWH6mCeGIaJZSbLBCxWI4zmMVgmTfweV2VG1kkb8zjxxvV2BuaHYa2NbW0cs3Eud5jPVrCwb4txFFbCONdjJjTZOHgpl0LINw/7lBk%2bjws2TiYc9CMVDcI80g%2bXcwary1XcXKlipVrExlIJ64Sbq4vYYJnA%2bnJF1d1aKePmchkbDXWCJ22lbLWUw/LsDJbZ59r8LNbcs9jgmCuzdqxlEsTR%2blJtGvrQx2gsW10sYW1Rm4vUNeLq427UyvX%2bpI3Mc7UGTZ5EHslkAsmIH5lElBBGIhrCYimLQiEPezSPbDqOaMBLoviwUspg1B2FMxBDLDCPCMuEeIlIANViFpaFGNyhGBLhBcTCfsQJkeACooR4IoKKZxZv/mcffvK7OQxd78R0dzvGWm9grqsD2ZFhhJIZZOJhRGQ8vxexkI/zCTLvQTIWwoLbyboFhPhdyiWRzaQRisSRjoc4hk%2b1i9bG83tdag4yP4HgghvlQpZry6n1Sdp0fSoIh8uNkf4umMhywmL9Pd2IsQObP4bW6SBmZyYx1N8Ds3EcBe5Smy0IgzMA41AvxkaGMMwjZJs0o5jLoMcehMkdgt0yxjoDRgf7MGzoxwTz48YxZNnXf/x6Ej%2b6nsH1a23ovP4e3nnnCpxjI4j09mHaE4aH3DA00IuJ0WEY%2brsxZTFifHiA30M8qm2Y4BEbHuxHkoQJhWOwzfngnLZgbHiQcxzFQE8HxkcGMcKxDQM9GOjtUnVypLPpJDcqg3I%2braApHAkjl4qhmE0RkmqBRaFsMqqgmI5qZbU64ZJoJIR4LKyOTmOd4JcyMeRTWpttQPwsdyjY1olwTx8yhgHkhwZR4MLSnGTOaSNOku1jqk%2bBPLlP4PbcUvU6GS/HsfJpjlmbh96mwFTmp7ct1dpJmww5UdaRTcbQJJO9XahBllBkQ0lzUkeWlEnpUJGBWC/lBR2PIDIjJYSRyRJP2gq%2bjpMlvgxaKJBw%2bRRyQuisBjkhjhAxsXk%2b%2bkZkNpXf/m6EreWb20fqdbLh8i1pk1BVqKOAExG2sJKdhrkrYxNkJ7KNSOxBsrpl0khpbVR1g4ZeDPDMTphGlSTvJGv2DA7A4ZxGT18PDGT5PmF/piPsJ8PFFss5FHjuZHeEKMWMQGIz1HZxN0Fkh3CGIoD80SErO8xdSnPSCS44yzMbI4tmJsaQ5HmU7xTPanzYgMz4KFIEKU%2bNDavy1PgYCiRQdGhAlUsfgit1JcqI6sw0qiIrwgFyAYVsNq1YN5cWSN752OwCCBH0NTdNUeVdf%2b8yero6qRepo5mmbnyAkdY2WDq74DNRT7dRUl%2b/gcnuHlg6OmDuIG57G%2bz9FFSsM/F75Np1THV3YvhaKxwDFHrXP8B03wAmu7oUvpX9xl0eYN6DD/1%2bfAjtVykV4HHPweuZr5/zwi5ywjYC6OdBzobaDZ7j8sQ4qrYpLNqmsTbrwIrDjpLVrGDJbkN5yopF7uaKY0bhLNlnUJmaRHnSgvTYKIoWs6qrsm6Z%2bNXpKbaxkDtYzj6qFKKLS1WUizmlObKpuFJ1jQL1U%2bOARhmgBpczwl2ZczpgJEubTROYnrRSaOUQDvgwwF13U02ZTEbWGWGfsWGUsmCcciEWi6ndvPbeFYyMjMBBIhoMBkxMTMBhtyOdiKHXlYDBaKGqoto1W7DgnYfVYkE8Glbyp/ApyYFNMkD/yNXSNKVl0OfF/JwTcw4bnPZppFgW59mV79mZKdi5OAfTedesIoiL5cl4lAaHR5mbJsoNwZ2jxecmFy3Mu6i3Q5j1hWElQe3kiAWyfcDrVn3FI8EGtZfYHcgkNBVZU9mKALqeFOrr7JeixaUfi1xN9UlZOq7ZDKLK8rrgrOFIWbrWThskXtfTuhqS9llabFImxFZlNXUkdZ8myHoUAdyOaWXpmcdHMMNdkd3VKKZxg0prxkhjvq49GvL5hjqdMNshvkP5pwS1OdY5YGyoD63vX8H7776joJ8WWYU2veygyAMxZopELAmn1NK8vssNUlW3I3RBo3PUvUjluwmse8G52xiNcm6TDCjQBM5nkurcp%2bMR5QiFef4TSToY1NnLtP%2bzhCT1eZZCMTk8pKR6iWmSTkmarC9OSGBBc4xS8Yg6Dr/91X/j1PEjuHT%2bNC6cPXVHuHjuNF67dA6vXzqP1y6eUxciKr0gqZ4/o%2bo1OKfKdFwdT3AusK%2bd4CLn8Pd/99fwe%2bbqgrauBZI0XUVItVJvt167ipEhWm4DfVgIcyE0ZBAKIECVN97ZCY/ZBGNHK1ZyeaxSVcbYLktjxkSDqPX9d2E0GpFJJSjQQmg59ir%2b6DN/jM994XN44M8e0ODzD9byDyr4/Bc/j0cfeRiPfO0hPPzQl/B15r/68JdV2UP8/tpXv8K6r%2bDRr39V1T3C74dqeI/U6gTny1/6Ah544LN48ME/wYMPNAC/H/jTz7L%2bz/EX33hE3SuIx9p4hJtEMsfpyooeFimfScaUPS/OTpq%2betVqUrp8mZpg0TbJ3beiSllRpC2QIL64qIlIUAkV6UvOeIp9dFz%2bPd76yY9x%2bWf/hHd%2bTmD69k//QX1f/tk/4vese%2btff443fvcrvPGb/9Xgt79U6Zsse7OWV2V6Xuq2lf9Sle0MWl%2b/f%2bPXmOMa5OzL%2boTbNTVIalRokCxXS1R7dlqE7ZiRRZbyqFaLyBUyiHBhFebLlQKhqAG/F8sFdZ7UzQ%2bPiY0%2bwVBfNwZoCoc7O7DotCNBARsxGxGhiZylSoyYxxFn/xv%2bBXzIsvX1ZWwsldWFxm7BRu0iR46nrFVkXEYXgjme/0q5jGqljEw6hYDfx92nx8fvarlEU7WIUiGv8tuAOGXWpygvkokE0qkk5UAAC4QITd8Fcsy8y45BOkdD9MsnLTSrRw00rMzIkGsKhn7lAeZ21Bj3D0TlJuIxNecK5y6crghQrZRwv383CUUaUWt0nta42Jvc8XWm6%2bSQdR6fFe78Cs/jIlVupZJXnuFum75y7svcaP2nTHASvqlaLqqCW7du3TdYXVlFmrbE7OwMXDxWDvsUvF6XSmdpdwSpPabJHW5yh1ib96oyP7n7q12MlEq311rIpXeHAPJbXVujkInWDKxhGCgXprnrZrrNcglrn7ZgnBpmzmbhcbAowdl4ebEbIOxeLpVqa8XOBPikv00EWF1l53FlcoqwydYswxIH1a/RyluutnZz4Urycy7l8qdFAHJAppBVN7piHMmtcCzk33TNtekKbhcJoI%2b1qwRQbWup/NaqiygO9m8zY/MNPsWugWgVMeFlvIykFIDyLUKwLgPuJwEaZcCH2j3PmsWKAnV/kTbEbt7zNdr2xax2Y1xKU4Vzt6tUc2V6nmXZeaYFOYK7wQF6G1m8ygWDWJmfR5bGklx6FjLJ%2b67SCrXdFT9EfBkF%2bQwKYuH19iE6NIhAbzvSY0akRscI48j09aJCe%2bauBLgnkMXqcOvD%2buJv5XK45fNhld8iBGVXdkOni92QiEVgGBzAKJ00w0A/humbLFjMCI2YYA54cK3nCq529KJraBTeQhWh/kFyRaJ%2bVOsEWKyU74/1s0Hzhxak/NY3NnjuUruq29UFDE1beT4THyTB3c/Sukz09sJ9owOOqx8wbYOvsxv%2brl6kSazGtdYNoQIzy0uLGixWmVaxtFhR%2bZXGclW3iCV2shYNY4M7sJGIYz0WxTopuzbvxnI4hOWVJTVQmmXRcBARepNRQuQ%2bgvSrQ4ye56Zvzi3OVBw08UpjUsY2Cbr7pWKhtr6qdhWvrsSy8iKTUvd5uUyaO0fBlc%2bp%2b4EYKZsmK%2bfV/T2BHRR9HkTbujBvtMJDG99Lys73dsNDNzrT3oZs2I9sWnRvZJOq%2b1RB7A96uFvL67aBSrXvJvGOciSADlk6RCIX5NFCiCKPiVKWI2RJmCXq9eioCY6FIMa58CnjBOy0%2bZ22KRQNBizxfC7Sa1xSL7DEL%2bfrsFjKb/rWyjbjLJV2xrtnoLe3SHmxWNq5XUXMb%2bI0uZzTmKfN3ghup03LzzWW25RnN0/z1XftCvztHyDQ2Qpf%2b3X4Om7A1/YBvATBm6PNL6DlJzHnmFIgY7kkr5cxdQuOQ8OXOpdjWoHeh44rc/BwfM/cXUBwiOulub0dX1uTlM/O2un5eiVE5pvY%2b%2bwThMex55nN0Fim4%2bzd8wT2fO9p7HnuKezZ%2bx0tfe472Mv0mb1PYv/%2bF3Hx3DG8fuksjrU04%2bzpo7hw7jjhBI4e3oeTJ47g3JkWnD11BH/12jkcPPA8Th4/jNcvnlIxRSfYRuKETp04hLNnjuE8y06fPILmfT/AM09/W5uHzGcH2MM5Psf05e8%2bpvJ7a3OXtoeaX1IhN/uaX8G/v/Aouv/tx2hq5oQlNufQwZdx9NX9WjzPYS091PzypvzBAy9pwDbbgOUS13Os5TAJcFIFOh1vOcTFHsel81pQ1OmTR7mo4yTKMZafUHd5La8eUMFTly6eUWVSJ7iy8AvnThEkfwInjh1WQVv1OXwEHCKcekUCqm6XyTpbjjTj2NGDePXIQfxo/zO48oufouna1ct0U8kaZM/2thvobr%2bBns4b6vJCojJaP7jK7zb1cFF/QE1r7wJ3cjzknl%2buyVKxYP3%2bPRnVrsxStTv5fCpCXa4JK1Fn2vtA7b5eb1Nrp/WlvUncaTx9TvVyycv7xfzc5vKGJ3IRgnEK91w%2biya5BivTZJVB5GZXdKyEtcj1UYYmpItnUCayRMG2tlRSAqZEq0varC2VtTgdpnLlVGHZSjmL1XKO3yWFL3WNeBKaEgpF4PVHlIbRjJuUmpi0X67kCPl6O71vaa/3oed1gbdcljba/FZlTOZXqQXWVqoqhkhrp4Fciso41UKauBU0TfjS8PgDcEyZ4HU5MOuwqXAXoVIim0PXXBI%2bqr6ZSaPiiuViGl2OCPpnw5ibMmLKaoLNalSBVDKRXmcEI64wPA4r%2b7HAIT6/eRy2KTPBiiJ3/l/aIjj6Rgbvtw9ioKcd7165gpmpScSjUTi9EYQonCSqy8a%2bZ9hOhNe0ZUK9NU6MDMJi1CLClJeXSsPpCSPgmcO0wrdghuPN9XfDLJFrnLMWvTaqIt3kLWOFBBLiSeBXU/dMAN5AEG7utEhal9OuOkqQC3zROIzzYTUhicGRRZZo3o5xgeOuEDw8NvI%2b6LRZKV0dyjmx%2bSKYDUQQ8bnVK9Os3ALNiLSfUcTNktXfGgjgv3piGB6dwMSoAQO00%2bVmSIwar1%2bMlwD7FOk/rSLXpG%2bR4upNkvOQt0ipU8eFBpeXKlmCo5wyDnFtXLi7v0eNN8lFyzuktJF5yJETDpC5LlfLaMqRzSV8Jd/grsoVlfYmGEU5E6uXycuPsGpBzjDrSvn07egSgrSRcgHpr7Fef5RU5zziQybq097pagaKXMmr97pkWO1s3YWuPWLkG%2b4N9Xlq73xaG%2blDxxfPr%2biwqZikrW54qkEulYt5NKmHzvTm9zq5yIjr4WUUhHKhIXl5AVJ1PF9y0RHwuuphaZJfoOCJsl5C0yQVIRpW9b76u5y2iKTy5hoXpE%2b%2b8X0xt8XXb3x/vA2J7fVcZJFcmavFAWxto78OV4QAsqsiGDThkKZwyKjzNTrUryI%2bhwd6IFEkEiYn93omlo2xboQw1NelzpbgD3S3o5OmsLB8T0erClEb7OnQ8JgXyitO2DSh2P2PB5A7Ai6uPE15U7P27oQnhFEEiAa98M3PYoECULSAxAdmKJ1DAb8Kh4sohyaIUDCAOB2gVCKGIOskTdARCvgX6ATKnVuUuPTKmKZTCYTpgMSiEeW8yHcyTnWXStbv5fV3BXFLpS/lc6TvgwstC%2bQRkpikQo0AO0WIKAKIAOvtasc4d0puaEVi%2bn1eFR0yOTWFcDiMSasVY%2bMTMFusmCKO0WiCxWyG3eGgFrDCaDJhfHQE07YZDBkopSeniGfF9PQUbDYbTEatbSgcqV2e3MTNmzdVXgjhJ%2bEXPO5NBPhEu1%2bLRRQClMm1OgEauWAbAaSgUshqkZO1K6Y8nSKp1O7TMppzlEurcyuPn%2bVCDqUaFGkTiBMlOyj44pcHSMAS%2b1ReJEE4SurlNSYUjSFONzrLfkTqS3k2nVC%2bfaEhIPITg04AOmgFHufC3TigUbrWX1DoIUrsj4SWDg0NqRigFNlX1FNHWyusZiMGqbr6%2b/tUDFE/87Lz0UiYDpMTV9%2b9gvffe1fZDX3dnejp6yenWNQx6Z1LoHN4Ap03rlENjmHe7dLahoP3TwYIAcZHPvJOsk6ATSalbs5yN9SrMRcsEjwcWECy9qIqpqnEAUnAskA05Fcgkl9rF1S3NH6vW2mAWK1eU3NhJUcCbC84UiYgdobU3a9b4YII3BED8jX1%2b5FaQHuw0HS1/kSVarC/MzVQYbAKQvWyTDyyLe5GtWm4%2b99WH9PsjsY6ZdHVnteTdT/gE4KMI2qXWkvyyp/YgpNST/oBjQA264SK6u6hX9/V0abycsuqC5SCBBSQlbZCoZi5Y5jLR51hrS75icJcPq4arBj6tfzdjoBz2qz09CgbjA4N0M4e0yLHhX1IJdGnizSBV3i2JV2kSVm1T6NESysvwZXy6EhcMS%2bFgxrZ7P8FZIFiB3BNhWzyXoRgQtnHIrzED/C6Z%2bF2zCBAgZahEKOUQo663mcyIj03i6TDjuU0PUGqwwQJkSaxFlyzyoGaYzuR6smoFk6nP1w0mssfBXd6%2bPh4UOMAjl3t6VSmux681TiGbrYrAsjt6Tx3tavtBnq6OjBJDjCNDsHpdiNFr4uWDJKpOGasZkRIiKDHhWJ1UYXCSuRHgnWTxBvs7YJJgqgo5ERbJOVScocYvZ3K9fD8bC1k/%2bO01UEJdJ7xQut1pDkHVR7b3odApUQCpKWBsC9dxBxZOClBkXJlTHdRjkCFpm5JQlnI8ks8Dsv00pboXZVJEHnWztbapOWlhiD/FhMToSZ2PfvN5bcAy7K0KWSsxnLBTfHoxESTyMOHaKQafiOeartDv5JGudgYFxevrWsbnhori3T9CFCVLVNqyl2/R4ThW7%2bDpasTS0E/Vigxy0zjcvbJKY2wxLpl6u4lqjpreytGr72Pqe4ODL17GcO0Afw8Mmvyv0cBn%2bpLh2WqxCrVnqQ6LKnx6ZJTBvVffhu23h6YuIPSVq/X2vvqbRv7lHIpW2Td8NV3MPDO25xL1xac27BC8zxLTlbeYLGnC2tzc1jzerHu8WLVPY8N5je8C/z2qPzNhQWVrs3PKxxVzzrJ3/T5sC51/L4VCKhvFQ4vIPmtwPJV9rPKIybttf4W6m1u6W1Ve/%2bmdmosj2fnvokvc9hathXvJssKNOjK5Iam3Ogw8ssrKKyvI7eyiizzS7TRFwnlD2%2bpdIOwQsiwrnKL9vutWyiubyh8%2bc6trince/2tErLLy8iyvfSx%2bnFe4O7DK56sJTcxhjKPbFNBOMBuxwq5YJVSflW4weVSoOeXnU6szDprZbOb8FZmtbwOetuPgtt9fbx2a645NZd7w925j3VyYJ5HTDjg/wDHZcUmBuAu0wAAAABJRU5ErkJggg==' /%3e%3c/svg%3e)
Use the private OVC wizard:
Use CLI:
# "dnet_id" : dnet id
# "ovc_id"  : ovc id
dnetcoin-cli [-datadir=YOUR_CUSTOM_DIR] dnet_add_ovc $dnet_id $ovc_id
Use dnetcoin-qt:
' width='891' height='768' xlink:href='data:image/png%3bbase64%2ciVBORw0KGgoAAAANSUhEUgAAAEAAAAA3CAYAAAC8TkynAAAACXBIWXMAAAsSAAALEgHS3X78AAAZzUlEQVRo3sVbh3Obx5XnX3J/w03uEjuucVGjZLnITtwty4kTlyQucuTeYqfYczc3N7nEZzs3vovPllVJihJJsYMACwCiFxIgCKITvbOTv/u9/fBRIFXixOUw82b3e9vf7r66aGlt3Y3rr7saP7jxWgU33nBNE2zF6XWuBDcSdu68GXt234p9e3djF/O7d92K1t07FG7njptUumvnLUx3YG/rTtxy840Kp9fZtUNrI2nrnh3M36Lq3/SD677UHC43r5tvukH1p83pFjVWy57WXZsdy4JvvfkGVryek7oBNzUWv%2bPWHyicEOqvwXXXXs362iK1xd2gFiYDSyp97eHgssDdXNRe4mSc1k0C7FAL37N7p5pkK/tQRGBdmct11171peZx8byuUmvct3fn5uJb95AAxqF%2b/PnDP6GvtwcDPZ347NP/wbHP/4LjRz9Fb885GAZ78cl/fYiTxz6HecyISbOJMIrJCQ2sE/xuBpZZxo2qrmVsBNZxLTUTJJUyC%2btYJycI47BYx1TebBljnt/sQ7UZH9lsZ26008eyNkAfT5/LZDN%2bez3Vr2mzH8kLtMzH5%2bCwjCKfSSEeDsI%2bacZswAe3w4K52RnMx8KwmAYx7XVhsVbG2lIVi9UiVuolBWtLNawuVhWsLFRU2cYi8Qtl4i6UbdZbrmEpFcPCtA8LwSmscMzVuRmsRUJYnJnCcinLfsqqL2nT3H9zXzq%2beS4rC1U1PzWXbfUkXW9qo0NLNpvFVDKPeDKBZGQG6UQEydgcEpxQtZhBvpCHPZpDZj6OSGgK4ZlpLJazGPZF4QrFEJ3xYS40TbyfbWZRLeVgmophai6G5FwAUS4wzgVGuLgI6yXYf%2b58N/79o3H8/iMbrGfOwNp2CmPtbQh3tCFlNiOSzpLws%2bxzipvhR5xzScwFEZkNIMb%2bpn0uNQ/pr1rMIh5PIhaLIxkNaXMhYRMcczboQyjQmB/zM9NezmcG9XIeNRK6xrm2RBMJtE3OwuGbgmnwvDp%2b46YRDPT1IBEOwDkbxxlbGF6XDSO8DuOjRpRy8%2bggbsgdwoShD0bDIOQquexWlPIZdDl4avyzcJqNqsxk6FfloyNDMJvHkOjuxttHZ/Hbk3Po6exE%2b/GjOHHqFEJDA5gZNJCwcfickxjqP48x4xBG2NbOKzI6wr6GBzDQ2wXTyDDG2F8hOw/f9Cy8/hmeZBPHG1L1jEO9qq1hsA99vMrSx/BAL2zWCUW0cj6toCWdjCEeiyDLHS5yYcVsSoEsMsujmiOU0jEUMknitfJMMqrapBJR1Ylqw/pSJ8d%2bypk4CvPSRutLT4vSRyGNrM2CyLkeJPv7kSeBisZhlEwGZLng3Ow08tkE8umEmoOMKXlt/AtzK6nxtLnkOVY%2bHd9S50L71ObcS405ShsBWV/LfCKmOpAPHalXkE7SCcnH1NWQxWVTcZWWchyE6bzCJ1S5tElGZxWuwIGlnuqTqfSl952TSZIQ%2bTyJnGuA1Ccxs416qm4jvRToZdqcYl8KZB16G31uLbKLzVQVkF0VDmwc6uOx7%2bPROa%2b4shw94e7j3DEDcUOE/p6zPGrDqn73mdPo6ToHt92Crs42Vae/%2byyGeXWMw4OKKCXZEdnRBhQFZIcy3C11Ui7s4jcNmydAKCE7qIMUJKJhJQXi0Tkyn0YaJjPi0Y%2bT2YVDQSTjEUTnZgkhlcbZJjInJyCmymPMR8h0pJ9YJIw0T08hyytDPlHMNYD5XJqEmZ8hQaLqWMsx/aZhkwDZdFIxmDNtJ9DXdQYmowHmUQNCMwGMGIYxbrYgEAhibGwUg0PDmOC3ZWIcxtExmCcmYLc72Maovo0jBlU%2bODgIu8MFk4ky12olzsy64%2bzLivl0BvLb2NhQIL9MroyK/X0Ug2d5LUo8CYlvjwCyW9sLJBXCFPNZtUvVUgEVQo67o3aL%2bDx3slTIEZ9X9UqFLMvJsMhs5CSkU0nVpsD2Uk/w0n6e97CQS6s25WJenYi8tCMTyyTmvpXdv4gAxczWeycMSybncjowSi49YhTtbYLMK8PjHERPdxfcLocSObL7NqsZA/19aseT7M9ps%2bLE8WMUpb1w2ifRR7kvp8fncSGeiOOsM4Yhowk95zrV6fD7POzfrBH9G%2bQBpUvzAHLl%2bQvcVKWENPmCKA0z1NimOcFpnxupuChJYQT8Hvg9TvjdDpVKHcEFp3xKaoiS4iQjtIyPqnLRDxwkitQPBaYw6fFjfEzU2DF43U5qnZNUT8dY5lfKjihPehqVdFZLRfGJqDSgfW/W0SDG%2bYrSFdsGOm6WvErEfr4hlZQUEALIkRDuXylkNuV6miqyLhZzDRCcEodNuE3CNUSNLg5lANHa3vvNm3j%2bmSdw5PDP8cJzT%2bHws0/iyHNP4EV%2bC06%2bXz7yDN5640W89sphBS/%2b6pd47eVG%2bsoLeOXFZ/HKS8/hzdeP4PVXX8AbhFdZ/urLz%2bOlXz2Dl45o8MLzT6v%2bDss4zz3ZBE%2bpsn89/FN8%2bvF/kJGHNxl%2bSyaVgMchu2XCUF83RqhpiWGR43GUReTlSpAwIqPzDWjOqzqEXCPdzJOoHu7s/tv34Lvf/w6uuf4qfP%2b67xK%2bp%2bBq5q%2b5/nu4imW37d2BQ4/cj3vv2Y8H7j3A9A48/OAP8Qjhzjv24qH772b%2bRzj48L24j%2bX3/fAO3H3gdhw6eB8euP8ePHj/AYXfcfO1uPqqf8S13/8nXCNjNsEN1/wz3r/uH/D2Lx5DlBKpoJ8AYWq2CSO6z52hHG9DZ/tppTbKSShQ2SlQDy/YzCjz%2bFa9TlSYVnisi1xc0WWnxhdXJ0bq6zqEzmi8bjtOf/IxTv3h33Dmoz%2bh8%2bMP0Mm048M/qnz7B3/AKVqax099gWMnj%2bL4ic9x7ATTU8dU/uTp4yo9fvILplSXj3/G8s%2bZEr74VFmsKv1CS08e%2b%2bzywLbHaeWeaT%2bJOV5RXdNVV0Cpm%2bTQUcp5kfFyl0K8zzGejizv6iqZYdbnRYyMKs18wmpBPRrFIsVkRu4t79aU1614wBStxrjIfN41D/lAiTYFFQbEqCjNkLAzw0NI0%2bwN8aRlyCB5%2bbFGgm5QwVonQdedNmwQt%2b53Y418Z4P6%2b4ZlHOu0Ujdoh2yQ8Gscb0UsO1qMzbByJaiXsb6yoNYmRpFslGiGSgrMk7kJk%2bukRdbZ0a40u1FyeG8ggCyZE6plzJFIEw47glSIrJQANcrv1Wk/0iSMi5PuOtuJ/t7z1CdOYsrnIyNNwEk7P95%2biqeHDPNcB0b%2b8gnGjx2FizjriS/g7z6HUn8vcjS0CiRQnnMo0L4vcMF59lkgAQucS4HXs0ACCL5A4uRJ9C18aBtPUrDtW3ZbpF2AlmSQDFvZNHIC0g09X/R3mbQQQ%2bnZxM%2bTD%2bRI8Tp3bpGcfJWwxIkschJ1QmWgD2ly3/TmIJptkKQeICas%2bBYSYveTAy%2bRga6x32WmSzGBsMJXWL9C87REyNNKK9BGL0gqhgshXyuhUCloOCmTPM3YAvmSwump1JeUG6XUbMFLvYZeIzxJdj3AkyWnNKvbAnIChGlVijnUK0X4eMe7OtuV5lalklPlxLKcbIRUq3CBJRKmzIWUJeVgoghJ2zIVoRonJ6JyoLdbeVu6z3bAS77hnPLA6XPCzrwv6IeVpq6Ptr6PNvqkwwqXx4FZirj6hAkVWoRVQo2npEIbosIrUDENo8y2VdodFfZdPd%2bFGvlVTerxu0Z7o8prVaXdUj99gnAc9VPHUevqZFknyjTQSlx8lRDihkS4afKtpIDwANHSarUq6oRSsYhMmlpbLqdwCup1Qg31hbqCWiOtE1erNupUtfaVShmFPHe0kIc/QLlNNdt94iQmjh6F6S%2bfwnH6NBynTsJzphOTx4/D3d4BT2cnpru6UKQKnevuQba3F5nubua7kT9/Htm%2bPmSHDcixTq63j9CLVEcHkp8fRaK9HYm2diTPnkWKPCnm9SDmdiPm8Whgt5G3cQNjUcyTp80GpxAj/6qUikpnaZEdq5aL%2bCZ%2bKRJitq8fAYORotWCSRMVn0kb7OMW%2bGlDeCcnYR%2bbgINl0y4PrUzxMZrhdbox7fHyFJkxNmKCjTaEmZqj3WrH%2bMgITOwvFU9hZXEZC5UaFhaWsJhMYdHL68ZxF1bXsbCmwwbqyytYWlnFfKGMmWAApVIJqysrOgGiSmdvNlC%2bGqxjY53A/hKiOnP3fOfOY6J3AObu8zC0d8LaS2OpfwgTXT3oO3YSk/1Uk03jcAwYMH6uB5O9/XAPjTAdwER3L2xMpb6N9dxDrNPVizmbC8XQHHLTM8gxzTuFgU4iW60jy4Vmi1shV6oinskrI69QKGBleelrJEBz28bub8zzGvHYZ3nfa1Ne1BV4UCMvqelpIy/4Crlzc1mVzEor826t79dwJfKqAvsuiLQQIC/JU8TlGl4pcbrkaFdoaUo5XIq892La5/NfBwHW17dCw7TdqFSwTjG4QREaD4WQJKdVHJ5cWbj85aDwV7634xWHJ0jfZTLfIlPxMpUaRk%2bJjK8SmUOFDLwcDaGkJM5cgwD5SxPgb/ltXALWs1lsxOPA4qKqE08mlUjc7gX6ukDkejIWoSE0Q5FGsUYmlyZDz1ApS5wfwLShG8HBfkSNY4hPWJHi1Zpz8LRwk1aWlzUCKGOIjerVCrl4hdy8rEGlRChreAUaXvJVctBlHrfVWfHnR7AWjWB1yo9VtwsL8RiqIhXIWAPECQHEyGp2uX0tQKJWKHqnqX0OUpkSZ8zI0ADGyVgTFjNmjBb0m87hJFXo0yc7MGZzIzpqQYD1YjTJKzT307o1WMzRqMllkBIHKRmX5MvFgqKouMAytBcUXpwXXHwlQFk6aELAQ1lOWeymrT9lNCAgPoPeHhR4/EQxmabsFrNVFA4JwGyFyF/5bsZrZSmBmAbyLQ5YiUUoU5f6hVif4p6LU9EJUrw6T3XAdaoN02fPwX%2b2C7MUlTPkFRJvEAJmhQCZlOYOz8wnkRbdP62l4rERi1D8fmk5XizPiPeXxKlQmYgJ57baMNnZBmd/P7xUWLzU8/MkQIl3TZiRBFe8ZFDin9dhwmRQTlWJEUgqOPPoiPLxK%2bD3OOuo%2bg2c%2bPnHTeJ4NSqrVYXXxi/kRemSEJke7rKaxzBJA85hN8POBduYl2%2b704ppMldZuHilklxTy%2b9/92v85NADePqJQ3jqZ4fw5E8P4smfPYonmMr3U8TLt8BTAlLv8YP4xZ2teOaOPXj27v149sA%2bPHPgNjxz5148xfwrL7%2bA93/7Jt5/7128%2bdoR/ObXr%2bI377yOd95%2bFS%2b/%2bBzefutVvPPmy3jnrVfw3u/epr3%2bNOu8ht%2b9%2b4YqE3v/rTdeYttf4d1fv46333wFb73%2bIp75%2beN44vGDm/PZhJ82gZr7o/j5Tx7B0wRVn/DE4/x%2b4jE1nyMvHcZ7R57GmRceRMvh53%2bJfa234k7a7bfftht337WP%2bVYc4GI03C4cENwdrdi/b5ey3W/btxP7aKdr0HoB2Gbv/t2490d34bGDD%2bDgIw/gngP78dijD%2bLHhEMHH6Ttfjcefug%2bPEr7/1HWOUT8XWwn3z9%2b7CG2If7h%2b1TdHx96EI8deki1l/7ukvFatfFv23t5kAjwnZynwL6muvu5lh/dcwfuOnA7HrlzN17ffy1awlQM2miLi6d32mNH26kTytcv/jpxUwUpg9toj0ukWFxkynCSayHeIbmjFDPNkFZ3k8aQ3EXeTbmnzW4puRYCEvtLx8NaICWuxSIT6k6H1L2Ob3NnSX8pGUPnAzqPSES28AlVLjjq%2b/PkPyqv42ON8STldyQubnHeA59rshEyitBcdKtUGEWMk8mwos9hUb63ermAZdrVNcph4ewSY5PvpXpJS2tkkIKr5LBUyfO7rPA6SNRXUmknwcy5qMZ/xEoTji7eJAlYLrKtivrSjtfbLtVKm6mOl7zUr5dzWCBIm2WZC8uX2O%2bywGIVy4220k7ayPgCtWIGLQUaP5NzGQTnIuoEyMKDZBR%2bWmjin0/n8hiYnsdcOAS/2wYXzeOlchbnPVGM%2bKMIuq20IO0koo1iz4ulagFdrijMU3MITznhpcYm0VzpWzzEYooW0jG8ezqGw5%2bn0Es1t5fW3Nn2Nvg8bsRjMfhDJA7n4SEDE7eatA9Ne%2bGh5ifzkgCuk6a25EtkZuFIAjOzUdbxqPpuzmeGTM87aoCTbRTOblFOWHHSLnKOEiEWaEmn0%2biyh%2bCeDsJlHaMNb1GODOHS8l5gOhLHgDuszEgJi0l0tUwVs9c5C4OH7dhGuLGNXFgWWM6lMOqfgzMQRtBr3%2bTODpqrk2bq%2b5x4iprZv3SE8YeuKIZoAfb1dKG3i6KKltxceBZTwTBmSEyRDg6OJ6nXZYfdMq76k2878S4uUvwZs7NzCARnEaDYVXPkGBaayc7hfkzQxB4Z6lNt5WGEeKBLTUHgFpHt2aQW%2bGyODssRz6vYXRzVbGITJ8dVC5DGlDYmOA2vlUk/lUwcJZ6eYsPTrLdTA4vIVUHUkCKEaGN68FLup6RyQrTobnpLhHe7MqSiwyktuJufj12ow%2bNd4uaVxO6XfFNUWerImOlGALglK7a/igs0orIN706KkxFmpnzuZH7iS9OZmGJGZC6ieKhHDw3GFm347JOK2YQVTpiYtJfF6e4pLdx9IQaoeZMlvH3Bqyzz2XRvXQGaPdGbrjDxZFNZy/PaqKhzs6usqU2DACkV6q42GJsO4ik2ULUcU48N%2bjDBoyXRXjnOosCYhvuUCiq4MWqBoqT093TiXEebum/dne0wDg9gZKBH%2bQqNPI6iWcoVyV9Cpy/kxH2V%2beqRIYlyya4H/CiRAJLfHvnaEhnKZ9LcpaDylIapTopKKbsmKrIwvuicFvGVdDYURJx6v6jHEv0VjVF87JIP0y5I0LCK8A4nmUo91Y7l4m2WshitsyzHq5ZLKDfijQLZDK9InHcz5VfxRSHCV4r9CQEovkviZBXL8UqxwUIuSzFnVXEBk2EAE6NkIpYxEmMa49QNJLobmg0ztcBoNJKpUMV02DE2SmZkscDhdGKSZWPjE0qXMFsm1fMVM9VkaeNwOKiKTsJut8FsttBCnNesySYTOleooeL9CJWZDhKDpm1264uQv/UEKAL4hQAuld9%2bAraFx7VHCerdTE57NyNMQyK2EtWViK5EeMU6lEix4AUntoJyiHIHBa/bEFKeiGlvCcrFnDKgZFfndXOVXDsSTyCV5B0kM5V3B6KLZDNZ1b45Qv13RX11AnDxJYpJnQBXeB/QsNWbChQnp7nolJ2mUTLQ1weDwaAmLYvrPNOOifExda/7%2bnpV5LinuxvDhmGWR%2bFxOfDZ/36KTvIDm82K/vNd6OruURHlJLWvs644ugZH0HuuAybTKOW2i6fGoIj0dfAA5Sih/lGSeAPzV%2bQBsju6FGjmlMqEJacXtVQkgbiSxYGqRBi5vDxfE44vYSbREmNK9Q0p8SJSQiK3EoCQdhIjEEkgfYkqHSMPmQlMqX7lJYpIF4koS9uvHPsXDi8ngFZoyWah%2bZ7bssHNsHkCJKO/yNJje7r%2b3Px0ptlOV89qGrL04jqRzchyc5leLvZCVrW70Fb3GQjxdJv/7wISNCUijopShgqT5EWkX1xXsysUE3RSm%2bun5tR15jQ6206q57Fi%2b2/nxvn05Z%2buaLI1%2ba298Lj8CWjwAKq8JWqfhcucgM3QmDC4gNdBmd%2bvXnqJ88FGtVF7V6fJbP0NoRg6RaWFpVWoSa6N0hazKfWqVNch9Fcm/z8E4LgSaqMuIlGkAg2r4mUIoPGAdEpbCMHjtMNNkBchHqcDIYpC4dBrqytIM/X7vDQv44hEIioStFCv8hhFFT%2bw0HS2UezZqO/PBKbVSzHtPeH8t/bsbRPEOyzOWBpUxcaGXPRcRg%2bPCxMUtTVMRUh8APLOT4yhcZMRXhJBQshry4tqoW6HTb0jDgUDKBfyWKBoTFDR8dNQ6euhFBjoQ393Jy1Al6ovdz3fUE8zcs%2b/BtgeDb5sXSkTZq6/WGmKGAsuq78UzdEWyMgxF2OmUlSvNuNkTvNyxMUgEo%2buHKlKAYtLdVTFH0Co0K4WfFZeidCWl3LxzwsHjnLhUTIZ6SchUoPyPivXRl6aXAb0VyjSn8LlL10vxslHuQkxjhGX9z7yOi1/6f5kLblGGhYpldDmInPMKqNMpIB4eiXawqO/yKMf7DmLvg8/wNjnn6FGub3gcaFIcZKgdlfhCahxt6tODaS87naqVPCLtPXTtAlGPvkzHKdPwHLsC5z/4I8w/PcnyFJXWCBjqrrsjfoXQ5WiS/qts570W3c3%2btdTtp2U/y2wXxtTV0e7mrM2D8dFbSoS2meaJ08b%2bPg/CR/BTR1m0etGmfqJOHtasuLlpdFTD4dRj8VQi0ZR4x1fiMf5HVffkl9OpbDQKBf8YiKh8LVoDEvMa/iYqrdC2JLOz6t0OZVspNtBw0ufVdoL0meVc5Bx6szLODK2%2bma6KONGotorlcY8BK%2b1kTSqzTeuzXPLHJJJLGWzWKRanwtOaSegTHmZr9VRXFpCrr6ALPMSZa2tb6CwsIjyyirW1fe6Kqusrql8YVGrX11bQ07wa%2btfKZoslkF5eRmZah3pcplpTY0nfcs4SQlyMi1xnoWlZVWe5/yKzAs%2bXamyPtswv8y%2b1hp9bv/JLBf8NLxo%2bKkTUCUB4PFgzedTcT0V22MFAT2/5vVixe0GpqYUbs3r21K27vM38N7Ndn8LXOjHp8bYaOpL72%2bVc9S/L8yDbRq4ZlBlrL9%2biflI3HKNqn2W2qrmD%2bApQL2ODVLvStBcB18C/1Vh%2b5wuNccrzRtX6He5UlZM8P8AKhHcApqCHFoAAAAASUVORK5CYII=' /%3e%3c/svg%3e)
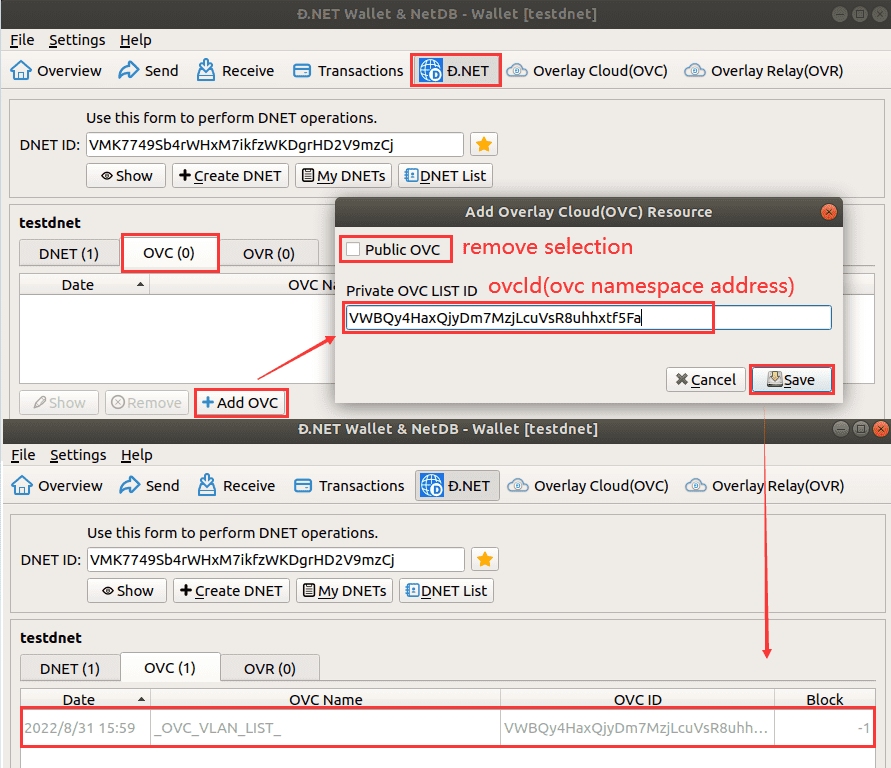
For private OVC creation, please refer to the next section for instructions.
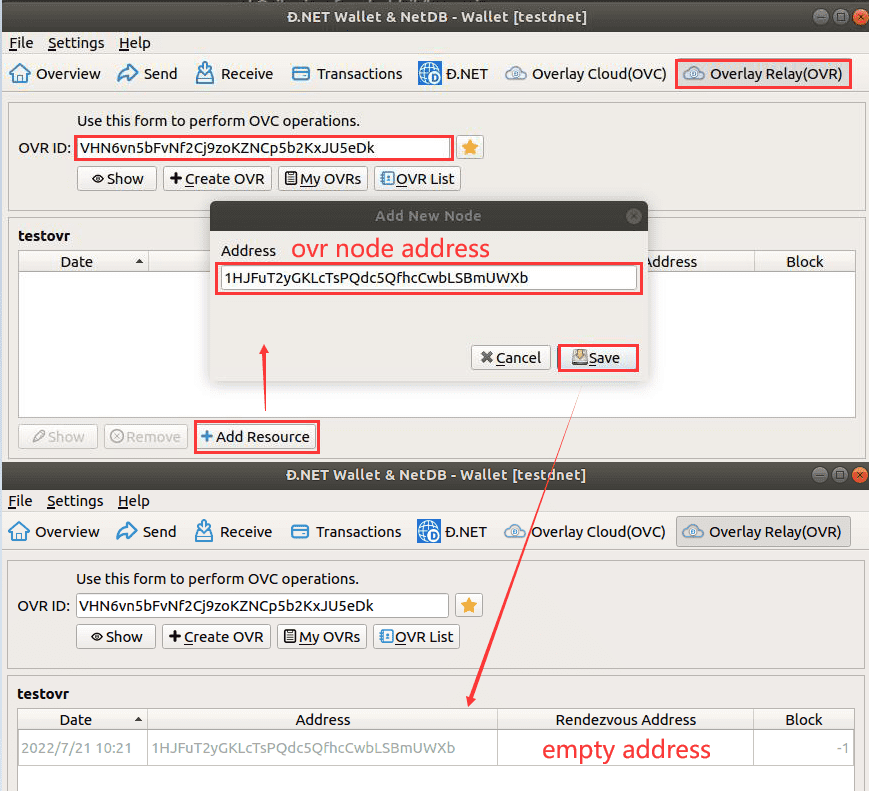
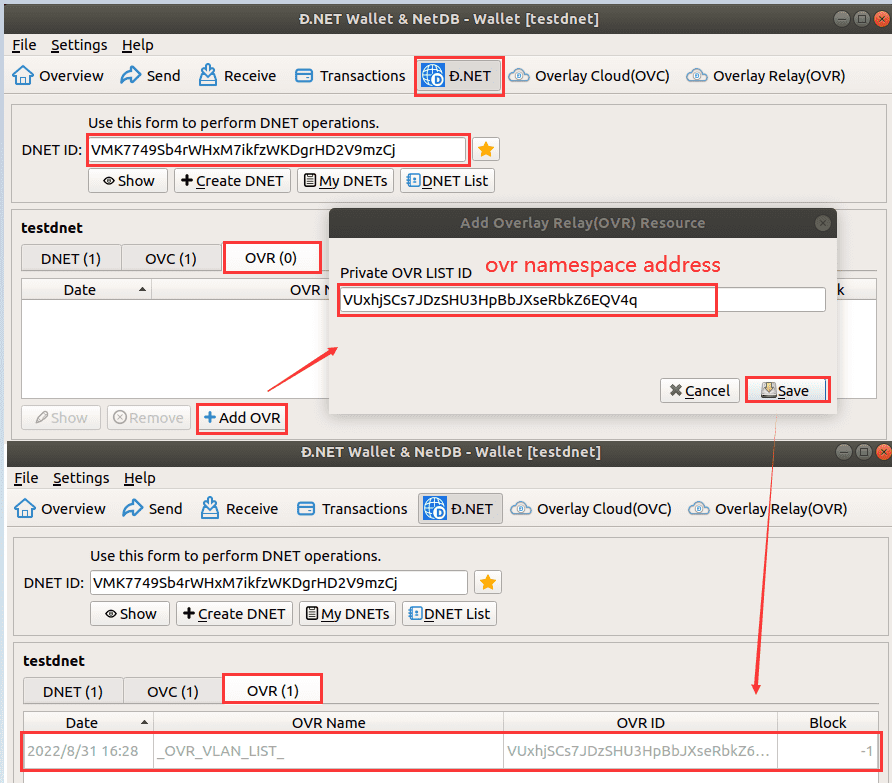
Add ovr namespace to dnet
In most cases, dnetvlan nodes under ovc control can communicate directly with each other.
However, in rare cases, some dnetvlan nodes cannot establish direct connections with peers. In this case, data needs to be forwarded through the proxy node. Agent nodes are called "ovr nodes".
dnetOVR is a namespace that stores multiple ovr resources (OVR nodes). dnetOVC is not only responsible for client node communication, but also for managing and distributing ovr. Therefore, dnet needs to introduce a private OVR to solve the problem that client nodes cannot be directly connected.
Use CLI:
# "dnet_id" : dnet id
# "ovr_id"  : ovr id
dnetcoin-cli -testdnet [-datadir=YOUR_CUSTOM_DIR] dnet_add_ovr $dnet_id $ovr_id
Use dnetcoin-qt:
' width='892' height='783' xlink:href='data:image/png%3bbase64%2ciVBORw0KGgoAAAANSUhEUgAAAEAAAAA4CAYAAABNGP5yAAAACXBIWXMAAAsSAAALEgHS3X78AAAZOklEQVRo3r1a95dcxZWef2Z/2LPhrINsggCbJCGwAQEmJ4PD2fVP%2b8PuOQ4LQhIGRAYBDtjgBZMkAZImx57QPd3TPR1npme6p3MOr9OEnqRvv1vvvZmeUfJKhj7nO1V1K99XdUPdbjv6uz/jl7/%2bFZ46cAD/8/TTF8RTBy4OaXfg4EEcevZZHDz8rEqfOXSI%2bcMqfYZ1Bw6yzLzUCWRuqRccaG2r2hxW4wnNXOPfso5zrUv6y3wHDh3G4UMH8fKhA2j791/8Alfs%2bmdcd80u7L7qm7h297cVrrn6W7iG5U0ay7uvZPnKb5wX0v6KXf%2bKO27fi5//5BH85McPYv8d%2b/DE4w/gZ08%2bhEcevhf33nUb7rt3P376%2bP348aP34adPPIRbbroWjzP/sycfxiMP3o0H7tuPRx%2b6G489/CM89sh9xL14/OF7cP33rsBVV/ybWtOF1nE2vomrr/gGrtu9C3fduQ%2b33HYzHt17Fd6%2b6R/Q9uFfP8bBA7/Gqy8fwdHXX8aR558lDrP8At587SW8%2bfpLivbyi8/hrTdfvSjelvSNV3CUUCnH1OteacGrePPtN/DGW6/j6Nuv46133mCqQ%2breOfoa3nnrNdVfQWhsK3Sz/yXDHI/jvPvGi2iLRBOw9LZjdjqAXCqKjlNfwOUYx/BADyZdTmRTMXSf/hy2UQuq5QLWlxtYWaxhY7musLpUV2UzFayTvm7UrS5u0VUbQaMCFJJAMYmNfArruRTTtEpX69rWmIv1beOa%2bbWlhj72OdDabiettbzCsZvMtyWSaaRzWWilArRCGrVyHo1KEXWtoPK1cg6xVBrlYg41LU8m5LFQyWM%2bmUGEfevlLOpsL22ljyCdzSKby3C8jKozx6sWs2hw8nrAg843j%2bGv71swdfI0ol3tmGk/hfnPPoHmtKNcLaNaynI%2brqGU2xy/wryMVSazqszL%2bELXJM/1CU3NY7SrcL6qsS7JS/uyrEnG1YSeR1s4nkG7LwFbYA6O0QFYhgYwPjqEXi4qFppBJFPAR44o/FMBDPZ2YnCgFwtaDu2eOE67I7AP98JC2shQH0aHh7BUK%2bO4M4ohfwQBlw2D/b0Ys/RjxDKIob4uWMfHUHKN4zfvzuK/etfwaWc/PvniOD7r7oDHakXUMgLXbBJ%2bt5OnsBtWSx96eroxOWFT41gG%2b9DX3c6xumEbG0Yxm0QwHId3Jgofx%2b3r7oSlv4drGVBr6uE%2butpPMt%2bP3o5TGLeNoskTKAxaqJbQFo0lEYolkEwmkEtGkUlEkU3GkI7PI5%2bOI51OIpZIoJCJIxWbV/Qyj%2bpUOIbp%2bRivTYz0MPtFkCZKrEulksiwX17q2D4ZDSukpT/rSy47hv9wAqPtY5jp6MBcZztCfT2If3EChbERZAtZriWmxpPxpa8aPx7ZXENW1koUyIB8JolcOqHaShupS0ZDpMVV2/j8nOov9UKTE2SiLUoZUMklyMmE4qYJjZU1OUK8FvUij3Oex62UVzSpqzNd4PWQY13nkavyaFWNOi2XVDRpq46w9GNaMsYucJG1aTcqU26Up7woCaZ9KAa8KHKhxVxy21qEqXo%2bpfJbZY6VSSjsXP/OPq110j4vIDMoBOPq7pdauFLhhsPhaYy7JuDiURRMephOOuDxe%2bDnQgNcsJ33dcI5DrdvknBjjMdrlNfHP%2b1Xbd1eFxwcw%2bG0wcd7nxcGVYvQaiWUG1WiAs0E76NCUb/bXzVEJhR4ctoikbgSBnJ35U7I3VhiGuc9833yEUInv8D08c8QpnYInvgUc6e%2bxNyXJ%2bD/9GMEKLRCvL/Tx48hfPokgszPEWneQef/voepY5/C99mnTD9RKI8Ooy4yYGQI5RZUxiwoZXhCihRchbRa3NcBOQ1t8XgKkRkvujraKWQGYLeNwDligTbYD7fbDa9jAuGZGUy5J2Eftap02uengJvAlNcHr8sNn9MJp1Xq3HCN2ymMXAgwL%2bmMz6vyMz4f3HY77yLV39oaVdkS1hcXsbGxDs3hwbLjKBaSXSgWylxc%2bms5AYoBMQrBbDwEn8eFcHAKEUr%2b%2bYAP5c7TiIyOImkdQ5EbSI/bMNffj9DgANLcSNI6ihjrU%2bPjSNqsSIwxbxtD2GLBDKV2xDLMOpvqn7TZkKFtERm2qL4bkTDWiPVoBGtJnsDhUdQC3SglXVRTBXUFvzYGiAwQXS/H39TjUq7HKE09bszx2E4PDSLCjdZCc6jNzcDT08WyDVGHHbMjw4jZbZga6IdvYBDFKT%2bSTgdG5FqQSVGHg/0H2IdMYfvylA/jVi/sfUPw9nTC39eLeTJnaiaEbDav5FG58LUyIEHpndk2qag5TStibj5EQcajzw3ZuPhkJk1BloONG7ZPODBBS9FqFwHnhW3cijFuNp1NI0S100v930f7wMWj76GQtLI%2bGJ5Dgf2diRIG7U7YHTYK0wBm54Jwc6wCJbZpNDWMjyHlhlFuGEbVZrkF9YvAbHOWDIjGdB0vKsFUKYKMoWsLpBdFzRg00aeSz6k6oSdVX6VipI3oW6ljXuyDGb8bQWqOWaq6aWqFALXJtNuh8kFqBqkX2pTPBZ97An7mTQjd30pz7yjvaDvFj3VO8ANIG5lL9iT2gJj4kioZUEjHlPEjRkbK2HiRp0BUoql3S0bZpG2ra8kLXZghV%2br0l8dxww3X4bZb92DfLTfh1n03G9ijUkW75Wbctf%2bHuPuuO4jbsf/OH26W77zjNvzo7jtZ1un3MC/lu1kW3EWaak/ccfttaqytObawj/Tbf7iPXuhdcFILyUkw7YG2JG1638Qo3nvvz/jkw/fxlz/9HsepujJJXTZcUJWIDS7Ib5fawoilhoZPPv4A3/zGv%2bDaa67E7qu/ex5cgT0334C9e27Enhu/j73MSyqLVuneG3EL627de5Oqk/yem69X%2bb1Guuem63ETGb37qu%2bo8VrHv2b3Fbj6qu/ixhuuVQwX83iRKl/WuXkFSrS80omoMgwEchok1U3MuDIzVR3vqHlF8sznInNYpLpsOifQnLBjWUCBtkwVuUxVGhoehJP2ucs%2bBqcBl8OKScJMxcafGB/V4dINqwmhsZ%2bTxpRDyqQ7pY40qXdutjHaG/VifLmMsVuh5uPcMkdkbnrTMSroatC486k4Ok9%2bjmPHjsE6OoIhSvVpqsNcWjaeVi6yuMp2qrxBUYdhSm06SGeCM6g0FzHCPnbq/QluPlEqA/Qu83ShF8V9pqW3tqy7sEt0d5dqGpZJk7wyvJhfZtqkhmmGZ7FMU7nJhTZnAjqN6lmlQiOWeVWXeVVXJiewQvXdpIyR%2buVISI2l5tiBZUKupfgGykvkydXtgHhSd3Q46fzsFMKzMxQQccQ5mDgR4pCIg5SgQzI/O40YaSEuKC5OCSddHOCRcjlQobqsWUeg8csvu11YpQos8It4/ZPop9rs7TyFYapDK09FX/dpjFF9Wvo6lHc2TAMsR%2belSgtSo4dXplld6e1ChR5fheUqLc8qmV%2bhdSrQOE%2bF4ygaj3SFXmaFdkuFY5XkChq%2bwDb5ZaQJnloRfuZJVlegzCtQocOySC4lI0FYaZ5O8ljLA4j45KIiRWrWDRWl/HPxuwV0kqq8HnUO3pBjxY1MiPvLDTip5jTq%2bkxXJ6I0qRPtp5Ghu5rr7UaatGT7KRTIwHRXBypkXJ2qskpjqkbUqV5rLFekTMFVY72UVR1RpddYMVPpx/oqmV7mPsr0JndC9icaysOPVaOK13gKDC2QUJypamXUqho3moDfS4fH74dWLimaVi7yzmdUm2qlvJUKWF%2btVlRaq1VRLOYRosE0MxvErM%2bDLL%2b%2bJxjExKQLQ2NWeAIBzITmebfpaHEOq92BSa8bDrcHfZYR9PTRoJoWR8wFy%2bgYBixDGKV5PURLc4zpxOQkJmmKbwA4sxNeL86cOQfdgMiwIO0O2VOFe5KPSnc4rr7oV/GrkVFyNIvDQ8jz%2bKd6e1Dkhkr8WgWWC8wXFQYVMjSepJ3QchSueZrd0i4/ZNb3sc8gcjw1dfs4GiYonxqUTQ3OU5XXJH7hqlbagSLVdQYLjbpa28b6un4C5D1AjrPiEtkn2NjYUDDLl4K11VWUOHFF3hU4UY3apM47J2mVqBmotqSqPmPUtebTLTQjrdBW0YitNAJNLFilitNnoSIWrrj6mqYYsLa2ajAgllB3Ai0M%2bH//WvqpVJjIvJZKqsVpZLBm2gxfITbtE7H1z4FyLs1re04GFC6ZAWd2bN7svR7nF/3oI1SotoQB51vU5WKnEaYgDBHhrVEgqpQfQB5TRf3tZEAsdvYVuCTIlZExmk1sUNCtUyCVC/Tu5DVXFvUVPGjIZhdMzWQ4PLIXuRY1quoFOl%2bL87NYIOrBADSq9goF9lknoK79fYTgmcVFnInFgEZDMUOjENTyKbX5r8KlFfUW8PsQpjcZnptFiJonTsOtYbUi77TCbzmB8IgVMZsN5Vnq/55e1EvF7UJQDCFZoEjHxQWioWOhXiOtptNa6GZdk9bhOidby2WxRhW5Sld5PUILLZ/DYnOJmoUqlfVicX0VkEdWYYCT5reVFuc4bYJxqsq5SBgNpvLK3PfhH9Hz3vsY%2bew44i4PMp1dKNCoW1hooFGr6I%2bicgIUN2m6ZmgDFAs5WlN5pftFb6YS9BQzKUUrSR1tA43GTqa7D0GbCyHq%2bWB3F6JUWYHODhROfklpm1KDi9WlP2fPXwAXqz8POK48fYvnanqwKk96inInQxM5Q/uiOO1HacaPLN3vDNME%2b4jbLtaiYkAqlVF2eY1GTaVUUDpTjISFehULtNlL5LJG40bpUtLlDi3TUyw73ZiOpuCm9eV22BH0eeEaH0eVeltCT2KTy73UHSzznSHZUt56nt5OT7Q8dSe3pbpDZiBjPnHveB6XMtVhgetWMQPm8xSUBTGR5aRXSmq/ArEN2tweH/q6vsRATzsGejv0lOjvOb1Fa6GrfBft%2bt8fxejbr2HsD29jlPmR3x3F2O/ehOXdd%2bhIdcPS34XhwR6MWvpgYVnyQlP51vqhXgwJXcoDPXqd0Wawr1O1UanRZ4j5oX4DfReGhT6HxD1baWodavwujPd3oO0Pf3oPu771T/j%2bdeJHS2j8O/Tfid27cM3VuwzaLkW7hnkpq/S6KxWuZj/BbsH3rsSVbPuD227GE088gp898TDu3n8rHn3kfjz55CMq3H3vj%2b7A/cRPn3wUjz36AH5O%2br691%2bPBB%2b7BE48/pMLld%2b//AR5/7EH2uw8/fvR%2b9rsPT3KsGzj%2b1RKil/mv%2btZF8G3ceNW3N/OSyrrv2n8bbv3BHtyz7/v4495/RNvA4DB%2b%2bd//iUPPPIUjzx9i%2bhs88/SvcPjg03j%2b2Wdw5LmDzD9F2q/xAvMvPn9YtRP6kd8e1NMdePGFZ/HSkd/i5Rd/y/xhvGzkXyFU/ojUP4cXmZd2MuZLpJntBK%2b98gLbP2f0e06Vpc2R5w7p818EL7Lda4eeVqH%2bbXSuR9b3MtO3n3sKbbl8CWODXfC5J5Wp2HXqBCaUizoIGz2thpZDb9dpopNOUxobK4sqtCzh7zPNhsrvDFGr8HhLWPts0B5fIdbq2OAY8lZgYjOEvVDd1qfJsh5qP3dYfG1pKxy/KuFzaS/hdiOcf1YYnVhmu7ZCUUNGpHxRDxebIejNcDRp6XSK2iG7aXQoWjaLcCKNxWpxm5ssY%2bTydDWpHtWLbbWkHiLMZ3c9zWHMPY/PR6MITIeQomSWd4ZoKKi/Tpf0kHajWtx6GTbmkP4qFN8Swq%2bW9JCa2U5C3zL3QixM4V7c/uSv5Y2wP8cg2nLFCoamkxgPxjExNkQB1gunbRiD/T2YCXiRL5XwiTMO51QQw72dGB0ZRJ7qZnQ2jePOCOwjAxge6qdw6aPAG1DviH2BBDq8cfgkCkzBJnp6SNLhAbahVxebxasdKfzHXzW8%2b3Envvz0A3zwwYdKjyeTSTh88whO%2bdi3F2MjQyosL09nw/QQ7WOD6Dj1pXrbG6L3KC5tjB9icioCL339kUGZp5/r53qOf4q%2bng5Y%2brrUo4xlsJeCvJMarkKmGOHxfKGMqfkYQrE4sol5pSczSseGlb6VMHcoGldvg6LXk%2bSq6NFghBsMRbfC37Gw0suigiSkLiFysbTkVSlOUzRGyDO5vCwV0lEMTITRZY/A7fFjWj1dexCamVLvkWKPZI2wuOj7aGhG5VX/yJwaU%2baVV2wV5eUJlj7yciVryHCMyLQP6ckJZRfIS5e8cKl9cYzWQLCSAVo2boSut0LJ%2br8v9DCV/CFCbG/96OjBhVqJV0L%2bMSJWWdlI5QqZ4XODro5eWT9%2b5lO66OdKji5wLqYeZNWz1bZQ9/YQ987n%2bVaY9sO2PnKNwrxONIiKXI/Z36xvtTUUAyS2Xs5nWsLjWST4xeQldYoWlG10BD5y0zPpUP/C0IMNbjjt8upqY50DAc8E7NYR9ZwW8OhBDrdTXoStKvWyv/yhYeuvKvpT1ZZtn1aRYa1wmX6DeIfiENEZqpAJ4oydy2OUdQgz2rJyAjix/lpbVl9qSb0NznHhdoSDft4/O2Z5J%2bVeSnRF8voGHZibCSiGSOTHJ5Ebmp9yDCUA4ScjPNy8ohP5dEKN3xpk0UGHqVRGuVzRGXE5XqJskIKvynVVeXU2XfEdXmTFOBlthVKFXzuorCwRHF6njcJoWPkAXo8bHrq18%2bEwAnRxJyf5ZVmeYt4XmML09JRq46dHpur8AXjcLtVHns2dE04EgzPs64ef7d1sE08ksLq%2bgSbd5hVidaVJ83oR1XAnGnMfURtpxkm4xKCnyQDKgOrsNPM6A859AsiAPCcU4ScxNy8XHwvP8Et7lScXmp1BZH4eBaq1FO1/cTeD3HQyEVcPn%2bKCRuZDiMciRBQxYi44TcYESA8jxPpEPIYE6dFoFJEQy%2by7sdrE%2bsoy1umTrzNfqzWgxawozw/Q97i88PgmA3hSqy2PMedlgBKCPIISLloUHWvoXdGtOYn0ckOzlM5RbqhMX7rCOxXweynVQ9xcFGHZFFNpE6AkTyUpkDiwxAAiYep2thOmSb0wRI7/ZCgBp38GHhevBp2oOCV8mJoolS6oSLXIgcu6AvJcz%2btbocQ3H2TOdQVKSgtQDZYMqV82hIVKaVjM8ys77XIl9EiRfGXZ3NjosNLnNnqCQp%2bcdMJBf3yAPngkQleVaujz48fQ292BkeEh2Fkn0SbXhEOpOftcCt0j47QuO3gtnJilyzo2YlHMqhn//7scBogBV7MOo5JJqnzlPOMpISgMKJjh7RaIDldh7xb1YYaVhUH5tK5GTLViqtCcEXZuVTfmGJLPpeIqGi1/oSvlU1s0I8y%2b0yW%2bJMgHpSFX%2bBvGowwoI5fU/0Onh8EiW5vf4Y%2b3/s1sk1mZxA7mpQwkL4rCWX3/TiDDJbRWvMj4igFlrYa5KTfe/%2bM7%2bOAv7%2bEv7/0JH7z/Z2Wxia28/dhkzh8eN1Ew0qL%2bOlu5nON8GajzBFxsbqUG5QRIcFSepnJp/SjKSTBfXeSo543w%2bNZR1l9aChKNpQxoUnusUKCt8D43XROq3JRYHe0FFRPIp7%2bW//6ZT%2bLqVZjyRyvlLvgfISUD9CsQpT2dpoMxgJMnjtEVHlZSPDjlV3a2IEjHqLO9HePWMVi46TAFVmkuCBoFqC8twEHB6HSMU0PQ7qZDgzzN5olxlKslxYC/93P4eQWlaAAaYnWJLBt/mK7seJU2w%2bO6IUQ7QGRAMqZ7YGKxRam%2bInRNBepvMzH9/7Yz6r8%2bdF5oBkfl/7esX6An2OBGS8ODKPOrSxywTvN4nRBrzNTDStglY5tC8lJRbNFYpWzqPO3im/8dNiF/9TX/AKZknDGW8gYLEh3ml1pcqNISy8BFHerjJssSHq%2bWFSezEgKnrdCQPzUQQpc%2b1UpJOUh1pg3lq%2beU3zBOU9jF1EdfwiMvtOwv/aS96rcDNaKiFfUvKG3EFqmUNiFraHD%2b2Rk/rPQ5JrjGAE%2blvobijj5F1KSPMF/eDdjPSrUoawnwI5t7KigZUOam6fQ03ZNYpclap90f4DXwH/sMDd7rVZq5TRo4ms2KRZqyKzRcpNz0epgn/EbZyC9SDsx3dmD29CnMd5xG4Lg%2bVp52gPRd4jzLnnPBrcZfYl7G2YQxn6RrAR%2byvJqzp04i2t2FZF%2bvWp/UCVZb%2bsn6FriWRZFH9E%2bmPz%2bh9jV3%2bjSarF/idS3yA%2bkMoMqopjOoFsgtYrlSxUp9Ac1qFfUiuZov4szyMlYbddRYXzPaNOjAVHN5tqthgXmho7kCrK8DGxs6zFjj6irrmhfACs4sLWFR0zhnSY1bpRyRvNAkXyFtUatgmfMtMTXb1Yx1lzNZ1Uaw2lhQf8WVdas1GUFbtba1NSwlUyr03lYQBlBg1Es8wnVuUJM/D9AsbjTQ5AALtRrqnHCVi1xk/UKtzjI3T7rU1Spmvs60rtptcIINbngbSDtzIXBh66srWGo01HhV2TQh%2baWFBTVnrcJNcz7JV7nGMhlglqWuSqbUBMyvLPGDcfPrnFvGbl2LxDKXyNAC5VZbXquiLELL48G63491n09hTY4cvTpV5jFbZb1gs76lbjPv22p3KVjhNVj1etSYmzDW0lo2592Q9fq3yutm2ViTjLdyrrnYfsXhQIkC//8ApZvRaaTpmhYAAAAASUVORK5CYII=' /%3e%3c/svg%3e)
How to create a private dnetOVC namespace is described in the following section.
8.Private dnetOVC
Prerequisite: dnetcoin wallet needs to have balance
dnetOVC is used to control the information communication of each node in the virtual network. This component is essential if you want to build a private virtual network. When adding the OVC namespace ID to the virtual group, you can use the public OVC or build your private OVC. Refer to the public OVC see public dnetOVC
Create private dnetOVC Namespace
Use CLI:
(Returns the namespace address of OVC, ie: OVC Id)
# "ovc_alias" OVC namespace aliases
dnetcoin-cli -testdnet [-datadir=YOUR_CUSTOM_DIR] ovc_create $ovc_alias
dnetcoin-qt:
' width='889' height='706' xlink:href='data:image/png%3bbase64%2ciVBORw0KGgoAAAANSUhEUgAAAEAAAAAzCAYAAAAn3w6xAAAACXBIWXMAAAsSAAALEgHS3X78AAAVjElEQVRo3s1a93eb13nm39Lfe5o0sS3XiR1LiiWvVnasLcu2MuykaU/PaZvf218Su5keja3Ilq04sSyJosS9QJAgCGIQBEgAJLhA7L0XKYnk0%2be9Hz4IpEYkOfYpznlw37vHd%2b877nvbdj3yDbTikYe3hzr9iKK/%2bRchZffsfgL7ntqLp/ftwe4nH8dTT%2b3B/n17sZfpu3c/jr17nlDxp767G/uZ9%2b1vParofaT3PbUbT7KOpO/d8x3sY/p39z6p8h7d9c3GmL75APgG6z%2bEp/fvYXvfUdi/bzfajh87hJePH8EJhieOH8bJl48yfhivMJS45Av98okjOHb04F/GkZfwysljOPXqy3jtleM4yXqKfvWEir96UnCMcck/wbwT7PtwM/815r1y4ihOMU/o104eVzjFvONs%2b9jh792KIwfvaWzHie%2b/po1LcOq1E2jzzzpxpf0Clhbm4HJY0NX%2bOYYG%2b9HdeQVzHjeW59zouNyOoYE%2bZJJRZBIRIooc6SyRjkdUWjqhhVpaGClBLKTRDHVIXMrmkmHkU9vLpKX9fBrZfAqZXPImslqYZV5O5aebdK6YQSYVa4zrVqR30KqfBi39tsWCy1ic96JayCCyuqRQyCQRCiwiy4bjwUUuhEtVvFYrYa1SUGUL2RTKDCVtvVpUYZ15FQ5qrZRBnVhjup63XtNoQYX14okUovE06zBfyqxVUImsImsYRMY0guz4KPITpgbGkRsf02izCQXGJcwRWcMQaukYauUcx5Zv9rF%2bh74FZY5Rxl4upNEWTWVgDaSxtLzEHTCJea8bPvcUZt3TKGbiWI5nMOxPcpE8cNot8LidagEuOoOwzi3DbTOzrBMO6wSW/V4UCzl0u4NwLobgcVoxM22H22mH02ZR7XtnnMilk/jvzix%2bdiGNCYuNbZhgcdiQZ1lP7yBGTFMwD/ahjzuv/8pl9HdcgrG3Bz2XLsHQ2YFLn/4R/e0X0XX1CgJEyDOH%2bWAc87PTmJmywsVxTjun4CZtmxjDDMdhs4zDYZvgOM1q0WulLJFD22okCoMniJVAAF6XA76Zafi5CC4OOhUNwhuIwLUcwcqCV01mZcHHrRqH0ctJ%2ble4WA61Q2amHVjiIuW5M6Y4%2beVwFAG/R0141jWlyswL2HY6EcM5UxqfTyQxOzOL%2bZkp%2bHgEiyzrv9oFm8EEF4%2bciZO0cIKGz/4EW3cXJrgYZqYZL3wO69UOmJm2eukiYr45rLA/GZuXH0/G7%2bSC%2bmZd8HBOU5Nm9eH8vhnmO1HiDijxSJVyKbRlEmFk40FkeB7y6Thy3Pb5dEIVkPNcSAkiPBYJVUHy5OwUkkzj1isyrZjVGpMyel4uqdWRPIG0m0tp7ctxyieCyAn0dPad4vHLOqzI8YvluKCyIAUOuMiPkmdcaC2uhQUubGbKhnQkADUPjvfmHG7ORad1JPlhE0QyGpIFiCjmJhnZRpiKriK0uoxwYAnBlQWEObDwyiL5gsYjEjyrEeavLvlZZlHlB5cXEGKZeDiACPlKlAhJXdaJh1e3DUKj480FafbNBcvpzE3ARW1iZ1ylNdJ3TFC119KuPq/W/gWSrhZAvpAwJvmKtWIWgfkZ9PZ0w2QcxphhAOYxA8aGemE2jWJy3KjiQ33dGB3ux9jwACbJlEyGfkyYjLCaR9HDczo61I%2bBnk6MDPXx/Jkbk47eMlCBtlMSDOPcVQ%2bATOKBIH23ySpEVhfJwHz8in6sEvlMCvVaBfVq5TZhFZVKCTXG19ZqKq5Q18JquaTQWqdWKaNSKt6KMjlyqUCeQmkT405MaZPRv9CXCelH7QCJeMjcjPyawqXlK2fI5La2trCxsYHNzQ1s3LihaMHW%2bjo2iY21OjbqxNoaNhuQcvKTujda6mjtbAJsa2tTozdb2o5Hgpj3eRELB9VuvJ9JtNL3im0LIEdAIiIbdYYl5ydLUSVfJhmPqh2RzWWQpyxOjBiQsUygYLMib51EbtKCzIQZ6TEj8sTKsvCKZZ7nFFJUmJJUlFKJODl/FEFKnGgsptJTlAQiTWSxdQVFxnKTed0Z%2bjn%2bqy1AK2MQuphLcyJLmKAyYho1wjA8hGWKyRp3h5Ea4mhfDyaNRoyQT0wx3y5gfMNhx/joCDqoWQ4ODlI/cME0NgY3Q9EYLStZ9IzbVZvzc3OUy5Pw8cuXC1nqFlnFh5SScheIoqUUsS94VLYtwM4VlAxRZUVUxMjVo%2bT4cRGT1A3KZHgpTjJDdTljNCBNBcP52acY/u0vYTzzPjqvXsLli5%2bh/eKf0XnlosLVyxfQ29WBq1faceH8p7j4%2bafouHQelxi2s2xfdwdxWYWD/V0YugOGid6%2bLgwOD0I02AdlftuYoNLNCaUrxyNN3V7X63URkpU0kfOyQJQW2dAKctS8RHX9zx9/H3uf3YPn/2kfnmf4j8/tVRBajz%2bz/0kaQUfwxg9P4l/%2b%2bQd49RXSr7%2bKn77xKg2tg4p%2b/Ycva2WffhLPPrMbzz59E88x/t39u/HvB57Arw49ge7eLtoSMejj18d%2br8jotoBmiISbxsFdIYaEjkb5gHkMP/vRKbz4wnM4evAADh96AYePfo94qYkjgkMH8IPvn8SPXz%2bFf/3p6/jRD15R9L%2bR/iHTf/LGKbzxo9do8b2Io4dfpJV3Kw7S8vuPY8/jv47uQwe1Qvkoqb805juisQDNI7CDmdxyZm5zjoos56f6OTc3q5iYOjJUiuJUQRNUe%2bMCam0h7pRlKk0L8z7457zk%2bB7S3hZaS/czbWlxHsu3gZ7uX1zAAhntLCWXTOBepYaUK7Qwzm1HQCkjUkDMTrUgmgorVqEOSWuNC0QNXvDNKu1QNL8AtcIMjZ6s2YzU9DTSUw6k3G5ct9tRjLPN%2bjqKlSpK1RpDDa20hupNlG%2bPWDyu7IqkSA5R10UVJ3MstI5ZFkY/76RF/c0zPacmn1TpMtc2%2bXIi9krkrLVygYaLg4zrMjm0hcpKXnFoEWHRUABlaomlfKYJyVtemKdKPAcrJcYAtb95WnD%2bzk44%2bvrh7LwKj2kcWw4HqvEkqhtbqK5dI67fggoXp1K/dhNS7voGKjc2FcpCE%2bUbW8rQGujpgpH8p7vrqtJhximCM6kEKvoYOTYx2UWiVYo5GISJUpqJnlOmxSofT44PFyCIAmV8nUpNjZpcmRpaLpdFsVigJldDrVpV6c2wdjNer9ewuhpQNoKYl6pzNlqlZVejRimoLs6hwK2doKYXp%2bxPxLcj3giz2TSZbJphBlmGKeohiUU/0p5ZZOZ8KHLrFxb8yDCept3h9XqQY1kZZ6GQRz6XQ7WhqbaOUadLnFc%2bn1Pla5xXldqp8LE22Rqirj7oL5VK0fgJKF1e6RNi%2bbUaNESeu0vyhWdsg%2bj/aTFc4nBO2eHzuLkDp%2bHxzCC4tIj00AhCUxbYej%2bGq28As8PDyNF8LlEMB6MRapEbDzxu0VYzVPTUAshq6In3A/klEgkuwErTHFZo1SvSibsaLMKQUuTIPk56isdumuat2%2bXkAiwgPjyC%2bZERmC/8CWPnP4e9qxsRCzVQbuNAKIhr69fue8xbopI31HzhH2oBai0LcC8r17oA6XQaEfIH3bx8EOiSqFUKKXOWukZhaR4lSpAqGa2gQKmTEVM7uIrr16%2brycik9MmpCe4Yrwob6foM/2oLIOcpFAzCxzPpmZ3l9r1/eCWc1TGjQc%2bbdsLD8z%2b7SNHnn1f0IiefK5exeedBamNsGGfNZIEsmhhxzGsegftZgJ2LIJbd%2brVrGmOpPiiqt6K%2bhmokgjptjOroKGrd3ahdvYqqzYY6cYOidmtlBZukNylltlwubLLspsmEzb4%2bbDJfwq2FBS2NNolCVxc22ZZYshnuuFsW4EHwpfyEMd/g16KZTXYOsnBQTDBel22HrVJJmeZb3AlbhQK2KhWNZjkVFovYIn9S5bigWzyqW9msVpb5G2y7sQNW2X4F/69%2bHDRk%2b/KcgscCC4ug2YgtfmFQwYJ7BpghqGTBOX2T9ngBmtxSFiMsy50Bl1ur4/HcRgpENU1QNCS5oSkX8wwLCiXSJSoM5Ua8FZLeGi8XW%2bhmWqP%2bfaAkN0ShVZSpM5QrJZQzKZQoGkv%2bOcKHEqVDmapzyT2NEtXnEtXn0vQUyhYzSjMulGZZdmVJo6cdKElZKcfyZeaVqWvoYxJFSS2AXGLK5UWSSkosEkIqSYsvRVUxn1U3NaHVFXVdlaaWlWZehnlydRXhQGPRsCovFx5SP63yksimU6qMZmW2IN5A4jbpIkX8XmSFy4unp2GhKq%2bQqK0C0ukM280llVWq0PAaSahAvUKFFMvNMnr5Rv%2b69St0W72cx3qtjCq/Wo1foCJfk1/vmtzxUTUWtVJUYkmrNHaIlBf1Uk%2brSr3GV5d2Svmsyhcvku45UiCtxVvSKsR6FevREK5RnK6vVbbXYRuqDMMb9fI9oHLnvEbb12UcjJe4y9re/s2b%2bN2vf4F3fvsW8SbeYVzCt3%2bjpb37u0Y6IbQWl/B/dsRvlv3w9Lv4%2bKP38cezH%2bDMB6Q/fB/nPj6Ns394j/F38BHDc8z7%2bMzv8dFZlnv7l7jwqzdx9uxpnGM9qfMJQyn3CeuePfO/qr332GdrX/eDd36njVna%2bsPp9/AxxzH0/i/Q9uiuv8fj33oYjz7ydfwD6W%2bT/vZjDylIfBfThf7WY%2bL6/ru7YtfDX8ND3/hbvHDgWeVZfvnoi3ju2aca3tmXcPDF55j3DF564VmcPHEYh48dxE%2bOfQ/HH3sYR1jm6BHx9B7A88/tZ/1DOHTwAI4dfgGHDx3A8WMv4bFdX8fDDzX6e6gFD98DWG7XI1/DM0/vwe69T%2bD53Y/izSf%2bBm1dHRfwwe/fRdfVy7hy6Tw%2b5Op/9OFpfHL2jLrK6utqx4dntLhhsBfDAz0KQ41wJwyDPejv7UR/z1XiCgZJD5BWID0oV1qk%2b/p70HvhM0ywL/Ed9LHsQK9WZqi/W5UTWofEpX9pf2d/wwP3Cmm3U12vDbKPXo6hLURTdmLUoGxkP21s67hReYvlQjQWXkVoyaecHOJbu85zo3uIN%2bpFdZb0ND2Us7q1VmJ%2bSZ05Sb/eOH%2bKljKkt0ppiiYHrrP89bUqNvSzr878rV5eHTv5ivCpa7Wiws6x6H0LLf3rkDa0%2bgW0iUkZSueUW0qUIuUhUr6%2bNBvPKRPVH82oC5JM4wqqXszAuRxDgDI3TT0i2/D3qet1ipeFcALhWByJSKCp70vb6u6BZarkyiN/HsXp3jCCYUoSlguvLlMcx7EwT3XX48OcODYpzrwz0/BRhHlJz1AM%2br00muzidZ6i4WTHKk3jjFzhU/roV%2bvSlyg5ygcYWVUeqSgNtihtixhRLdF05hyqNN/bFkIxXHauYsY3xy/dp9xhFpMBgwP9SFBEOpai6HaH4HJYud36aLFNcMJJfGoNwODyY1xcYtwtw8wTx0o%2bl8XlqRXYF0KYnjRhnO2NjgypUFxqFvMYsmz7rYth/Lw/j5GRUUwY%2bzE2NoosRaLN4cbAqAOjhiFcPP8Zrlxux/k/neOx6kH7xYvouHgefzx3Dp0dl3C5vV15gBeXg3DPBZQ7XLnoxHU3NAgzd7ZBjiuPj3GY8bERjBkGNakmV%2bz82G2iDERpW2cbPrpci39Aux6PqNcgsoq6w1FeiIQjYaUfaFdLmlc226gjzhDdU6t2gLwokTYpm0vDA8jOeTAfTmFpJazuAnSzWOqLgzW4vKh2hDhZxQkbFMcsIbRcvmh5K8rxKo5Z6V8fg45WC1PzfcQbXurtVmtbq3KgP2OReEEmK5NIas9hctxSObkql47kCo3btZnXSM8mtMWShxV5VT/WCOWoBJHr60ZWLjNlwnFxj2s3zKrfxhhaTeSd1/M63ZqeabnNltttHc14y01w84lOS/wWz5Cc/8CyDwMjwzBxuxq5bcYnTNyiwxifnIDFaobNPgkDt7RxlGXINC2Mj/HYjFvGYec2HOQ2GzMZMUjmaeR2dPDcFrlVi6ybWyvzmIhbO6PdGHEbSly7NIl/JY7R2/oGS41ByOVojuc8PjSAtDhKORF5o5PmecqZx9W7nAQXJ84zmubipIxMZ772pke8RgaE%2bnuV9yjJckkulJSvOe2ouqZQkctWLpgC%2bUpl0ozC4jyPR7p5/f5FPT737BuUa3GJyBsakZOOyXF1a5rs6oTHbsPE8BDstKFttMenzBb4p53KDzhpGIHP6cQCrTIrLTSXZQJLtMgWXNOwjZngoP3tmpjAtGUSrkkrpsjgvE4Xtmp1zbylLa4glxM0U8Xp6g%2bskGOH1D3hV7oD5E9Eg7zmUK86iAw5epwTS3AxwlyEyIgBCU4iSM7q7%2b3DXE8/QqMmxCcsCBrHsDgwiJXhEawODyPKslHjiKobZ53kuAkp7hqhyxRbdbcL67MzqDGsM6zbrMhyNwSpc4jYav1CX/oOaL4QEfktHLr53ieNRDAALwc867Dz600hFQ6RV6QwNGzEtGMK7mk3RZoFLtrjTsYnrVOIxZLcLSMY5RHwcTcse2fhslqx6KWVxwla58IYt7u5K7hjfF6261BhPqM7YhK3uL2/Eh6QEy%2bKPICSjlPaNXWQZrCHSoiLdrXdNokAxVAskcCow4X%2b0XEMT9gwMG6ByT6NkUk7BhlfDEWVXB6TpzVjRnXTK9fdM1RiRKv0BmMYt9lht1owR1teXqLNM8ztGNhXxgPUAoiok2cxRE6XpfJGgAV0ZaFa0DRBJf7kIYXslkae7Bbddy91y4102VHlhi9fQqUlZplPLVDalXy93Fc18Z0LoHyDIgtLA31Y62jH2qefoMSvkmCmaIGiRsYF/HpCJxqq5Z0R1Mq3pG2nt9ePt9S7e7tfDoTntBUCC5j9/XuwnvkA9tMfwP3JWaQptvKNL/4g52vnK7Avel5v97LsdrjXNrY9kyuuLsLx1s/R/8s3MfzbX2Pi3bdRooyvlPPNxxGqQmPL3AvkiIifUB0fhoX7qHu7SeltVQp6qD%2blyWxLv9ti6WWlnkrTFyBJdVEmu7Few9b1unoyN0nlxO%2bbpdWUV51L4QSPSrWYU9Ze5Q4oKw9zXnmLLeZRxeymqeyIY1QssHJzsDvraY5V8eSqMkWtLelfmLSVmqhYfnZ58qqe3lIHoT0hT3DNVNRc1D7FWhRvsFZ3e3vSt81M6UWpI3Xluk54WFrzDofUazC5BC0V8lhe9MNmncTigl/d9srj57x4bmkByo1q8W7I51SdYGBZDXiWct5N5Skaiaj7Qsm/W/2CeKU5Dr0tuZmWC1t5bDU741YTEC%2bSmyJWHlfJ4wonRbSX5rJ4k7Jyi9zSj96ezEukk9vlwpxPHnTnlUdcucdbnaObt/GrtTo%2bvoij5KtyutxrO7pv8P8AeMPG0nA5dLcAAAAASUVORK5CYII=' /%3e%3c/svg%3e)
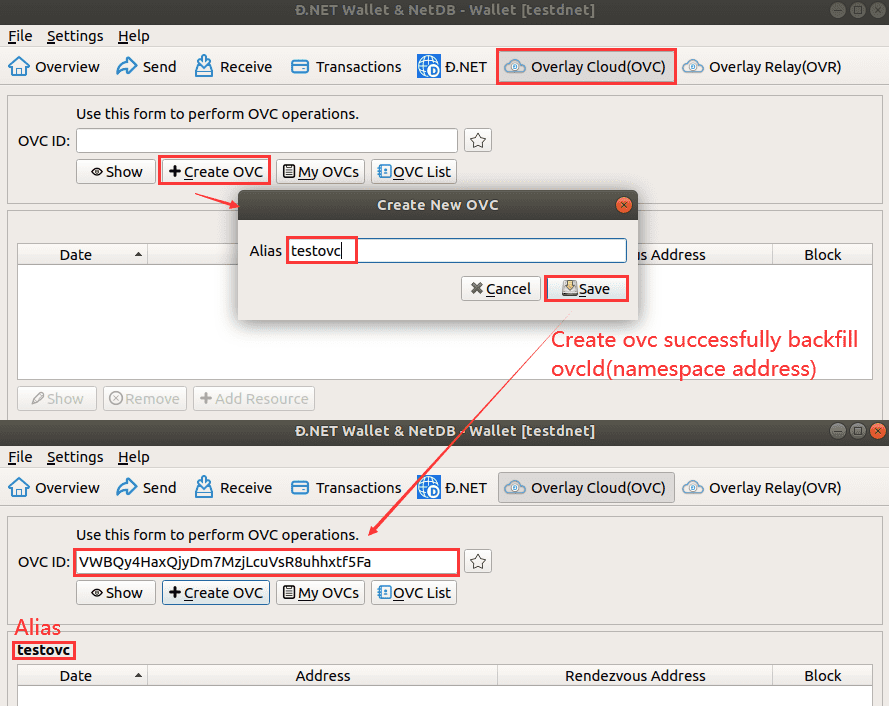
Tip: It takes a little dnet coins to create ovc namespace,the submitted data is packaged into the block and waits for miners to verify it. (Verification takes some time, depending on the mining time.)
Role Description:
The "dnetOVC" created by the wallet owner is called the dnetOVC administrator.
Only dnetOVC administrator can add, delete, or modify the information in the group (except for query, the dnet blockchain data is public, and any block dnet client can view it).
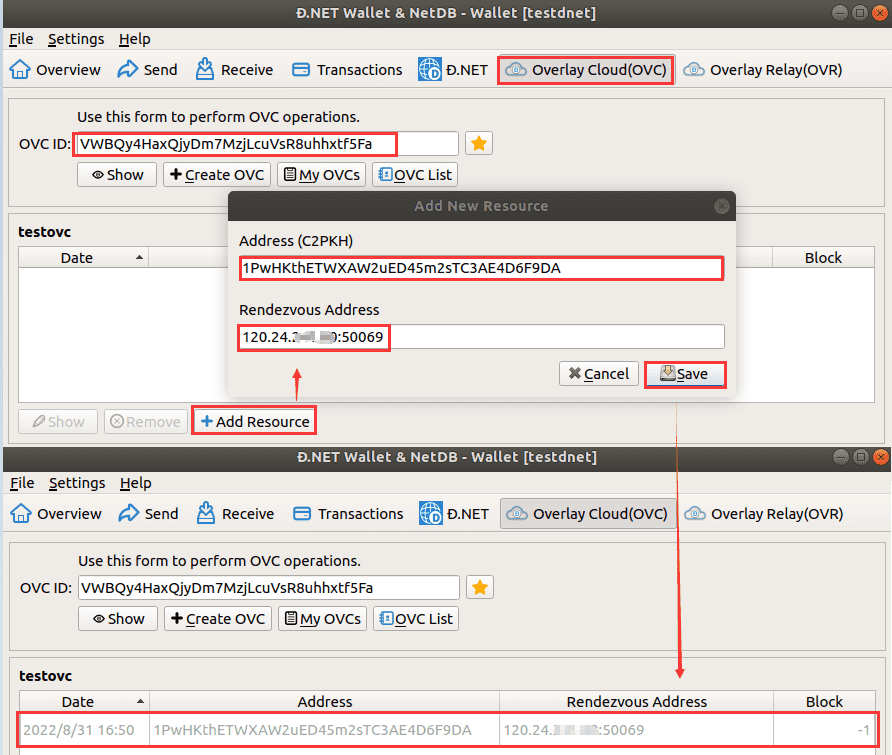
Add ovc resources to OVC Namespace
A dnetOVC namespace stores one or more dnetOVC resources(OVC node). A dnetOVC namespace manages multiple OVC resources, which are connected to each other and run in cluster mode. (OVC nodes must have public IP addresses)
Use CLI:
# "ovc_id"      : ovc id
# "ovc_address" : ovc node address
# "ovc_host"    : ovc public ip : ovc port
#                 (example: 1.2.3.4:1213)
dnetcoin-cli -testdnet [-datadir=YOUR_CUSTOM_DIR] ovc_add_res $ovc_id $ovc_address $ovc_host
Use dnetcoin-qt:
' width='892' height='755' xlink:href='data:image/png%3bbase64%2ciVBORw0KGgoAAAANSUhEUgAAAEAAAAA2CAYAAAB3Ep8CAAAACXBIWXMAAAsSAAALEgHS3X78AAAX2UlEQVRo3r1aaXdb13Xlr%2bla7acmteM2TlMnqZN40jxLljXLUmy3aZ20zXLsOHbi2G36oR9dN7ZszbPFGZxBgiAIggRIgBOIeZ5HzpR297nvPQqURYmSvYK19roX547vDufsc%2b%2bte%2bOf3sCLz/8A27Y%2bh21bfoqtm39Sg59qsk3af4lvBMePvYxTrx7Bz18/jiOH9uLUycN47fRRnDpxEEcP72P4CtNFdgyvnTqEvbu34DT//%2bzUEZw%2bdViVOc34ieMH8frpIyx/CMeO7Mf2DbZ/P0j/d%2b/cpOrZd2A33jywCR/texZ1r7/xBja/%2bGNmeB5bNj2HHdtexPatL2Dn9k2UPYfNm36KnTs2KdlLzPdQvPBjHHplPwfhkPrQvXt24OTxQzh54jAbP4CDB/YwfJkfd4ThQaYdxK4dm7U8xPGjB/HKy3vw6okjHIgDOHnsoJIfObQfW1T9z96DH2%2boXy8y79Ytz2P/3h3Yvmsb3tjxE/xu69Oo6zWbceazT2Dr70VPewuuXzmH61cv49ql87D09sDa24WzZ/4P9V9eh3t0GG6XA55RwjVMONR/Ax6VNgynwwbn0ABG7AMYHR7EiMSHrErmGrbB5RAMqFDSxkbszGvVyjkdGHOPMByC0zWEEQmJ0TG253F9BeNjI1q7OtwPgtTDttyqTgeGXSOom5n2Ytw5iEImiZBvSn1A0DfNjtsQiwQRD81g2NoN76QHS/NVLM2VMFfOY6EiKGBlQWRlLM9XsDhbwjzTbs8VsTxbVDKB5DHiy/NlzLFcpZhHtVTQ0vU888UsFsJ%2bwofFaBBLsTARwqKA/w0s6f8XwgFUMwm2W8RitaD3Q%2bvLkh7WQtqQPkr/53XUBWMpuMJZhCMRBL3jiLEDUX50yOdFtZBGIpOFLZBBIhLAzKQb/plJzBUzaB0Lw%2b0LwesZQWBmClPjo4izbCGfRc9EBJP%2bEPxTY2owA94JzEyNwz89gWjQi3Q6g4%2baMvhjQ4x5PJiS2ZxwoyQzdPEqhhpNGL52BdaLF9B/4TyGGB%2b4dBGDVy4pdH/2KayXL6L/zGdIdbUjEEsiEg6r/vu9k/BOjLGtcUyMOTlxbrbtwaS0wVUQDsyoAajyG6oc8LpxXwSNzgA8k1Ow9nTAbu3DMJdjT2c7P8gHhzeCTncIE1z2vd0dGHEMIptOoH44gIFxH%2byWLlgtvbD0dKoGs5k0WlwBuGdCGBvq19K62xmaYe3r4TawIhpL4I/NWXxsisBp70d/b7dajmVuAcfVW7B29KGfW67x8zNoPXcWTZ9/hp5rV2FivPmLM6j/9E/o5KC0nzmDlKkFbm8Ik5NejAz2wW7rV9u2lwMj32Ixd6KrvZVbvA8Dfd0Yd7u4%2brIo5ZJECnWRcASZRBjZZBTFbJJbIaEgiSLLJyMophim46vp6XiY2yOEVDyKki4r59MqzDCtmIqocrKttPru1itIMU%2bUM5aMMx8Hs0hZnvWk/dPIUSfkqDfyI0MocjsWXAIH8tyzWnx4VZ4ftiPF2c2lY8ixvbzRhvSJKNZA5BLmUjHVf4VEBHWhYEgVzvCPCCVMcX8J0kSCeiAZkf8h9XEiz7MS%2bcAkt4XI0tyT0YAXseAM/0fUwBl5JcyyTgkNqIHloOYIaU8D5aw3w06uQgbUQDax9r%2bSJbka4zV1bAzSvkC%2bty4UCnEWtRmXEZJ9EeLSb25tRH9/Dzq6O9HL5Svx9s4OWG0W9PF/G5eVmUtN0CvL3NKDPqsF9kELGpob0NfXxfwmmNpNGOHyLpZyyOZTyHGlyIcbnZDBlNnJpbmC%2bDGPhZrV9SiQwagLh2RWQkqBJWXGOZtpczdiXR0IUQ9EOQDJPrMe9iLO/RqmPMz0GPOFudcSTE9zjyU5ECF%2bcKC9DRGmS55wZxv/m5AZ6EfJbkNxmEu7kEORyrLEsJDLcCBCKCe4lFNxtdX%2bHFgdgFgsBhf3XXtLPRUFZ7alGXFqXmdjA3rOX0DvpUuwUQHZr1%2bHo7EZ/ZcvoZfptpv18JhM6Gd6/7Xr8LSa4G5twcDVKyxzBbYbN2G/qYNlx9o6gHgcsA7g9vIybt%2b5gzvEwsISUuFxLDp/oyZCdEIh8818YH6d1bFmAEJcAUU2WDAUoCgNKpzKqAtz4zRNXL4ll1OLO4eRHbIh5xjC3IQH8%2bQGs54xKiPOqixzpmeGyCkYSv7yqBNV9ygxptKyLJdnPJ/jNsik1Ozn0qIUIwrSIVFSXxe1A3C/QfjKABRqRk5VUMwhFI2ovd3Z04OuXjMC1NoFkpfOHu57Lnnr4ABa29vhGhvFoMOOISc/draCHrLH%2bqYGDHIgxjxu6oV%2bjHrGUWSdXf48ehyjZJhmTE1OwMEt4Z3xYYEkZr6iEZO5r4lZ6rBH2gJhYwXUjFCOyilJrR8L%2bhAhcRCiI9Ygm4giFvLDR1ITpEzShmh3b167jAbabVNzPW5evYQLZ8/g3OefUnYDt25cRf3Na2htvIUbX36JSxfPk2pfIrW%2bhhuk3EKx21oa0E6lq9ByN%2bxobUJnWzM6TRsA85mofAetvesu/fsqwVBIM00pwzbqprDWXMiqyNbI5L%2bYLZmxd379H/irv/wL/O1TT%2bDJJ/4aT33n24z/jfb/yW/hO09%2bm/iWwlMCpn/3757EP/7oGTxL/OiH38cPnvkeniF%2b%2bIPv45l/YPz7T1P293j6u9/BE6xT6nnyiQdAT//e009hH52dINmqsvcPMYeaGSQPEFNUSxokIUlrkFoHsjqEGstIf/jBe3j%2buWexZ/d2eo1bsGP7ZgWJ79q5lZ4eZds205t8Cdu3baLb/ZJKP7BvNz2zndi3Zyfju5TXKP9Fvo/hfsp279ym8ku5jWAPvbzXTp8gFXarDxSrtu436GFdIp6ApcuEW9cv4QbpZSv3b5ROhvCCBy0fGSipIEICJBDOLTw87PeS/08p7i8yH/l/LORTKyypNyyQAUyI2VVk6z5xhuoD9NW5EUi9UZIxMem1rHa9/qstEI1E4WNHx0dH6CY66NSMkZHFdWqbXKWV%2bRqKKfIiB0galNViH%2bhD082r6OZetJAX2Mi/zbT/5rYmNN36Ej46J7Osr8gVUxbazDokLEncAMlYReR6aMSLQpS47R6GPD9GfRTzawOQukuL9e8oqknVVrmYW7UFRAkW2FC1lMciXUbxm0VxDQ1aURKywo6nqPwiVIilfIamK6UgcZEnxAMkORLiI0RISFKkq1OFsZ5uJGgVwmSQcbPEuxHsaEOYiJm1tIjkJ8mSMiFJ4/9Qhwn%2bNpOK5wdtKNPMlmhpSo6hdWBHeYQ%2bAq1Tkr5BXAaDplYmssLvCvkmlSI2mVrh5kRXywVkDCosA5DnqFQqZVSJQj6HVJIjlMthtlpBVUB5pVzS49p/ScsX8kiHAsjV38BAfSPsTc2wfXmT8QZM0lwONjRjmMTK3tDAtBY4Gbc1NMHR1IhRmlBHSysmOXATvRYM1tdjiHnsDY2M34LT1IYBWo3ClBdgX5BKgX70/ZFkWrGEFfsgUnSQMuzXrP490k/pey6bUZ5qsVjA3GxVue2rSnC2UsLj/JaXV%2biMJDFLQrTArTPPpb4gy50up2BOZON3ZRWOvkDiVbrOEpewTM9OwqouN8obaSVuTQkfBsmXpYKem59/aN8XF%2bY1JRimMyRLQn53dHq6EchvYXFRnQ2EqOSiHM0QFZeECeERdFFjjAe5RUQeExPKrZMnUckVMlw9RNEIs1qoI6djNW2DKBCy7GWVPuh75Dc/N1s7AMU1BR70WzMAC4tcShn0m9vR1dZCQtOoSImlu4OyTgzSa2ypv4ne7nbKWxDhQCmfPCHnBdFvHsJXkjFu1eq63/ONDsDiygpyAR8qPZ2Id3chJ16huYdhr0KG8STl8Q4qOiJLHTAbpucn%2b7JUIIpfA3KuWKgJi8q7FOX25xkA8eSIAp2ePLm93WLF%2bMAAxgftmBlxIjA2hrF%2bC1z9Vtja2mDp7IKvuRVIJHCb9dy%2bfVt5hA/CHSMuee%2bF1KFjRQ8XKc/IFni0AQg//gpYWkY2FkGJ/kDFPoAyTWeZYYmauDRgQZGoUFalB1l1DKJs7UOW/oN0MkMTKrP1QOh57trvlIKcHGW9E8h7RlGgAq7SLylPa/9FCVZnZ7/eAGxMCd6hJl1UViBfSGsnPaK0xBGhRs7pik3J8zXpQkyUs7L%2bCY/hsclZYTwaRh/5gptep2fMBafLhah/BnPmPkzbTLDVf45hmttxcy%2bqg4PqnLCysKBW6AaVYJhmsPhYZnCRdWVpT4vCGgX86CIVXIXKsFDKkfnF1EfchRysJtb4HQ9DMhaGh%2bbSYbNidGQIwyRFcVlFbe2wkFM0ffYp2s9fhrm%2bBUFTJ3JMn11afGjfF%2bbntAGQ8/QyffXl5WViCcssLFiSkP9XlKxWzjht6B2SiuUkqaZ3CmnPGDGKlJsYdSJNZZiYnkQ8EiKCXwuxcFCdHidjkdWDkziXeWTCg6jLibjbjeS4Bwn2IewcRpJtzpLoLK/2%2b6tYWVkmQSprREiOxYUXy1IWaisnNXkB95o0loxzH6YSSp5jnlwxjxwJR4wzEKXCC5HuzlDD%2b0llo9T8ESIs54MN9Yhxb0ZDfjoovseHcAw6OGvhU7dWMXF%2bJJ1Ok0D%2bx%2bU0O76xk2FtACIRje8n4%2bpj05zVFFGmaUknYgiT6ibjMSVPM0%2bKVLnMpeixjWJwbBKdzaSucnLU2oJ%2b0t%2bB3l4M2gaQaG3FLLdAifteHKsHQTzPh%2bUx8q0Bt0gpqd1NrEI/3V4PRrpcjMh1gNIBiYify01zQyVU8Zr/CUNGNzku7iw1b76rDYW%2bbmRJeHJ0cnLmLmRIgLLkBKn2VsR7OtRsSVlxhw1IW7X/5RpO3F4tbuTRy4Tl/4yKi4eX0r1P5dPHNaTpehvxVVnN4U4tUrobLu3JNgpyu9S99/5vcfzIPpw%2beVjdw78qd/fEqzoMmRFXOHUEr752HK/%2b7BhO/cwICcpOnj6Gt999C3/46H389x8/wNu/ehO/f/9tfPj7d/GH372Dt371C3zwu7fxHvOI7L8%2b/C3%2b5Z9Pq7SPPngXH7z/Dn7z61/i/feY5ze/wn9%2b%2bJ4q/%2b7b/47XTx9d2w/i58cOrvm/HqTc6%2bzjO2/9Em/%2b27/iw58fQ89vT6HuzV/8Qt3979m9Vd3T79uzHXt2bcX%2bfTuwV5fJnfre3dvUm4Ed217SsPXFr2DnNi089PJenDh6kI0exoF9O1fv/k%2bws68c3KvCY0dfwdEjLzPPIdXmyRN33wccPXyAeQ5poSr3inpTsGfXFvb1xbt9IA5teQE7tr/0cDDvrp2bcfDAbuzdvxvHd7yA/zm5A3UeMrbLF76Ak/60a8iKWzevqwPMJrq4jkEyu7FhXLl4Du2tTQj5tdMWQULfGrXLWW6WZavICVHYP62u2yPBGRUqUKbSiHhIg8iieh6RS1zdUAe9LOtdPXEytkYt1IkRvUajTwKtL35Vhwr1vhlp6sSIYZhpoaiyAiHMTIyq0xOpUI6yJJQrbTFB6VgQ4y676uh8taTu1%2bXouUzlJrescidvYKFaVFdrS5UcFgTMW5tuQPIkkhnEU1lVRmRSb4V1GgRJGF%2bloLVTpsNVVIovrRS2AuPqlIf9nS9lMV/OranLgNGmEZcjeGlfrsflGL0uyo70z6QwHQhiyj2s7tXlWEzIhxCXWDqL9skkQpwFt9OuTlTmSxk0uUKwTQbhHh5QeUdHBuFj2Qo5haQNTwfgZX0e%2bvST7hF4nLQcYyPqHYFciLxfn8VbV2KYJH%2bQlyNyAiUnuTb7CMzWEVioVFuaGtFKK9PZ3oaeDhPaTa3oINQqbW5CW2szggP98PnCmAmE4B13YYwsdIxWStqUep2k4C6yQ3mNMmSzYHrCjflK4e4ABCNxtI0GMOGdUXf1Y%2boZyRBs1l61VDyBKCwTQfimPGRjdG6YJqulzRWAbSIAz7BNdX6YmBJuzpnrG%2beq8WuPJxySxnolfYQ%2bgdSdSsTxSVcaZ7uj3GJO9TxmjCRG3FnHsBO2IZe6zze1NKGr3aRCi7kbnW2t3IrN6n9PZwe6O9vVAMxMeuH1%2bTE5Osw2tCc50ld5CiP3FvL%2bQHu2Y8M0J7ekX%2bWLaa2Lx2LI6%2b8DxOEw7tglUZwOobPldHT1zYBxmprWyYRhkyW/kabyp6JqiRplak9kNbMUUncNciFa1P0DdVwtezviV0fvxtm9EBvDBEpc2k6TIqfkKp8znKe5lDcChv9Q%2byah9n2AuvThN6VimkmU71Onwll5H5CMrjIk0QERZcP96lZI4nIomtAViTqCZh5RdIbyEZ0RmJnUuYN2xG0oL9VYMrrmosWAJoso3HvHd2%2bZ2v8K8lFc8lm2I%2b8EtMub6Bq2d5f9ad7l2rr0ARBWJApIZmuWToxo4LbmetgH5La4CX0kN/0kPeaOFtgsZnXCY%2bLe7CXZ6ZPnL72dsDK9t7uTlqQf9Teuoo97uE2utkyNsNORkdWQTURWP1bFZQXISQ6peCad1W%2bGNwjxHGXVia7iBBXyqUd%2bHyCrT20BeQkmD5hkxgJemcUQYtEI/D6arFBQUeAILUKClDgWCSNKBiVyiUdIlSVvmv6C7O0wV4rfN6Pkkkfgn/GqPNrpclGd0kpYrZRIlfMcEHqkUQs7pPklhY1eg8sAiE7yTSMv542PeIWutkAykcQ4tXtPZxuGBixK2wb9PozQrTSbzejq7lEzaLfb0WexwmLpQ093NwYGrHCNuuGwD6Crqwej5BOjo6OwD9rQzTJWqxU2%2budSzjnsgN0xrHz027dXtBOdFS2Uc8VU1Ic55%2b%2bRic2oI3rjfcDDVoCcN6gB4KTJYDzKa5HVAYhG724BUWTKFoviUH5%2bRnmJ4gXKmz65DEko5UPFSK9Q0uUcLpvSvMkizZscYIhTJfnlv3iR6jUI7XYoGkeCqyTNvSfOl5SRuHoblM6pJal9fGLjA0DtLlxADmUeawBi0ZgyP7ma9wEyAMFggHu8C10dbWij7Z2anla3Ld1dHco0Wej2NtNO2%2bj5Sb6%2bXjOS/LhO5r9w7guG7corbDNRb9hsSjG2uqNo7bUp/eF0jlCvmOFwONQEFNKxR3sZot4xcJJo8oq07Xn9NOqRt4AMgGJfmdqnZHH9ulwzQ/I2QEyHoUXFHxfKq92whlfNU1Z/VyAXpHIpmlLlI6v%2buRxshAJCpwPK6mh3i5HHe%2bQks02FXZIzSCFXci/wOEpQBiCtf4hxdXyvG3nXHq99P3A/l7P2DcFX0tQTufXLPhKkrzJZ/b3IOh1ICb%2bIhTZcXr5TJlTpAHnssPo8Rn93l/oanUvpDayXlv4mwJWWkoNWKu0sWaYMxmMNQDqVRn9XKz2%2b87h09gy%2bvH5VvROusPJ8zUlt0Vh2G4DkNU5oHqXcenWtIlsTlzRugQqpbon0tkBuXxD99YD%2bFO/pj84D4tTcAYS4z8Pc1wG6iXFqZjnClj2mIHduYmaM/w%2bAdEoUUkIoJ7V5Tj8t3ki5gn6/VyuT8sbL0bSE8oRXJoeeorwWTYiM8Vw%2b85U6lZLU%2b5OULUk9l6UiL9IJyuW16/O6GAegQEorlwuLVE4TXe1o/NPHGKi/hTLta4XyHEc4Ss5dJeGQCwiR3w8lps1SAY53mnDrfz9Gx4VzMF%2b5CB85wxzlpQeUFYg5Exh1SRkfmWfrF5/BfPk8Ws9%2bwfouofvSBTia6tF18RwaPvlYyQZufanVw3IlHYUJj%2bpznN5g458%2bQdvZz%2bGmAyV9zE2MIUu9Vxf3%2b1Gk6VqYmiImsTA5idlxjwoXafpEvliTtqj/X%2bT/ef6fn5hYTVfyacYnJ5Rc8s9PaqHCPfVInnnVzhSWyRaVjPml3bvtaLJ5vU7B3Pj4av%2bWvNNam8y37PWuQuTSj9r/km%2bJZZYDflT6%2b5Gjd1iXoCBDppdZWkZubh4ZIj07hzkA5ZXbyM0voLi8ou7fSsvLSFVnVXpubg7J6hwKS0vIzM4iy3zpqhYa8TxZXmZuQeUpsH75L%2bVVG5KXofzPLy5pN1NEkXlzzFdkWyKXMiW2L2Xyi1p5wcJG3i%2bsI5d7xBypeZ7Mty4WDKJMcnObVHaZVHaFoeC2261gxFeYpmRGWk2%2blXtkK6Nr09aL17Zxx0iv7cN9yt7bv1rcqYHR5zv3yQdZmXKDTfP5/8XCK5bJ8IsQAAAAAElFTkSuQmCC' /%3e%3c/svg%3e)
9.dnetOVR
Prerequisite: dnetcoin wallet needs to have balance
dnetOVR solves the problem of data transfer when the dnetvlan node cannot be directly connected.
The bandwidth, IO, network stability of the OVR resource server, and the distance between the network and the OVR resource from the client determine the performance of the OVR. We recommend referring to these metrics if you need to deploy a private dnetOVR. (OVC also calculates the dnetvlan optimal OVR node from the dnetOVC namespace)
Create private dnetOVR namespace
Use CLI:
(Returns the namespace address of OVR, ie: OVR Id)
# "ovr_alias" OVR namespace alias
dnetcoin-cli [-datadir=YOUR_CUSTOM_DIR] ovr_create $ovr_alias
dnetcoin-qt:
' width='886' height='709' xlink:href='data:image/png%3bbase64%2ciVBORw0KGgoAAAANSUhEUgAAAEAAAAAzCAYAAAAn3w6xAAAACXBIWXMAAAsSAAALEgHS3X78AAAVfElEQVRo3sVa93eU15nW/7Ln7MkPm3WyicFxIcZgmsFGFJOy2ZP9ff%2bBPSfZJMdxjRMIYLAxDjaGuAECCVAbTdNomsqMpqiPNL33IiFAevK895uRRrKo9jpzzjO3vfd%2b997vvW%2b579eya9cONGPnzkb6YlOdlt%2b9e%2bcDIXQHDuzHq4cP4dChA2jd/woOHz6Iw4cOorV1P/GKgqojDh08gL1795BWKx9k31bi0MFW5lvVGAfq5Yd5/v3mtWfPLj5DxtPmcOhQK1q2b/spdu3chu3btuDF7c9j965t2LljK9PteJFtWt12VffC1meJ5%2b6Lrc8/i5d278DL%2b3Zj756dauyX9%2b3By3t3q/o9u19UeIV1e1/aiX3Ejhe3Yh/bhWbvHpko%2b%2b/dpdo1ml2qvO2FLXjh%2bXVzkPJDYOvzz2Ab6V/Zt4vj7eC4O1S%2bRd9zExfOn8OgfQC6ruv4%2b4VP0HH1MtoufQHbgAkGtn9%2b8TxuXO%2bAb3QYXvcQfO7hOoZUuQEpC83oiHMFHtcgRocdGqRcr5PU61pL42lqbx6j0eZd9zz1TM8IfP5RDT43vHX46lif93hd8HoIPkPQEg5MwMeJlPNpTI971cLCs9NwDdqRiIURnPTC7RzAzOQ47t6qYrFWwnw5j8UKUS3izkIFt%2bfLKpW2BbYtzRdxu0awrrm9kZ%2bvFFAt5VEh7iysti2w/la1wL4FjrVa3xhb%2bq6MJXmm8%2bkEbk2P41ZgEouc9%2b3gjMLiXCMfwO25GQ2SJ818eFbNQdbREs9k4Y1kEI0EufApJGMhhNk5HplDrZhBJJ3FSCiDBMuBST9CpKmWcuj2hOAPBDE74VH00xM%2bRVMsZNE/HsFUMIy5KT%2bCnJi0z3KSglgogFwmjT93pnGsK4WJ8THMcOPHfaMoZhNIJZOYC0VJN0P6CcxJv6kxRDjGHMvBmXFFG2CfGS6oYDXDe/kaXDoT3B1X4Wy7DMeVS3Bdb4fj8lewffUlhq5egf3yJeY/x8DnnyNz87paW7WYRYtvNoJeTxBevw8DRh1sFjOcHLTf2Ic0OcAyHoLZH1Qs2G/oVeyYyabRNjQLq2cSjn49HNZ%2bWEx6xT25XAY3RmYxNheGe9DKegMGzAZYzXpY%2b40YdloRj8XwZkca54wpWC0W0vTBNeREIR3HLPt5xgLwk71tFhOPpgX6nk4%2bfxB2HkkL52gy9MFhMWKIz0vxuY5eE8xOD49rJ65e%2bgo326%2bive0KOrkJbV99gS8/u4iOa1fR1dHGtB3J3m5UMgmUyPUt2WSEbz2MfCrGN5BEgQ2NNJOMIs/2QoopJ1dgvaQpckkkHEIqEV2hLeVSKk3HwyimIsixX55lqVN963mNJoJwOIxYlDRp7XlCk0lEIPPJS//Uah9pby43kOcCsjzX2e6byPDlZPnS8tzsPDclZ9SrVCsbkFN5I/L6XmS4sWmuTebaIn/yYIHkBbLAHDdElVmfYpplhyzrhE5Nqr7YXL1O2F%2bxN8uycJmw9JVyg6YBGSvPTc0Rjec2t6/Op4H1c4yosTNSLxvHzc9wkzLy0h4EHrOs0Mq6uM6WlQWxUhYlwnDMPYi%2b3k6yvA593dcx0G9Cb2eHYuUB7qTF2Iuezhtsu6HY084dNem60NfVgX62CwuKdum%2b2QEdaUTDFNWmRFc2pAHhvI245KEh/R4Hshlce0vzm2/sdIo7HI/K248xT1ZJxpGUVMqxCGLhIIVkiPRRHh95MzHVJ5dOKs0RCc2RPqLyCbZL3wLlRoHyoZBbl7I%2bm4ypsRWbc3L57wDqKMoGCCs6KVyuy1vTdcPMM5LjpOS3DKxJ1/%2bWH1DeqG2ZmSX%2bCSR/9%2b5dRMNzGKMQjkdDShM86kIelXvy6zlgPVtm%2bSaK%2bSxKhRzKxTzVXoHqLYd8cBYl7yhKfg/KYz5Uxv0o%2b70se1FmfWFmiucspd6q6sMxyvUxCtkU1V9KvfUKy42xS1SbImOS0eCKfPkmb/WxNqC5s2xAKZ/BzPSUUkNGA898fz9CsSiqVgt0p0/BdrWNuvYrGC5ewGB7Owaoa3Vnz6LY0w09JW0b9a3ZbIZreBA6XS%2bMJpNSqcaxKLpsLuiphvot/RhyWOEcHFKa4JEXLvLj2zgC6zdAINI%2bRrYMBaaU8TE94UeUCyhS7yb1OgR5TKJUM2EemQRVTHzIgYS%2bD2WHDdPkgtFhJ0ao14OBaQSmpP8Y33AIARpHHp9PGTJzM5NsE%2bNoSqlbxXmiaVQ%2bfl9kJM0kH09oNkFxQEPwNR7ejFx9lwuZ%2bEpdQTaC6qMY19IS5UeBltX5D9/Da7//X7z9xu/w9pu/xzvEm3/8P7z1uuB3eOOPv2X5N3j3rT/gLdJI3Ztse4fl11/7DfO/Y58/4N23X1O0b7z2Wy1dhz%2by/ujrv8WHR9%2bEn35APhXfcO4PgxTX0iK6UHS4vCE5hw%2bE0AtIn5Czy74zfT040PoSfvDE9/DUpiew6cffx6YffV9L69is6v5NeXo/P9KKX/3nEbTu24Ff/Pwgfv1fR%2bgFbsfPjhzAr355GM/%2b5Id4Uuif/Pc1eIr4/o%2bfwP8886/4wwvfQxsFd7ZugzzU3NchQfN/wyOQb9KVD9LBYj9M0F7/8P2T%2bOtf3sGJY3/CieN/wfGTR3H8BNMTR3HipOAYTrx3DKeJDwSn/or3mZ4izQf19PTJv%2bC943/GKeK9e%2bAk8eHxP%2bHMsbeVXfKwQnAjmiYtIA1JZcGJISTOjqQNU7aQvfd5kw0Yp4spY1CpaSjmAHqPPOAA5QB41pcpR5bHvKhlqQVqVVQqZYVqdTXVUHkgVP9yAdMcT%2bYoTk2lkPn6olfySdUuaJjsDbNdHQERekVK/mopS2fFhk5acCLEqnQXRSOIrxAnu0i%2bSAOmGVI3SZUoXptYg52U8AFaj%2b7267Db7XDZbfC73MoQuD01jcrkNErco3JtAeX5W2tQqhHryuXqAlOinlaIfGUBkzMBXLv0OW7Q4TH09cJJazOfTSsHR5uX9gJlXQX6FkJn7OvGENclbniemyLHQG2A6OdKuUQUea5jmJ0NIM5U6sqlInV1ngPlVH49hGZqckK5vEFuwvgkJf6QHdNt1zCuN2GyV4dppjnvGB2UfuS4CZlKFZl8gSiuIFsoIlcsqTSTKyhIPiu05SpylXlkSmWFVLlCtRzDILXO3NwsHStxzsIoFTmfprmVigUtT3tDnLdwcA6JRFzNWewatQHytzBfwzf5JRIJpTZrZEVhR7H783MzyPMICHKBSaR4BNJUfWIyJzdAnFwWoqGVoNmcoUmdSaeUuZ2kDZHpp6o1daNgs6HodKBo5obSPY7wuY/7W1pa0pyhFDegxnOlmanLCtLYyD8I8ovxbURDsyuGlBI4PGsNFPKCtJZuKEcSyhcw0JawWsx0qIwwWyyYcbsQ05ngGXWS3T/AzUtX0dvdi7jHT/fWgFm607cXFx9yzksaDSG/O3fuKI2mNmC%2baQMe5rd%2bA%2bLxuJIRlUJaCRkNyXsgtSEaLnOQXBINziASDCBNVZun9ZnixoQ6OxHp7kTSSMlP6zTnGkIwEsad27eVg6HmU1/ghhvQVC%2b/u9yA1Le1AdlsFqHZGWJaWXiPgyCtToEsXORJmEdILNFgeBYhHpEIuSpCTSP5ECceSkQRT6WU3nmQI7aRU3Z36e7jc8D6TVgkGyY5mUAggBlK55lG%2bkiYWYX0n5pCYGICc0YTZnU6apZuzHZ0IKDXI%2bBwIMYjUiPdEuXAciSigX2X5%2baw7KfKHR/HEumWyZ2SXybt8uQkloaHsWww4A6FYYpct6EM%2bKdD2LVc1vLJJDBNW8JNVerx0KaY0hbF/DI3fZnSf8nrxRI3a2l0FEv0NZZIsyQbMDSkLXx2VuUVnWwSN%2bhOLquu9L4VLfCt/6gOKaXq%2bSKQzwPRKMge4GvjmaOhVSppbVKWTUqnNToeR4UcaapVrZ4bgmBQq5My25coO5KNO0ExIIQLqpWSBmUTlFATC01Bq1sBy7VqU9v69iaahwbHqvFFzMciqKWSzFdRo8VXHRlGdaCfsKDa1YmazYoqtUTV70XVR9DwqtIFr1I1Vvt0qF3vQNXQhyqFZdUzqtVLHQVp1TpA%2bh7UJOWaU2IKiyORz6boYiZYQZeU%2bjenrq/SSmdHw0HVlqWxJJA7fbkwkSuzVJKemNLZSa0f26Rvnuau1N/rsvNrEDpxw2lIZcc82kVno69oh2xi9dKTXlyG3qmiScdWLjpV2rh8lby0S1nS9RejqahyouT4t9Roty9yt8sFidTQcqL1JNbU4kINNVqGeS5abm%2bkTrUzvTVf0W561K2ORi%2bpoFrWLEdpk0iPihYxXaiwX7WoypJqUSDWCc2tKuY52UWJ8MyXVcTpVgMVjUZwpykqdGe%2bUke5CZUN2pvL2thqDswXuJ6W9987iqPvvk4v7h0cP/o2Pbq3FI79%2bU1V1urf0kAPTOoa9RoaZQ3S99zZU7hw/iwufHJWyzO9eF7yp/HRmZP4%2bKPTqvzpx2fwCXH21DFcP/YuLkj5b6dx7qP38em5DxTd%2bXr66bkzOPHXP6151qNA%2bp1k/4//9j7Ofsg5nTkO0%2bk30PIS/fDnnnkST//kR3jm6R/jp1s2Y8uzm7DluU14hnVSv%2bW5zYrmqc0/IH54T/yE2PTkE2jd/xL9%2bldx6MA%2b7Nm1Db/8xWH8nL7%2bAdbvf2U39r%2b8W7X/7NVWHGH9fz%2b7Gb8%2bchBHfnYQh1tJ07oXvzzSilcP71c4QsgdwtNP/QhPbdpgDlJ3P2zW0qef%2bg/s3vUCtm7/KV7ZuhmvbfkXtPT13MQn5z6EUd%2bDrhvXcP7jj/DlZxcUpK23sx1///QcLl/6Eg6rCXaLUYWoJHJsVzCuSR0SvjLr0W/UqZCXhMQs9fyAgGWBhNnMA2Y4LnwMN59jknrSNdqFfj1WnqXmYFSpPM9hNWuoP1%2brM60t1%2bdrpV9hsxhochthotndIoHHQXZWARHPiLqolKCk02ZRtz6BMTec7DA5Tt25UFXRWTm/d1UEuKQitGuiw2zDQontpTXRXYksN6LDElleWpqnWvNjadKPxTsLWGLbrWqJY3DceYkEV9b0bzxD0sZYjYjyfCmnoMkaTbZI5Lchd1bkTbW00taQKy1pSuxAIqtUgkRgc2kJiYWUtJ0vZRFNpuALp9UdmrSLnS4PM/rDKgIcD06pSLKE1EUCyzX34HQUwajQT5E%2boNolqiwmbioyi3ShgM/aJ3DlrAHTtNwkRD83M6EuV8QLjETjSJAuRgcrEpxGrD6G9JeocYAvLSRR5/ozR0e9cI/64BpyYNhpx6DdilH6CkN0l522AVUvqdPaDwfVqFz/1bgGuSBp8Qfj6BwNYpRWUj%2bPwQB1qrCtsa9HqSLLRAR9vjBcgzYYejvVdwNZWlEX7QGY3ROw6Lt4HMzqCEkEN5/P4drwLDyBEIZtWpRZYFHQYZCTSdPt/du7PXivJ6WuzE19XWRPsxYdDkbg9gfUNwsSZpP63s4bcLOfHA1TXzf6dN2cY5%2b6BJEXYrGPwGR1Qdd1E5e%2b%2bAzX2i6j7collX7x9wv47OKnLF9B%2b%2bUvceVKm9oAcduF61syyRjC1PW5enS4OaKbrofNconwmiiMOBEx8dXjkTWBBi2gGlIbJ3o2r9qaIjf18YvtVxAan6RTE1%2b5V2zc0WUS0jf8tVhFrh5DLDRd0wlNgro8LNxAREMBxTUxOlDCHeKix8Madwonyp1FhE6WBHHT9eBri7C2PFSLCodVlEYWkE9qxkI20UgjqwuTyfCo5NbVC3JydS73AdxYyefq/dOcaEo2pP2quszI5bkAblaamyluaaoeiV5BU7zyflh7pb82At2cb5Sb88odzqoLjNVvAoQt/D4XjJSS/WQ/g7EXVocdekptB9nfarfA7hiA3mRQdaZ%2bI5xkT6NJBx3Zc4Dnr5fHx8x6SU1mA4ZdgyjcqqCk70WJ9fnFqnZZwjOYJyvKZUnxGwY5HhXFeoi8pRHzz6e1yEyeDVlqglhvF7JUE2mewxQXm9DrmDcgwwXEeAZjuh6kzVI2IUO5IW050qd41kPdXYhzsbG%2bXo2ObfMUSjX5MoOCqcKNrFBYVQYdqFAw5cd9NGdT6mY5/11Hh4Vdh/lWO2%2b0U5DxLfOtp6%2b3w0epOWgyw6rTw2uzYZaOhcsyAHe/WYPVBjcdDSedDMONLowPOjE6MAA7HRJzZydGSGuj4zHEMUbM/XAaTFiaXwDm5zUvTXDrllwnIUm6idkAJf9qdPj/8%2b2vCY6KcBGHSNSMRHliPKvySUmB3leeXlOaUrpI1VGwWtR1VIwLSnFxSYsVaW5CRM86owmJ/gHEDQZygHBCv%2bqT5UZlySEVpwNJgx5VprfdLtz1juL2qAu3vR7c5vFKO20IR4JKHnyjjyUeZwPk4wThglL9CxGVL%2bXpPs/BRWE1PDQIl8ulrpMjyTS69FSTg8NwjrioeqhzPX7YhobRY7YimEjDRpbuunkdDqcTkxNjsNupizmGSG3LVBz6YZ%2b6%2bJQ6v9cNj39sjQz4zo%2bAyIBcvi6QaByIDBDpLfd74/JxoXtYhbnVHV0kAuuwG0arAya7E/oBGwaG3ASFpn0Y08EQJn2jSnfbyUGT9Nm9fNNe9wi5K4jJuQiGXKMYoQyYHPMqy3PM5/m6ivuOoHEA1VTeoEOBwqtAWZCltZWpx9/Vd0PZ5MqtrYoOZ7Q6eaPFpjCTlLV2TZMIVr49Ul95xdTXZqXs6hdlje%2bSHje6%2b02hfSRFq6hiMWGBKmuh4yrKHteKXk7Vo8FiOaViq1gpr6tXbbHVKPNKeU1baMO2fwZkLi1FzzBsZ06j%2b8z7MJ0/BztNx1xPF/K0rJSufowvMdZ%2bbhP7xud1/Sc898LDjtGoU8HRIs%2bh64NTMMmnL9wE92cXsUiOqNBszIm52XQ%2bcw81WQrRXJq2dk7Z2%2bJ0yLF5HB2vnleP/jbGauQb0d5KvV7y9x6rHvWu2/%2b5lQ2QL0SoBWSy4mIu00KT73bNVINjFGA1uo3yAPmqUiLEki/zQfeCRIqlz7h3RLMp6FIP0eCR21cVcr9P3zK9SJEpEtWVvDZWQdnt4kwN0xmz0PByDzvhpnYaowYZsvfTYTLQ97fAx6MrkeA149G4UmNl45xPn/oE2EcVXOW48iwVHM1wFzJJOiSFPErFPOZmZzBKXR2YmVY3w1Inl5xy4Sn5%2b0LdKxbVd4IejjFBNegZHUUqmViJMt%2bvv0RsV2jkXrFUUJFreRnjY341L0n9fh%2bmpyYxNTFOLeLlorzqo%2btiU181Hj1TLc1o/Wh3SORbouAFerRqA%2bQc1O4RGVKBiYf8DhBN3wE%2bSv3jjPUwoa8H/e7e1WKD/wC%2bAbgiMEzrqAAAAABJRU5ErkJggg==' /%3e%3c/svg%3e)
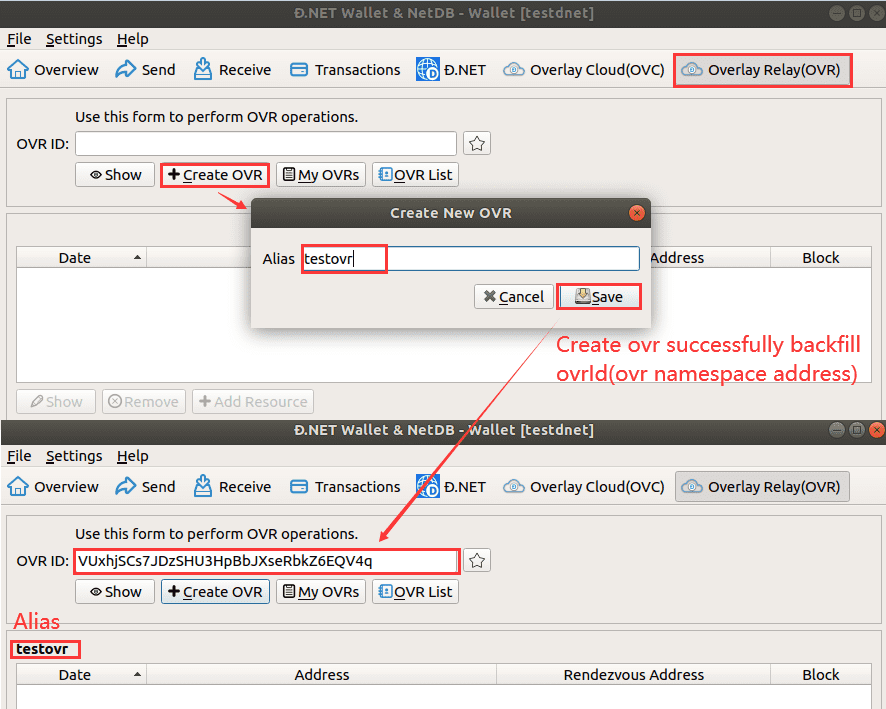
Tip: It takes a little dnet coins to create ovr namespace,the submitted data is packaged into the block and waits for miners to verify it. (Verification takes some time, depending on the mining time.)
Role Description:
The "dnetOVR" created by the wallet owner is called the dnetOVR administrator.
Only dnetOVR administrator can add, delete, or modify the information in the group (except for query, the dnet blockchain data is public, and any block dnet client can view it).
dnetOVR namespace add ovr resources
A dnetOVR namespace stores one or more dnetOVR resources(OVR node). (OVR nodes should be deployed in the public network environment as much as possible)
- Use CLI:
# "ovc_id" : ovc id # "ovc_address" : ovc node address # "ovc_host" : ovc public ip : ovc port # (example: 1.2.3.4:1213) dnetcoin-cli [-datadir=YOUR_CUSTOM_DIR] ovc_add_res $ovc_id $ovc_address $ovc_host - Use dnetcoin-qt:
' width='869' height='791' xlink:href='data:image/png%3bbase64%2ciVBORw0KGgoAAAANSUhEUgAAAEAAAAA6CAYAAAAA0F95AAAACXBIWXMAAAsSAAALEgHS3X78AAAZDElEQVRo3r1aaXObx5HmH9rdqs2HzcaHbB2WLcmWbdnWfVmy106cy2u77GySD/mwm9pdJ5tKspWtxLItiZIs2ZIliqIEHiBIgARAAgSIgwdI3Pd9ELypZ5%2be9wVEUYfFyAqqumbQc7wzPT3dT89My5tvHMeLz2/FKy89T9qBXS9uX0U7buNJfi01yl59ZSf2vvYSXnvlBezf8zIO7X8VB/bswoG9r%2bDgXqb7mO7bxTo7Vf7owb04fGi3Kn/l5eexj%2bmBA69hH9vs372L6cvYs/tlxd9LEv4efuNe43gQ2sXv7N/3KvbIuPa8iHf3bEPL7j2v4emnvodNTz/O9DFs3vgktmx%2bEps3PYGN5D21gWUbn8CWTU/iaeafugdtePKf8RTpySe%2bi2NHD%2bCHbx/HG8cPY9%2brL%2bEHb7%2bBt948jCNHDmAfJ3/o4G58/1%2bO4k2Wf5/1dmx/Bm%2b8cQRvv3UMr7POkYP72Md%2bHH/9EI69fhBvHDuIN48dxq6dz%2bGJx/7pvuO43/hkPrtfexE7dm7HgRe24JNtf4eWs2da8fF//wdOfPInfHbiT/jj7z/Gbz/%2bNf7wu9/gz//3R5w59Sn%2b9w%2b/xe9%2b8584%2bfknOHv6U5zRqXVVvkmtn%2bL0qU9w6iTp87/g9Mm/oPXkCbSSJ/zW01peyqW/k6wj3zjN/62KTjT7bbQT/plTJ3C29bM7v6foxD34d1LrqRMa6X23BMbH0X29Dcl4BIFxL7q7rsExZIXJcAOj7hEU0nHcaLuI/t5OFHIZLM1VMTdTxuJsmfky5uu309xMSS%2brMK1ggdQoW52XOlgmLZaaZYt6%2bcId9SuYq5eafPnGgt63qsMxqfrkz3Nsa2lB0pq0rzRpflZr05JMppDKZlCp5JDPJjBTLbKghDrT2VoB1UIa0/EEywuolbIoFTOYKWUQTacxEUuhWkyhUsyiSp6Uz5RzyOUzSGTTKLC/UoH8claVFfNJ1suizm/FUlmcs0TR446yjyTLUshlYqq8VMiizD5Lev0yxzBTzqOYS5Kv5fOsW8jGUeB4qmMexNuvImIwIHa9HfHOG4jd6EDcIGk7oh3XkOwyINLRjvC1qwhfvYzsjWuYqeTRMhGN4UtHAMP%2bMfR2tcNs7IR1oBcdV9swPelFiANttU9hxONGr6Ed3T1dyCdD6PWHccY2BduAEcauGzB2k7quK42xTUdxfmgaPq8LvT2dMJuM6OnsQF9fN7o7r2PS64A7lMNbp6L4r4seDA904RoHPmAxcQEK8E6E4fZPwe20wsCBmnoM7OcGbFYL%2bpiaertx9fJXsJi60WPuRaG3C3ZDLzp7h9Fz5RK%2bbD2Ny%2bfP4synn%2bDymVM499mn%2bOL050xP4GJrK85x602dO4c5LlZLLB6DPxRGKhVHJsk0HkImFUUiOo2spIkYoom4lidPyvOZOIKRMPzBENI6PxELIhljWTqGZCqGcDSs6kn9RDSo6qQTYVUnl4ogEkugfzQG31RQ/U%2bxTL5RzKWQ4TfT8Shy7EvaS7toOIBsUvjSR1DxpX5KNMHtQPLqFa4%2bV5oCi3GV41ztEIUR1/NB5mXlU4YOxNrbkKXGFLMptMRjUZQyUXYWUR0KyYcrVLuSqBzVsEIqZZkWUopXpGpXqbIzRa1Ogy%2bpqGWZ%2bWohqfPSigoURjYZ4WSjWkphlzMRFOS7yWjz25nkrXFoY9HSfDp%2b2/iEVF7asO8cKd9ME1rKMef0fIF52eKN8izz8i0KIKIaSqGkss%2bSLBi0D2BkZAgW2yDsIzY4XEOwOe1wuobh9rngHHWwzKz4Q44huDwO9NsG4PO7MTyi16UKW%2bxs77AhwhUrcs8VqHYNype0tEgBFbPy7YT6vlBBT5v/s3pZVss3/hf0BSmsk6SNCFFpgBiwOvdejYOp14rITU9g9PIlTNFwBLo6McF9O91rwBjVK2jsVv89bZcxRnUK0TuM0%2bCE%2b3pY3oFInxEutvVca8fEjavwtF%2bBn2qYHbaj7h9FiQIsU2VLOpUpwGIkgFypzMmkleErUbv%2bFiQL3pJKxjE17obV0guH3Yxh5xCStJoxDnjM3Kco4XJirL8PkxYzpm1WeIxGRB3DmDCbEbTZMDU4iIn%2bfoSGhxGmC520WBAYHEDK62XbEUwy7%2b7uRszpAHI5LKdSpDRWMhks0pYUTSZUp0%2biEHfRG%2bS0bfaISQSgNEATwCiGqM4%2bqrWDqpukkQhwtf0dbWo1ZcVH277GOC21aMUYU8l7rnwN9%2bWL8NKgjF%2bnVly7Am/bJa54O7xsO04NmaBW%2bClQ19eXEOs3AcEprEwFcDM4jRXSot%2bPAj1FbvwMchE3BZBdlwBUXU6mMalvotUCUBqgtkDx1hYQ31imFa/FwkhPjiE55kWGaTkSRJ38qMeFiIcAKTiJ9ISf5EN2akLxsoFx5sfhNHYhSheYDwaQIrgKu50ohKaQYz2H04OQdxRB2g2pExOSsnyJdii1vn2sT2Ttyq5LAIl4VBkf1alubMR6xun6zAN96OntgYF2wMFJlCikEaJDA7Wgv79XlQ1YB%2bAadaGTWGAiMIEkrXU73VEb3ZKNKm%2bjEZT6/rExZLi6PZMZ9A4MoJdCcvu9sHHLeHxezBF01at5hQPqD0iyYA%2b9BUQAaw1Pw%2boKAhMq5dOKJxKrUFvEpRToSiLBCVgIXgYIRqyD/RikHTHTGEreSPDSR4BipRBt/C91%2bgmEBnQwZKEAzYqMit/PdhbWETD0TTRIkja%2bUac%2bvvUbQGmnbYF4w9fe8q2rfXKDVvPSiZCCo7//3cf4zj/%2bPaPIxxkFSiQoUdf3VP6pDY8xOvyeztdo49NPYPu2rdi%2bfSu2PbcFz23dgq1bnsb2554h/xlGnBvw5OPfVX3cj6TvTYxaJXpMrxrj%2biiq4wAKIBEhwiO6ikemdOR1OxhZS4LMBKP/DyPE7/7Td7D1mY0MoZ9iCL1BI8lzYk1i%2bSbynmXY%2b%2bJLL%2bD5F7bhhZ078NKuF7H9%2beewk7yXXt6J7TuexSa2v62vu9Azm59WAnzrzWMKWd5vrPektC6AHIMWI1XyC4aIp09%2bjotfXkAsHFQTFNCh7ZmUvg10a8s0R40Z97nhE6Ih89AI%2bpn309f76Ov9w1b4CYB8JD9BlZ/exU/s7uWW8BAoecnzMu7wMYbwWs3wkHzk%2bdiP6pNgy9fo/y4k3/ONjhAaR1QwVs6n1bga412bNuqUFehaYwQ1aEkjmGFkSOufoFQzxN1lRnVCJQKUHGOFkv6/wmhNcLnATB8ndv3SeRgZdZkpyBC9wKLHifkvv8A8eXP0AgsMXOYZDC1%2bfgKLxOPzThsWWz/HwtdfYZFByoLhGha/Os96FzFLLaxLxChQm7bprsRJzRK8CaSdGvdRayNqvILty/lsc9zFnEyYbpX8CMFdRsUSETV%2bmZPMQQlAOqoWcwx/K5jgCn799QUaJxMnLGEsw1B2FgoFUCZ0rbBejZRjmJv0upEmIozRyifoBeIUQII%2bvUQ0mGNIWqSXyJpILCt0G1BgeY7laaZFkvh/xWedHNOi4AFGenmzCTn2URo0ozTQfwcVya%2byfJptLlw8DxPT69c7MB0YY6hdUhOU%2bYgAquWCiiOutX2Frm5GugRls9WSEkAmEdXdIBvMzs6uojrmmM7p/%2bfmZjE/P98sF351bg4Z5zDyQ4Nw0MUNEBG6PB5Y7XaYiQytdIEOt5fIchgmosfeAYuKD/pY1k3LP0gcMETX2sWJOEfd6DQKb1jFF11GegTrIJah/W6uIfktl0vIEJYXK5VVY6s3x7yW5jje2bo%2bL85nplZVUa8KhmrVMtb7k8EVJ8dRIWLMWvqQ7WNcTtic5qCSPV1cwV7me5CnJgkluEpZkxEplucoAMlnqCFCwssobTGqutKXtK9QCFXbXWjIhirrFwctmFtawl/zW15epiGMaQKoVoqapG/efCCS3%2bLiIvI52gda0jLdYpmeoSQpw9yK4oVVXnhCq3kqbeRXU6MPvbwYD96d6LFK9FYF2q06V3U9Y2%2bMf2lp8ZYAatw36xfAEgVAy1tIaeGsUH5V/lug0ppUEYGYkBzN5TPJRyOAe/3uKoAGvJTJl7VI7q%2bhBjwtKySaUKTK8hqVxcLL/yy9USbGlJCd7m2tAL7p92gEIPBSYDL9uAysuCZAeRAqsE1cjrsIwuRcQCaXofVOiTvu7UXGTFvT14Wq1Yqq3YYajWqBLrC%2bMP9wAkg8rABkhURNKYAafXyJnZbWic%2b1094MHPQMfTSgPd096KWRM1v6EQ0FkWg3wNB5HpfOfo4rFy7C1GdB3juG4oAZ9eUlGdjfXgBLtL5yTyBBkUZJ5bcLBBqNYOnBKamQpfhlOUCNEnMkoyGCspACOdleI%2bLdRkS7uxFnPmXuR8ZE78Loc3Zh4SE1IL5%2bLyC0srJCX1qjFmQZPtMgFQiY6Pvz8Tjy%2bZzGE5LydVAhz37YV4F9NChPN10gFWtaWuCC5SpllKsVNZH1jPvuGlAt4WF%2bTZBSKICS%2bXb6WgV6lIpzy91cuanyTXqIXxMHKCRIyCvWVJBUvT7TpNnZGcVby6/z/3wxj0XGDvNctQVuhUWu3EIygfl0GvPZLOYzacwVCzqirD8Esf3MDOa44oLgHq4vjebZZ51IUI4A9AMR7uVCjlaXFrmQU1QuFZDl/kxyX0rE2OAXixIbMJC42oagyYKEsQsh4v6QXEP1dCPd34tUnwlJ8gsdVwlWYurIXe4F/iqStgQ%2bhWREy/%2b1/dylXwnwWpKJmLq/S6eSkHw6lYAclJY50RwrRSMhiJCEr0iERPeUIXa3BxPqaMvICZuI6bt6iOFpuQeI94cddhQJa6tyssToTk6SNEqvymskIepa3m31aQwb9R6WpL/G9%2bQuQmmAHHCkE1EVLoolFkrHV52cJG4nuQ4rMLYvyV0gBVAklRjFFYnpC4y4Moz00lz9lNGgrrySMbk6m25eaSX1azTFj06r7whP8o06ckCTZNvU9DhSkz6Vl3prT63WS%2brqT/plX2HOveWDD97F4YOv4vjr%2b3Hs6F68fmQvjh3R06NC%2b1Re%2b78Px3U69sZBHDt2YA2xj%2bOH8OGHP8Uvf/EBfv7LD/H%2buz/Az/j/Fx%2b9iw/f/zHe/cnb%2bPCDn%2bKj93%2bIn//sPfzi397D99862qzz0Qc/UW0%2beO9H%2bIB1fvWvP8LP35f8j/DO20dx9PAe7fvrJY7/zeMH2fc7eOeHb%2bGjd47ikx/vQsuhQwewdcuTePaZp5huwPZtm7Ht2Y1MNynels0bsIO87c9tar4c2SK08XFsXkVbNuq8TRtwcN8rOH5kPw4d2I1XXt5B4R7A64f34dD%2b17D71Rdx6OBeHDnwqkrlNcnz25/BkcMiWLY5uAf79%2b7CQaZHWP%2bdva%2bxbK/q6%2bWdz2Lj04%2bp1ypbGuPQafN9SJVzbFs5H3mOs%2bOFbTjw/Cb8esc/oKWXKvvZiT%2bjnyrdfaMdZ0%2bdwMWvzuPL8%2bfQbejAIOHnmdZTOH%2b2FfbBfjiHBuCw35ucJKuc3MpJsaVXtWnkhW%2bXU2KmNqby38qyIatZpVJPyqSNjTw7t9iw4RoGB9lmwIRhm2XVtyy3fVPGpch%2bJzmaqUV9a5g0ZBvAAEPrliBjepeNCI7BxjSx9dBAPwITfg7UjKmJMeQYng5SOCOMwesETEuzNczJawt5CaJeg1RvIylbrpdxU70QEV5NpUtzNdVW8uqFRqN9vaKXz6g6cwQ7ii/1I9NYqhSwND/TbLdYl1Trb/U356pFjWp3eSGivlde9UKkill5CFIr0gtk85hI5OkCaf0JQ0UQ2jU2sX1Jc4ejMZbT5ycj0wqq1ugGPaEkrBMxpMIB8kKIsyweYVkxi0AsBdd0QvHkxDmTiCijp/6zboWRnjeYxb%2b3p3FxgEY1EkBoagJBQtsZfjORSrEdDfDQII1nGPHQlHoXkGD/QmkaMlmkGCFzNBhQMNrlcsM54oaLC%2bW00wsNUkOG7FxtaqS5T/FtFrNaWAvjDFl4Odpv8QbjuOwMwe0fg6mzAyYGI1azEYYb1xEOjMMbTuKSIwTPqBs9NzpgkdMcTsjoi6J9JAi7mS6QXsBEDGCSMz66yEEKpt0VweS4H0ZuI4u4SLYdYNseuXH2jcA%2bkcN7X2VxqjsAq8kAI/kuQukZCtAVCGN0wI5RQzuMxP5mo2zPa1Rxq/at7hu4dq0dVvZn4eREsBabE72DDnR2XMPlC1/g6qWL%2bOLMOVxhevHcGZw/fRLnz5zFtStXcKH1NCbG/GqBW1JEb3I3kE8n9GPklDpdlaNj0QI5OZVXHzIxCVoagUs4EkYocivw0Y7Q5bqJsYC4yVRM9akeJuhpg%2bRuPhaLYWI6xm8ntO/lUqpM%2bparudKwTQVWArrUm4CMHmDpeW2MWhu5x4gGJxXJPWM8PK2E0siL1kg%2bFp7SNJU8yctYW5LxmBqwwEL1UiOp5dUZezbZJPlQWR%2bMlImqy8sRGXg5r008p26X4uoMvlLIqHpC8kJEvfBo9J%2bMKqHKwYb69ip%2bVvqhahdotLL8lmjbbeV3ocZ3m2N4AGqMh0gwrlakMVGZZHx6jKraCXNfr3a/RzW3ENRYiPhslj5lRc3kGzsNVE8DBrm3bLTgfdwCbiJAOaaW7WA0XEe/sZNq202JT98S4CrBNgQqYxB%2bifuyPDqCMvd4iSpa0su/TWp8M680gAKQFazqqybP2cRoTYx5EZ4OkCYRCUo6gWkaqShVaXpyDBN%2br8aXq/GQplJyoyQTHfO66UH8qt7UpJ80plCm3C7JBYyc5TWp8V9C4Yy2DSty/s9VKq7Rwm%2bTmgLIpmmxaW3b2y5z5a7DRAsZoQr6fB6YTfTLw074vF4MDAxgaMgBt9uJfrMZI3L1zf9D9iHY7cMw9/dj1DMKm43Wlv%2bH2G4qEMCo263yvaY%2bTE2HtFCUIfOKHjbPzy%2boLbfs/RXtjB/F6WlU6O%2bLsvoZ/VruUWpAmkYwSdcWnhqncQgoY6HwPgOiFIMjMZI5ukDljqISG8RV1BinOxP7kZTLVaZZ8uRKLRQU3M%2bYgcGVtM9IAMU2ElRJXvz07EwV83MMs2dqqDMvK5%2bd4p6ne6zQhZUnfJoA9O3yN90C6nkcw%2bMMNcM36oJrxKmezEY5%2bXq1BK/HrZ7SToyP0zWOwsdVF3dntQ4iEg4rLNDFvT9styHILeR2OZVWRGV7JBJ0nzGMuEZoNyzwez0YZT4wFWD0WVJ3eBW5WtM9yqNS/9sEkFpjBIXkrjDOFfO4HHA5hghDOVhuCRHMuI9qzj3qILAYIpQU3%2bz3jsJKgBGa0uxFHyPDG/TTTroymaCNoGRyzIcoNcM6HmHIrAES6Wtk2E5QM0bjR9Dl96j9L8/pSpnEt77yd9UAEUDjYFLzr7cONMVqi1aIdjQaqCtmRbe0ppzT8g0BapqUabrARnsRdFk9pNTqy4mwqifGj9a/YupBiUazuKqvR64Bsl/ltaUGWOKKBHbKNbk6lVVxe%2bOE9hbvNv6a/Fq6VRZu9nFbfQKeNA1vvu3rO77xKEnm2SLGatI/Co9zSLmvcbnyphFcK7Em2ntAWnv0fc%2b6Ui6%2b32lHmXijwOBHTpzu19e96EHH0%2bAJIGqRs/1ehp3nW0/i4oXzMHDvynsAefa%2bWl0aIOZB1UsCjQZV76fSuvpXv7qAEqPRterf6EtweyMVkj6F6pV8k3%2bvMUofs/KqTG93xxYQ5rweKsqRkRi/AAdTUQ8isgrACN5WEPd%2bJA8T5P0v97p/1IkRGlC/x4UQwVT5G9pWBUKLPZAXKA1eKa8OVb1uB42oF54RhzKcgTGPAllB2gsXkaeP2ESAmWhuTR9zY9zShzyFGbJaOCePMrgz1DIpU1BYzgQVSitQOuWi%2bkCXwUA3ZuWgC%2bpwVLQkRr8vdcrFnOJp6aq8XiYvMtLsTyJAi7mf0WMfnI5hddlxq93qNK/6LcqLDgpQMIcc06sXo0UJwxPos/QTkNnRz9QsDy3oVez0Qg66ZzmQHaQ36qdbDYYZaleKdKEZ1V76kv5lft2GG/RU/XTrLjVPeZQpi6o0QCY4U6%2bjNjOjXlssLS%2briwN5WSH3BYLWlpeXCFrkTmAOtVoNMzP1Zpu6/gqjWq2pMmkjfcgbgjnpb2lJ8WZ0qrKO1Je21WpV1bmpo8OFhXmVCi2z3QrrUhKA3AKXy%2bAMtZuNuTmAWAUpklzIyH%2bWLTNd0W%2bupC%2bZx9orM%2bHValVlcFsEyeXEBRaLJIKRUokorKQGJ5ORvExQBFCtVlDiR4QnA8/lqV78uPwvl1nGAUo/mUxG8bK5nCLJF6hNebn2YnmOvFK5pOpKeW3m1hW3CK1x63OTk14xmbDc1YXl69ex3Nmp0hUCrmXG/cttbVimti53d2PZaMRKRwdusqxxm6T60vttCLVxPSZzUQKQq7FKqaCYInFFy3eSSHNJlS3rtCYvq9X8f6t8ZeXOuhpvWdVXbdhWBiu0QG1o5BVxIRZFmygsledWUqnQbB2LFFKzHhdlkRqwuHSPvnSSb8stkwR96n1AvVa57eb0/rert%2brdbFyorrk9Xlu%2b9va20eZBb3QfxU9djtIN/j9Lg/TkLdNEwQAAAABJRU5ErkJggg==' /%3e%3c/svg%3e)